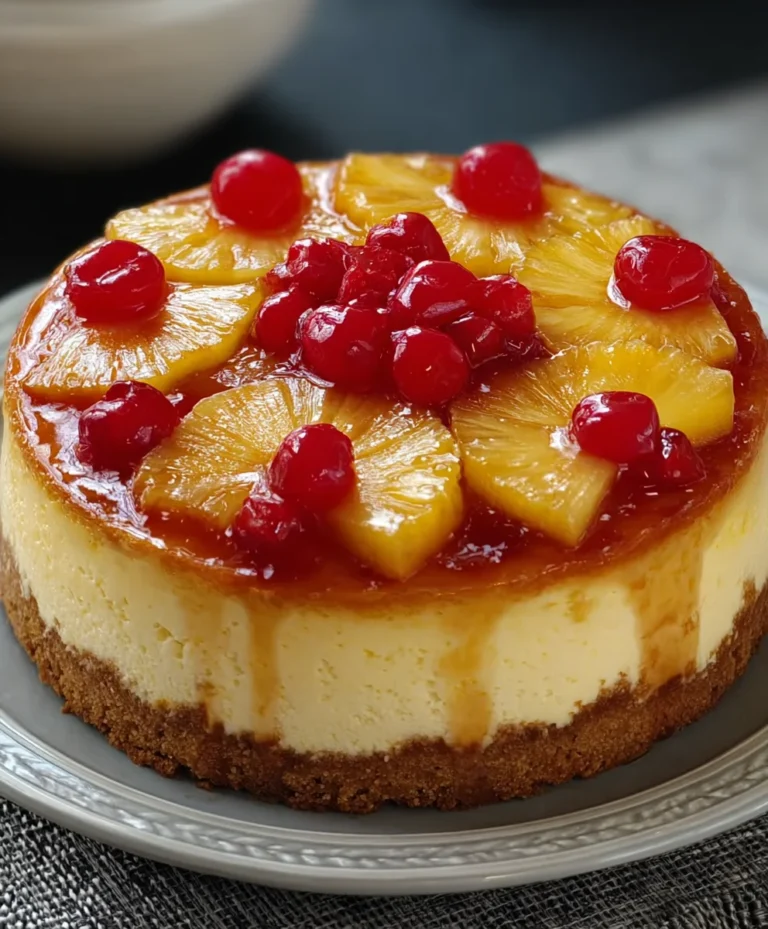
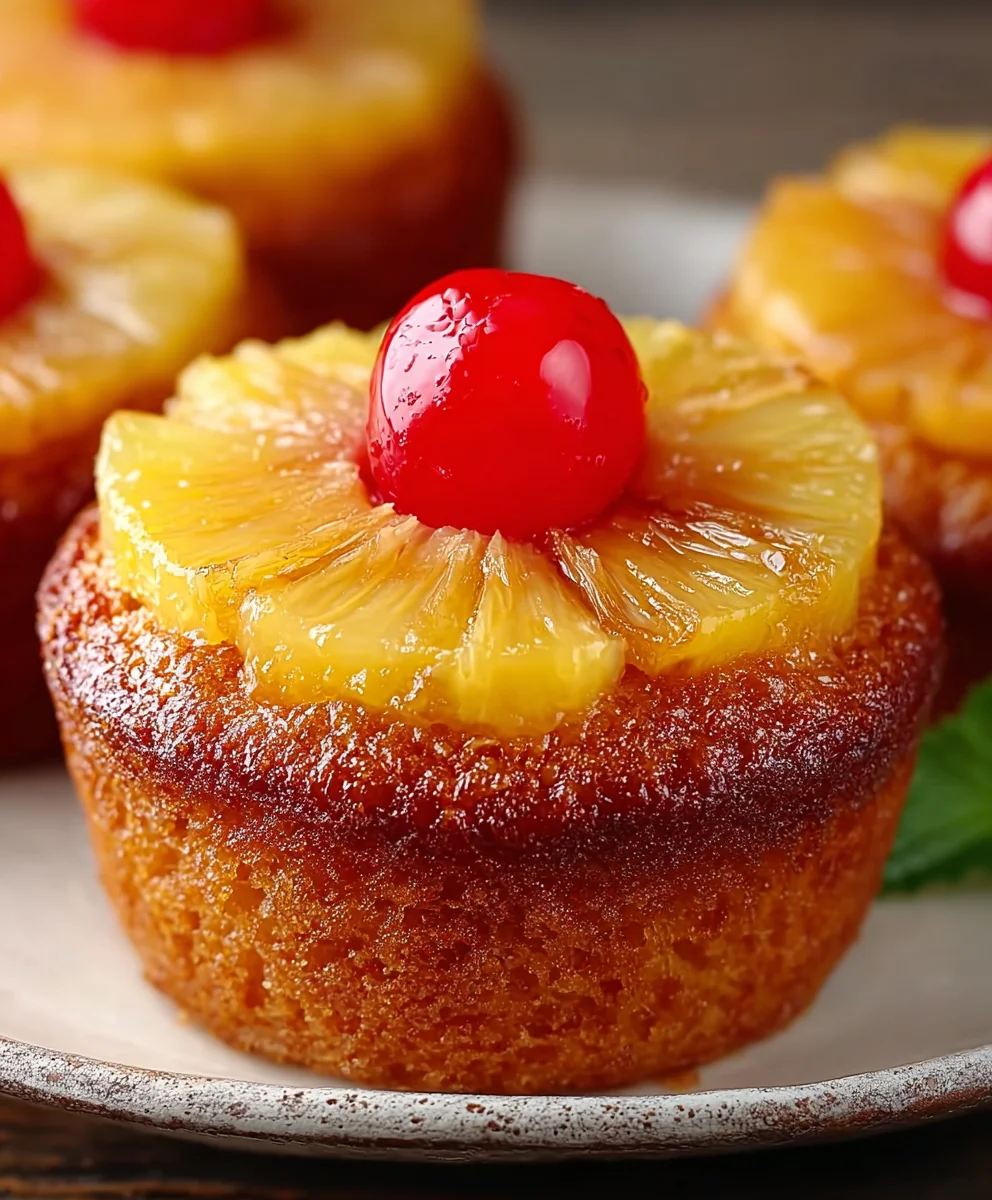
Easy Pineapple Upside Down Cupcakes Recipe
Easy Pineapple Upside Down Cupcakes are a delightful twist on a beloved classic, transforming the traditional cake into perfectly portioned, individual treats that are as charming as they are delicious. There’s something undeniably nostalgic about the sweet, caramelized pineapple topping, the moist, buttery cake base, and that beautiful inversion that makes each bite a burst of sunshine. People adore these because they capture all the beloved flavors of the origin extractal, but with the convenience and charm of a cupcake. What truly makes Easy Pineapple Upside Down Cupcakes special is the magic that happens when the syrupy pineapple caramelizes in the muffin tin, creating a sticky, sweet glaze that adheres perfectly to the tender cake. They’re incredibly easy to make, making them perfect for bakers of all skill levels looking for a show-stopping dessert that doesn’t require a lot of fuss.
Ingredients:
- 1/4 cup unsalted butter, melted
- 1/2 cup brown sugar
- 12 pineapple rings from a can, drained
- 12 maraschino cherries
- 1 1/3 cups all-purpose flour
- 1 cup granulated sugar
- 1/3 cup unsalted butter, softened
- 2/3 cup milk
- 1/4 cup vegetable oil
- 1 1/2 teaspoons baking powder
- 1/2 teaspoon vanilla extract
- 2 large eggs
- 1/4 teaspoon salt
Preparing the Pineapple Topping
Step 1: Grease and Line Your Muffin Tin
Begin extract by preheating your oven to 350°F (175°C). This is a crucial first step for any baking project, ensuring your oven is at the correct temperature before your cupcakes go in. Next, take your muffin tin and prepare the cups for the upside-down magic. You’ll want to lightly grease each cup. I find a baking spray or a thin layer of softened butter works best. This prevents the delicious caramel topping from sticking and ensures your cupcakes slide out cleanly. For an extra layer of insurance and easier cleanup, you can also line each muffin cup with a paper liner. While not strictly necessary for the topping to stick, it does make the final removal of the cupcake much tidier.
Step 2: Create the Caramelized Brown Sugar Base
In a small bowl, combine the 1/2 cup of brown sugar with the 1/4 cup of melted unsalted butter. Stir this mixture until it’s well combined and forms a thick paste. This simple combination is the key to that irresistible sweet, slightly caramelized flavor that forms the base of our pineapple upside-down cupcakes. Don’t worry if it seems a little thick; the heat of the oven will help it loosen up beautifully.
Step 3: Assemble the Pineapple and Cherry Layers
Now comes the visually stunning part! Take your drained pineapple rings. Place one pineapple ring in the bottom of each prepared muffin cup. The goal is to create a beautiful, decorative layer that will be on top when the cupcakes are inverted. For an extra pop of color and a classic touch, nestle one maraschino cherry right in the center of each pineapple ring. You can gently press the cherry down into the pineapple ring to help it stay in place. Once all the pineapple rings and cherries are in position, spoon about 1 to 1.5 teaspoons of the brown sugar and melted butter mixture over the top of each pineapple ring. Try to distribute it as evenly as possible to ensure consistent caramelization across all your cupcakes. This topping will bubble and transform into a rich, gooey glaze as the cupcakes bake.
Baking the Cupcake Batter
Step 4: Mix the Dry Ingredients
In a medium-sized bowl, whisk together the 1 1/3 cups of all-purpose flour, 1 cup of granulated sugar, 1 1/2 teaspoons of baking powder, and 1/4 teaspoon of salt. Whisking these ingredients thoroughly ensures that the leavening agent (baking powder) and salt are evenly distributed throughout the flour. This is important for a consistent rise and flavor in your cupcakes. You can also sift these ingredients if you prefer an even lighter texture, though it’s not essential for this recipe.
Step 5: Combine the Wet Ingredients
In a separate larger bowl, combine the 1/3 cup of softened unsalted butter, 1/4 cup of vegetable oil, 2 large eggs, 2/3 cup of milk, and 1/2 teaspoon of vanilla extract. Use an electric mixer or a whisk to beat these wet ingredients together until they are smooth and well combined. Ensure the butter is softened, not melted, as this will help create a creamier batter. The vegetable oil contributes to the moisture and tenderness of the final cupcake.
Step 6: Combine Wet and Dry Ingredients
Gradually add the dry ingredient mixture to the wet ingredient mixture, beating on low speed or whisking until just combined. Be careful not to overmix the batter. Overmixing can develop the gluten in the flour too much, resulting in tough cupcakes. A few small lumps are perfectly fine. Once the ingredients are incorporated, the batter should be relatively thick but pourable.
Step 7: Fill the Muffin Cups and Bake
Carefully spoon the cupcake batter over the pineapple and cherry layer in each muffin cup. Fill each cup about two-thirds full to allow for expansion during baking. It’s important not to overfill, as this can lead to the cupcakes overflowing. Place the filled muffin tin into your preheated oven. Bake for approximately 20-25 minutes, or until a toothpick inserted into the center of a cupcake comes out clean. The edges of the cupcakes should be golden brown, and the center should spring back lightly when gently touched.
Step 8: Cool and Invert for the Grand Reveal
Once baked, remove the muffin tin from the oven and let the cupcakes cool in the tin for about 10 minutes. This brief cooling period is essential. It allows the caramel topping to set slightly but not harden completely, making it easier to invert. After 10 minutes, carefully run a thin knife or offset spatula around the edge of each cupcake to loosen it from the tin. Then, place a wire rack over the muffin tin and confidently flip the tin over. The cupcakes should release easily, revealing the beautifully caramelized pineapple and cherry topping. If any pineapple or cherries stick to the tin, gently place them back onto their respective cupcakes. Allow the cupcakes to cool further on the wire rack before serving. Enjoy your stunning and delicious Easy Pineapple Upside Down Cupcakes!

Conclusion:
You’ve now unlocked the secret to creating incredibly delicious and visually stunning Easy Pineapple Upside Down Cupcakes! This recipe has shown you just how simple it is to achieve that classic, caramelized pineapple topping and moist, tender cake in individual, easy-to-serve portions. We’ve covered everything from preparing the perfect pineapple layer to ensuring your cupcakes bake up beautifully every time. These delightful treats are perfect for any occasion, from a casual afternoon snack to a more formal dessert spread.
For serving, I love presenting these Easy Pineapple Upside Down Cupcakes warm, perhaps with a dollop of whipped cream or a scoop of vanilla ice cream to complement the sweet, tangy pineapple. They also stand beautifully on their own! Don’t be afraid to experiment with variations. You could try using different fruits like peaches or cherries for the topping, or add a hint of spice like gin extractger or cinnamon to the cake batter. The possibilities are truly endless!
I truly encourage you to give this recipe a try. You’ll be amazed at how quickly you can whip up these impressive desserts. Happy baking, and enjoy every single bite of your Easy Pineapple Upside Down Cupcakes!
Frequently Asked Questions:
Can I make the pineapple topping ahead of time?
Yes, you absolutely can! You can prepare the caramelized pineapple topping up to 24 hours in advance and store it in an airtight container in the refrigerator. Gently warm it before spooning it into your cupcake liners if it has hardened too much.
My pineapple topping stuck to the bottom of the liners. What went wrong?
This usually happens if the sugar in the topping didn’t fully caramelize or if the butter wasn’t evenly distributed. Ensure you’re heating the butter and sugar until a nice amber color is achieved, and make sure the pineapple slices are well-coated. Allowing the cupcakes to cool for a few minutes in the tin before inverting can also help prevent sticking.
Easy Pineapple Upside Down Cupcakes
Delicious and easy-to-make pineapple upside down cupcakes with a sweet, caramelized topping.
Ingredients
-
1/4 cup unsalted butter, melted
-
1/2 cup brown sugar
-
12 pineapple rings from a can, drained
-
12 maraschino cherries
-
1 1/3 cups all-purpose flour
-
1 cup granulated sugar
-
1/3 cup unsalted butter, softened
-
2/3 cup milk
-
1/4 cup vegetable oil
-
1 1/2 teaspoons baking powder
-
1/2 teaspoon vanilla extract
-
2 large eggs
-
1/4 teaspoon salt
Instructions
-
Step 1
Preheat oven to 350°F (175°C). Lightly grease muffin cups and optionally line with paper liners. -
Step 2
In a small bowl, combine 1/4 cup melted butter and 1/2 cup brown sugar until a thick paste forms. -
Step 3
Place one pineapple ring in the bottom of each muffin cup. Center a maraschino cherry in each ring. Spoon 1-1.5 teaspoons of the brown sugar mixture over each pineapple ring. -
Step 4
In a medium bowl, whisk together flour, granulated sugar, baking powder, and salt. In a separate larger bowl, beat softened butter, vegetable oil, eggs, milk, and vanilla extract until smooth. -
Step 5
Gradually add dry ingredients to wet ingredients, mixing until just combined. Do not overmix. -
Step 6
Spoon batter over the pineapple layer in each muffin cup, filling about two-thirds full. -
Step 7
Bake for 20-25 minutes, or until a toothpick inserted into the center comes out clean. Let cool in the tin for 10 minutes before inverting onto a wire rack.
Important Information
Nutrition Facts (Per Serving)
It is important to consider this information as approximate and not to use it as definitive health advice.
Allergy Information
Please check ingredients for potential allergens and consult a health professional if in doubt.