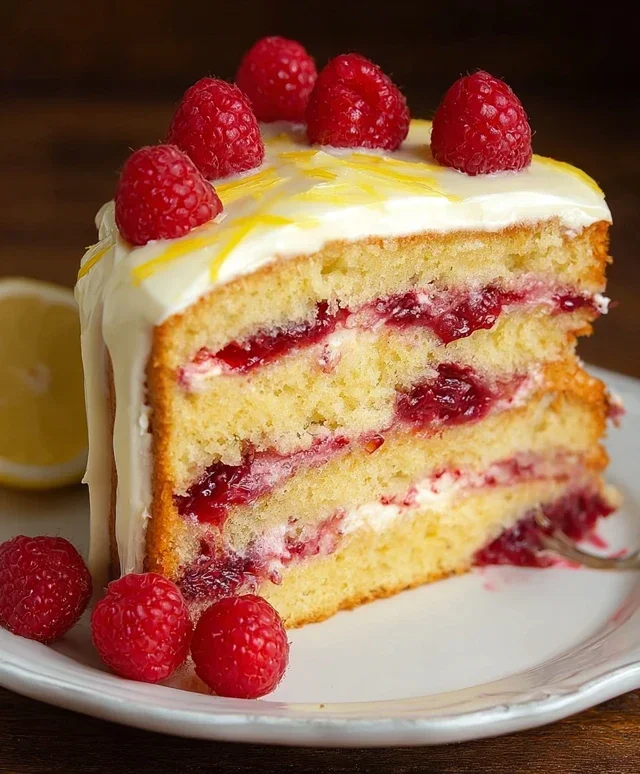
Raspberry Lemon Cake-Sweet Tangy Bliss
Raspberry Lemon Cake is a truly delightful creation, a perfect balance of sweet and tart that always brings a smile to my face. There’s something undeniably special about the vibrant burst of fresh raspberries nestled within a tender, zesty lemon cake. It’s a flavor combination that just sings, invoking sunshine and happiness with every bite. People adore this cake for its sheer deliciousness, of course, but also for its elegance and versatility. Whether it’s for a special occasion, a comforting afternoon treat, or simply to brighten a regular day, this Raspberry Lemon Cake delivers. The tartness of the raspberries cuts beautifully through the rich, buttery cake, while the bright citrus notes of the lemon add an irresistible zest. It’s a showstopper that’s surprisingly simple to make, and I can’t wait to share my favorite recipe for this incredible Raspberry Lemon Cake with you!
Raspberry Lemon Cake
This Raspberry Lemon Cake is a celebration of bright, zesty flavors and delightful textures. The tang of fresh lemon perfectly complements the sweet burst of raspberries, all wrapped up in a tender, gluten-free cake. It’s a treat that’s both sophisticated and comforting, perfect for afternoon tea, a special occasion, or simply when you need a little sunshine in your day. I love making this cake because it always brings a smile to my face, and I’m confident it will do the same for you. The gluten-free aspect makes it accessible to more people, ensuring everyone can enjoy this delightful dessert. Let’s get baking!
Ingredients:
Baking the Cake
This is where the magic begin extracts. We’ll combine our wet and dry ingredients to create a batter that’s light, flavorful, and ready to bake into a masterpiece. Don’t rush this process; each step is important for achieving that perfect cake texture.
Step 1: Preparing the Dry Ingredients
Begin extract by preheating your oven to 350°F (175°C). Grease and flour a 9×13 inch baking pan or two 8-inch round cake pans. In a large mixing bowl, whisk together the 3 cups of gluten-free flour, 1 ½ cups of sugar, 1 tablespoon of baking powder, ¾ teaspoon of baking soda, and ½ teaspoon of salt. Whisking these dry ingredients together thoroughly helps to ensure that the leavening agents are evenly distributed throughout the flour, which will contribute to a consistent rise and texture in your cake. This step is crucial for preventing any pockets of baking soda or baking powder, which can result in an unpleasant taste or uneven baking.
Step 2: Creaming the Butter and Sugar
In a separate, large bowl, or the bowl of your stand mixer, cream together the 1 cup of room-temperature unsalted butter and the 1 ½ cups of sugar until light and fluffy. This process incorporates air into the mixture, which is essential for creating a tender crum extractb. Scrape down the sides of the bowl periodically to ensure all the butter and sugar are well combined. This usually takes about 3-5 minutes of beating on medium-high speed. The mixture should be pnon-alcoholic ale yellow and noticeably increased in volume.
Step 3: Adding Wet Ingredients and Flavor
Beat in the 3 large eggs one at a time, mixing well after each addition. Next, add the 1 cup of unsweetened plain yogurt, ¼ cup of milk, 3 tablespoons of lemon zest, and ⅓ cup of fresh lemon juice. Continue to mix until just combined. The zest will add a wonderful, vibrant lemon aroma and flavor throughout the cake, while the lemon juice provides that signature tang. Using room-temperature yogurt and milk helps them to emulsify better with the butter and eggs, leading to a smoother batter.
Step 4: Combining Wet and Dry Ingredients
Gradually add the dry ingredients to the wet ingredients, mixing on low speed until just combined. Be careful not to overmix the batter once the flour is added. Overmixing can develop the gluten (even in gluten-free flour blends, some protein activity can occur), resulting in a tougher cake. Scrape down the sides of the bowl as needed. The batter should be thick but pourable. Gently fold in the 2 cups of fresh raspberries. Try to keep the raspberries as whole as possible to prevent excessive bleeding of color into the batter, although some color streaks are perfectly fine and add to the charm.
Step 5: Baking the Cake
Pour the batter evenly into your prepared baking pan(s). For a 9×13 inch pan, bake for 30-35 minutes, or until a toothpick inserted into the center comes out clean. For two 8-inch round pans, bake for 25-30 minutes. Keep an eye on the cake as it bakes; ovens can vary, so the toothpick test is your best indicator. Allow the cake to cool in the pan for about 10-15 minutes before inverting it onto a wire rack to cool completely. Ensuring the cake is entirely cool before frosting is crucial, otherwise, the frosting will melt and slide right off.
Making the Lemon Buttercream Frosting
A bright, zesty buttercream is the perfect finishing touch for this cake. It’s simple to make and adds a professional polish.
Step 6: Whipping the Frosting
In a large bowl, or the bowl of your stand mixer, beat the 2 cups of room-temperature unsalted butter until smooth and creamy. Gradually add the 5 cups of powdered sugar, about a cup at a time, mixing on low speed until incorporated. Once all the powdered sugar is added, increase the speed to medium-high and beat until light and fluffy, about 3-5 minutes. Add the 2 teaspoons of lemon juice and beat until well combined. If the frosting seems too thick, you can add a teaspoon of milk or lemon juice at a time until it reaches your desired consistency. This frosting will be incredibly delicious and will provide a beautiful contrast to the fruity cake.
Step 7: Assembling and Decorating
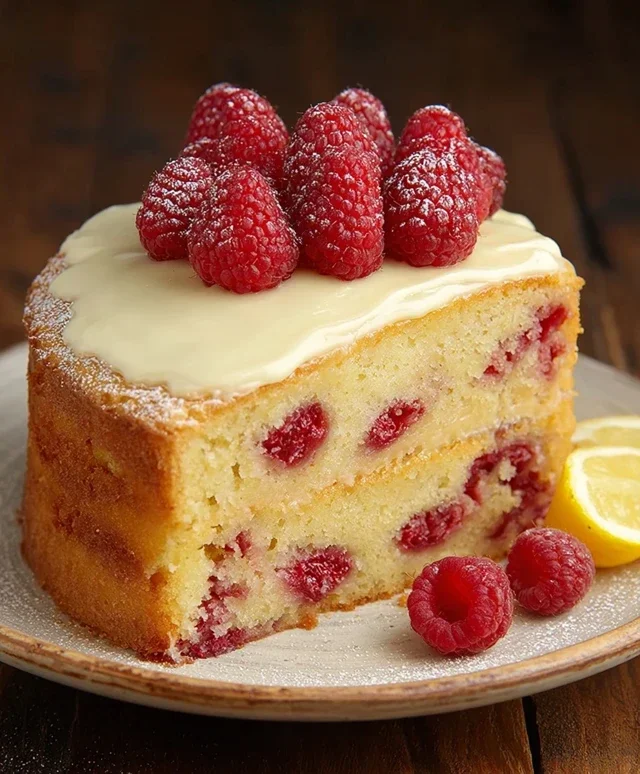
Once the cake has cooled completely, frost it generously with the lemon buttercream. If you baked two round cakes, you can place one layer on your serving plate, spread a thick layer of frosting on top, and then place the second layer on top before frosting the entire cake. For the 9×13 inch cake, simply spread the frosting evenly over the top. You can add extra fresh raspberries or a sprinkle of lemon zest on top for a beautiful presentation. Slice and serve this delightful Raspberry Lemon Cake and enjoy every last bite!
Conclusion:
I truly hope you enjoyed learning how to create this delightful Raspberry Lemon Cake! It’s a recipe that’s sure to impress, offering a perfect balance of tart, refreshing lemon and sweet, vibrant raspberries. The moist crum extractb and bright, citrusy frosting make it an ideal centerpiece for any occasion, from a casual afternoon tea to a special celebration. Don’t be intimidated by the steps; each part is designed to be manageable, leading to a stunning and delicious result that will have everyone asking for seconds.
This Raspberry Lemon Cake is wonderfully versatile. Serve it plain for a simple treat, or elevate it with a dollop of whipped cream or a scoop of vanilla bean ice cream. For variations, consider adding a swirl of raspberry jam into the batter before baking, or a touch of lemon zest to the frosting for an extra zesty kick. You could also experiment with different berries, like blueberries or strawberries, although the raspberry and lemon combination is truly classic.
I encourage you to give this recipe a try. I’m confident you’ll fall in love with its beautiful presentation and even more with its incredible flavor. Happy baking!
Frequently Asked Questions:
Can I make this cake ahead of time?
Absolutely! You can bake the cake layers up to two days in advance and store them at room temperature, well-wrapped in plastic wrap. The frosting can also be made a day ahead and refrigerated; just bring it to room temperature and re-whip it before frosting the cake. This makes assembly on the day of serving much easier!
What kind of raspberries should I use?
Both fresh and frozen raspberries work well in this recipe. If using frozen, be sure to toss them gently with a tablespoon of flour before adding them to the batter to prevent them from sinking. Fresh raspberries will offer a slightly brighter flavor and color, but frozen are perfectly acceptable and often more readily available.
Raspberry Lemon Cake
A vibrant and zesty gluten-free cake bursting with fresh raspberries and bright lemon flavor, topped with a creamy lemon frosting.
Ingredients
-
3 cups gluten-free flour
-
1 ½ cups sugar
-
1 cup unsalted butter, room temperature
-
1 cup unsweetened plain yogurt
-
¼ cup milk
-
1 tbsp baking powder
-
¾ tsp baking soda
-
½ tsp salt
-
3 eggs
-
3 tbsp lemon zest
-
⅓ cup lemon juice
-
2 cups fresh raspberries
-
2 cups unsalted butter, room temperature
-
5 cups powdered sugar
-
2 tsp lemon juice
Instructions
-
Step 1
Preheat oven to 350°F (175°C). Grease and flour a 9×13 inch baking pan. -
Step 2
In a large bowl, cream together 1 cup butter and 1 ½ cups sugar until light and fluffy. -
Step 3
Beat in eggs one at a time, then stir in yogurt, ¼ cup milk, 3 tbsp lemon zest, and ⅓ cup lemon juice. -
Step 4
In a separate bowl, whisk together gluten-free flour, baking powder, baking soda, and salt. Gradually add the dry ingredients to the wet ingredients, mixing until just combined. -
Step 5
Gently fold in the fresh raspberries. Pour batter into the prepared pan and spread evenly. -
Step 6
Bake for 30-35 minutes, or until a wooden skewer inserted into the center comes out clean. -
Step 7
Let the cake cool in the pan for 10 minutes before inverting it onto a wire rack to cool completely. -
Step 8
For the frosting, beat 2 cups butter until creamy. Gradually add 5 cups powdered sugar, then mix in 2 tsp lemon juice until smooth and spreadable. -
Step 9
Frost the cooled cake with the lemon frosting.
Important Information
Nutrition Facts (Per Serving)
It is important to consider this information as approximate and not to use it as definitive health advice.
Allergy Information
Please check ingredients for potential allergens and consult a health professional if in doubt.