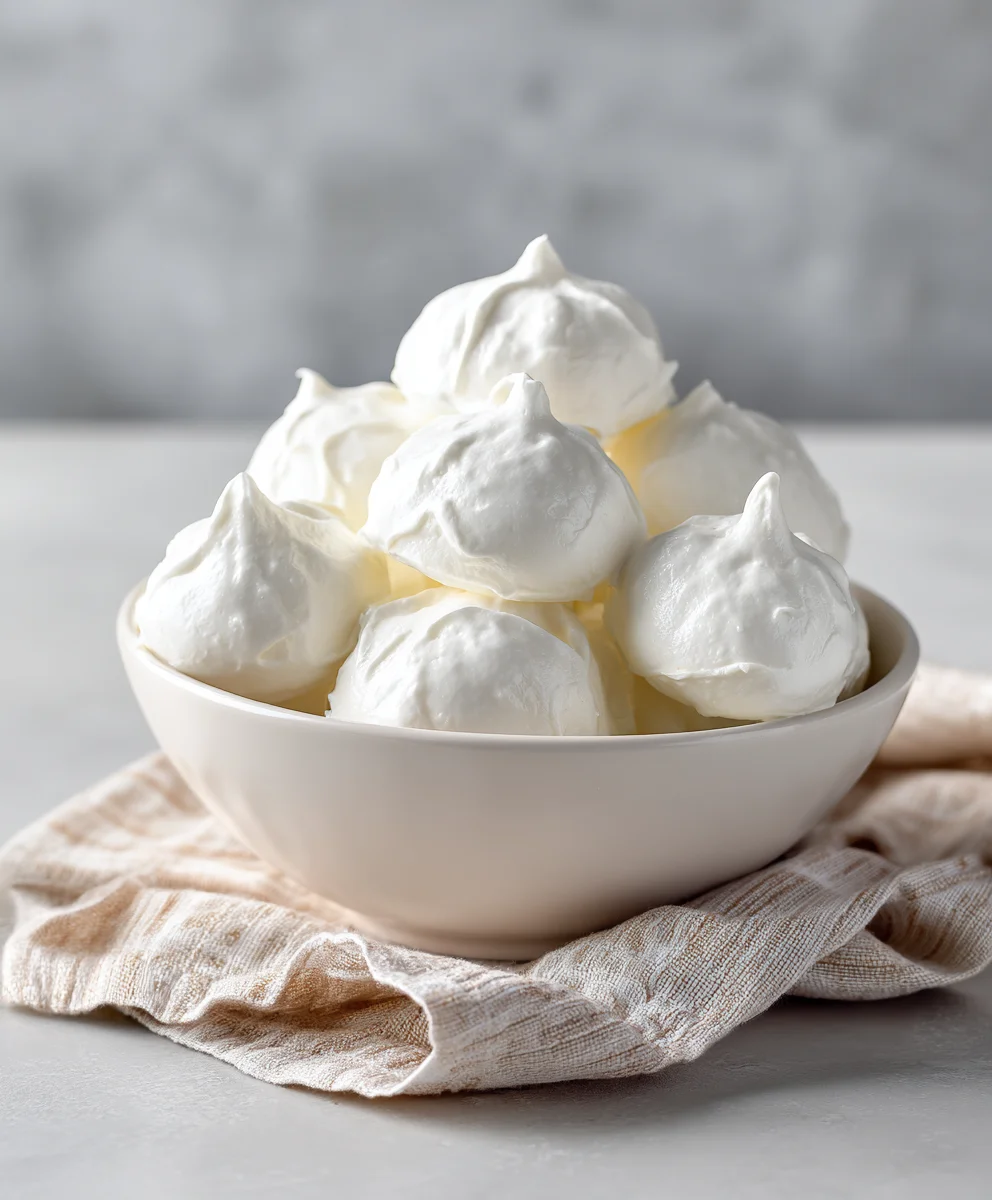
Homemade Yogurt Drops – Easy DIY Recipe
How To Make Yogurt Drops at Home are surprisingly simple to whip up, making them a fantastic treat for both kids and adults. There’s something incredibly satisfying about creating your own delicious snacks, and these yogurt drops deliver pure joy with every bite. People absolutely adore them because they’re wonderfully refreshing, light, and offer a delightful tang that’s never too overpowering. What truly makes them special is their versatility; you can customize them with a rainbow of fresh fruits, a sprinkle of granola, or a drizzle of honey for an extra touch of sweetness. Whether you’re looking for a healthy after-school snack, a guilt-free dessert, or a fun activity to do with the little ones, mastering how to make yogurt drops at home is a game-changer. Get ready to impress yourself and your loved ones with these delightful, easy-to-make frozen wonders.
Ingredients:
- 1 (15-ounce) can low-sodium chickpeas, rinsed and drained
- 1/4 teaspoon cream of tartar
- 2 tablespoons granulated sugar (optional, for a touch of sweetness)
- 1 teaspoon vanilla extract
- 3 tablespoons yogurt powder
- 1 tablespoon beet powder
Preparing the Chickpea Base
Step 1: Mashing the Chickpeas
Begin extract by ensuring your chickpeas are thoroughly rinsed and drained. You want to remove as much excess liquid as possible to achieve the right consistency for our yogurt drops. Place the drained chickpeas into a medium-sized mixing bowl. Now, it’s time to mash them. You can use a fork for a slightly chunkier texture, or a potato masher for a smoother paste. For an exceptionally smooth base, you could even pulse them briefly in a food processor, but be careful not to over-process them into a liquid. The goal is a thick, paste-like consistency, similar to mashed potatoes. Take your time with this step, as a well-mashed base is crucial for the final texture of the yogurt drops. If you find it a bit difficult to mash, you can add a tiny splash (no more than a teaspoon) of the reserved chickpea liquid, but err on the side of caution to avoid making it too wet.
Step 2: Incorporating the Dry Ingredients
Once your chickpeas are mashed to your desired smoothness, it’s time to introduce the dry ingredients that will transform this humble base into delicious yogurt drops. Add the cream of tartar to the mashed chickpeas. Cream of tartar is a stabilizer that will help our drops hold their shape and achieve a nice, airy texture. Next, if you are opting for a sweeter treat, stir in the granulated sugar. This is entirely optional, as the yogurt powder itself has a mild tang, and the beet powder is primarily for color. Then, add the yogurt powder. This is the star ingredient that will give our drops their characteristic tangy flavor and slightly chewy texture. Finally, incorporate the beet powder. This vibrant powder is not only responsible for the beautiful pink hue of our yogurt drops but also adds a subtle earthy note. Stir all these dry ingredients thoroughly into the mashed chickpeas, ensuring they are evenly distributed. It might feel a little thick at this stage, which is exactly what we want.
Creating the Yogurt Drop Mixture
Step 3: Adding Wet Ingredients and Flavor
Now we’ll bring our mixture to life with some liquid and delightful aroma. Add the vanilla extract to the bowl. Vanilla extract is a classic flavor enhancer that complementsgin extracte tanginess of the yogurt powder beautifully and adds a comforting sweetness. Stir the vanilla extract into the chickpea and powder mixture until it’s well combined. The mixture should start to come together and become more cohesive, though it will still be quite stiff. Think of a very thick cookie dough consistency. Ensure that there are no dry pockets of powder or unincorporated vanilla. At this point, you can gently taste a tiny amount of the mixture to check the sweetness level if you added sugar. If you feel it needs a little more, you can add a pinch more sugar, but remember that these are meant to be lightly flavored treats, not overly sweet confections.
Forming and Baking the Yogurt Drops
Step 4: Shaping the Yogurt Drops
With our yogurt drop mixture prepared, it’s time to give them their signature shape. You can use a small spoon or a piping bag fitted with a plain round tip to create the drops. For spoon shaping, take about a teaspoon of the mixture at a time and gently roll it into a small ball between your palms, then flatten it slightly, or simply drop small dollops onto your prepared baking sheet. If using a piping bag, fill it with the mixture and pipe small, round shapes onto the parchment-lined baking sheet, leaving about an inch of space between each drop to allow for slight spreading. Aim for uniform sizes so that they bake evenly. Don’t worry if they aren’t perfectly round; a rustic charm is part of their appeal. Ensure your baking sheet is lined with parchment paper or a silicone baking mat to prevent sticking. This step is where you get to see your creation take physical form before it heads into the oven.
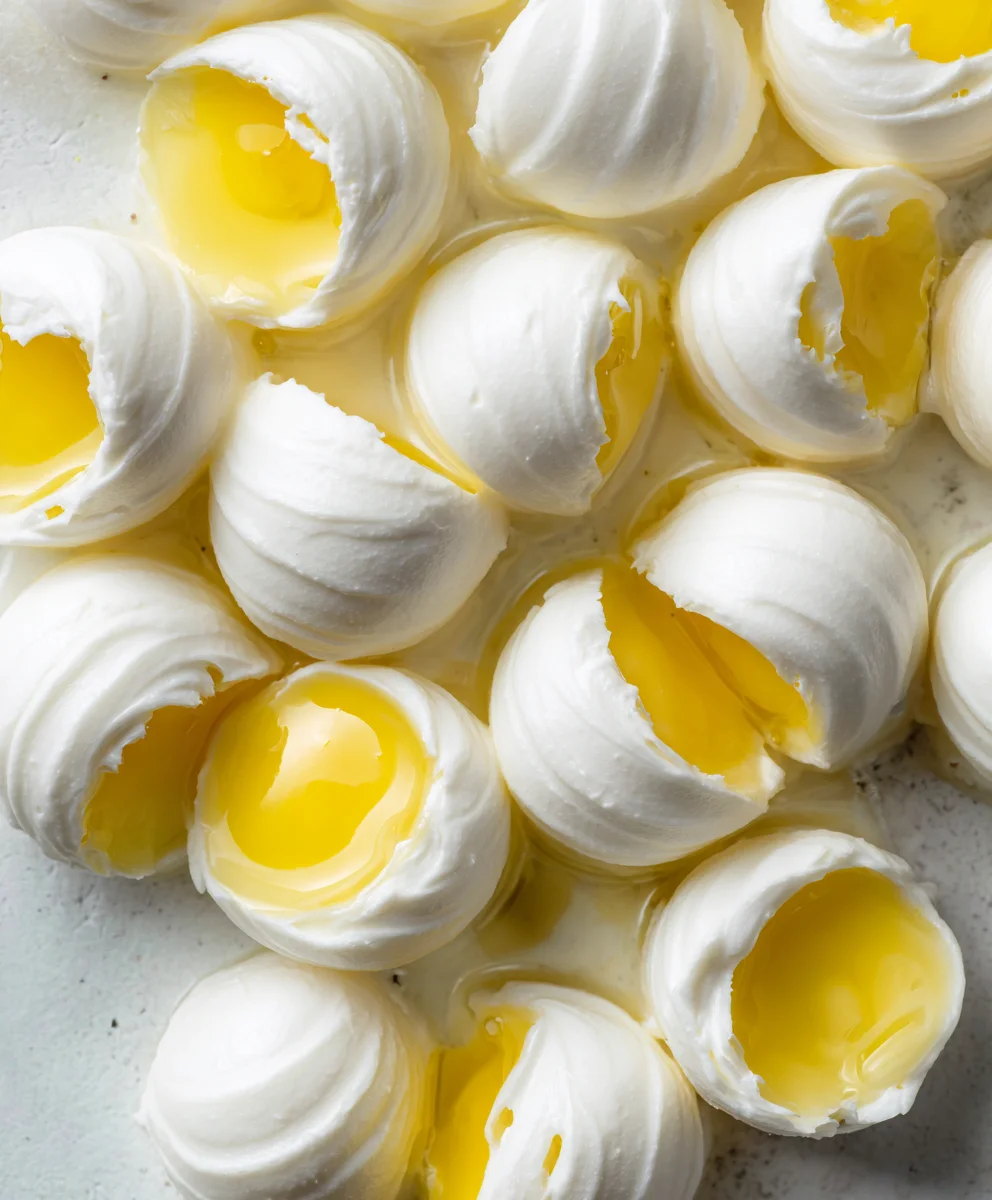
Step 5: Baking and Cooling
Preheat your oven to a moderate temperature, around 300°F (150°C). This lower temperature is key to gently drying out the drops and ensuring they bake through without browning too much, preserving their delicate color. Place the baking sheet with the shaped yogurt drops into the preheated oven. Bake for approximately 15 to 20 minutes. The exact baking time will depend on the size of your drops and your oven’s performance. You’ll know they are ready when they feel slightly firm to the touch and have lost their wet sheen, appearing more matte. They should not be browned. Once baked, carefully remove the baking sheet from the oven. Let the yogurt drops cool on the baking sheet for about 5 to 10 minutes. This allows them to firm up further before you attempt to move them. After this initial cooling period, transfer the yogurt drops to a wire rack to cool completely. They will become crispier as they cool. It’s essential to let them cool entirely before storing them, as any residual heat can lead to condensation and a less-than-ideal texture.
Conclusion:
You’ve now learned the simple yet delightful process of How To Make Yogurt Drops at Home! This recipe is incredibly forgiving and allows for so much creativity, making it a perfect activity for all ages. Remember, the key is to use thick, creamy yogurt and ensure your drops are small enough to freeze quickly. The result is a healthier, homemade treat that’s wonderfully refreshing and customizable. Don’t be afraid to experiment with different flavors and mix-ins!
For serving suggestions, these yogurt drops are fantastic on their own as a light snack or dessert, especially on a warm day. They also make a beautiful and healthy garnish for fruit salads, parfaits, or even alongside pancakes and waffles. Get creative and think about how you can incorporate them into your favorite dishes!
When it comes to variations, the possibilities are endless. You can blend in fruit purees like berries or mango for natural sweetness and color. A touch of honey or maple syrup can be added for extra sweetness if desired. For a more decadent twist, consider stirring in a little cocoa powder or a pinch of cinnamon. The base recipe for How To Make Yogurt Drops at Home is just the begin extractning!
I encourage you to give this recipe a try. It’s a rewarding experience to create something so simple yet satisfying from scratch. Enjoy your delicious, homemade yogurt drops!
Frequently Asked Questions about How To Make Yogurt Drops at Home:
Q: My yogurt drops are melting too quickly after freezing. What could be wrong?
A: The most common reason for this is using yogurt that is too thin. For best results, ensure you’re using a thick, Greek-style yogurt or a strained regular yogurt. If your yogurt is still quite liquidy, you can try draining it further through cheesecloth or a fine-mesh sieve for an hour or two to remove excess whey.
Q: Can I add sweeteners to my yogurt drops?
A: Absolutely! While the yogurt itself provides a slight tang and can be sweet enough for some, you can certainly add sweeteners. Honey, maple syrup, agave nectar, or even a touch of powdered sugar can be mixed in. Start with a small amount and taste as you go to achieve your desired level of sweetness.
Homemade Yogurt Drops – Easy DIY Recipe
Easy homemade yogurt drops made with simple ingredients for a fun and healthy treat.
Ingredients
-
1 (15-ounce) can low-sodium chickpeas, rinsed and drained
-
1/4 teaspoon cream of tartar
-
2 tablespoons granulated sugar (optional)
-
1 teaspoon vanilla extract
-
3 tablespoons yogurt powder
-
1 tablespoon beet powder
Instructions
-
Step 1
Rinse and drain chickpeas. Mash them with a fork or potato masher until a thick paste forms. For a smoother consistency, use a food processor briefly. -
Step 2
Add cream of tartar, optional granulated sugar, yogurt powder, and beet powder to the mashed chickpeas. Stir thoroughly until all dry ingredients are evenly distributed. -
Step 3
Stir in vanilla extract until well combined. The mixture should be stiff, similar to cookie dough consistency. -
Step 4
Shape the mixture into small balls or dollops using a spoon or piping bag onto a parchment-lined baking sheet. -
Step 5
Bake in a preheated oven at 300°F (150°C) for 15-20 minutes, or until firm and matte. -
Step 6
Let cool on the baking sheet for 5-10 minutes, then transfer to a wire rack to cool completely.
Important Information
Nutrition Facts (Per Serving)
It is important to consider this information as approximate and not to use it as definitive health advice.
Allergy Information
Please check ingredients for potential allergens and consult a health professional if in doubt.