Easy Chocolate Swiss Roll Recipe-Delicious & Simple
Easy Chocolate Swiss Roll recipes are a gateway to dessert perfection, and trust me, this one is a showstopper that’s surprisingly simple to make. Have you ever gazed longin extractgly at those elegant, swirled cakes in bakeries, thinking they were beyond your baking capabilities? Well, prepare to have your mind (and taste buds) blown. This Easy Chocolate Swiss Roll is beloved for its incredible visual appeal, the delightful combination of tender, moist cake and luscious cream filling, and that undeniable decadent chocolate flavor that we all crave. What truly makes this dish special is its inherent elegance combined with approachable techniques. You get that impressive “wow” factor without needing professional pastry skills. It’s the perfect dessert for impressing guests, celebrating a special occasion, or simply treating yourself to something truly delicious. Get ready to embrace the joy of baking this classic treat!
Easy Chocolate Swiss Roll
There’s something undeniably special about a Swiss roll. That swirl of fluffy cake and creamy filling is a classic for a reason. But for those looking for a delightful dairy-free and potentially gluten-free option, a chocolate Swiss roll can seem a bit daunting. Fear not! Today, we’re diving into an incredibly accessible recipe for an Easy Chocolate Swiss Roll that’s sure to impress. We’ll be using some clever ingredients to achieve that perfect texture and rich chocolate flavor. This recipe focuses on simplicity without compromising on taste, making it perfect for both seasoned bakers and kitchen novices. Get ready to create a showstopper that tastes as good as it looks!
Ingredients:
The Cake Batter: Creating that Perfect Swirl
The foundation of any great Swiss roll is a light and airy cake. For this recipe, we’re leveragin extractg the power of oat flour and cassava flour for a tender crum extractb. The combination of baking powder and baking soda will give us that necessary lift, ensuring our cake is not dense. Aquafaba, the liquid from a can of chickpeas, acts as our magical egg replacer, whipping up to a meringue-like consistency that provides structure and lightness.
The Chocolate Filling: Rich and Velvety
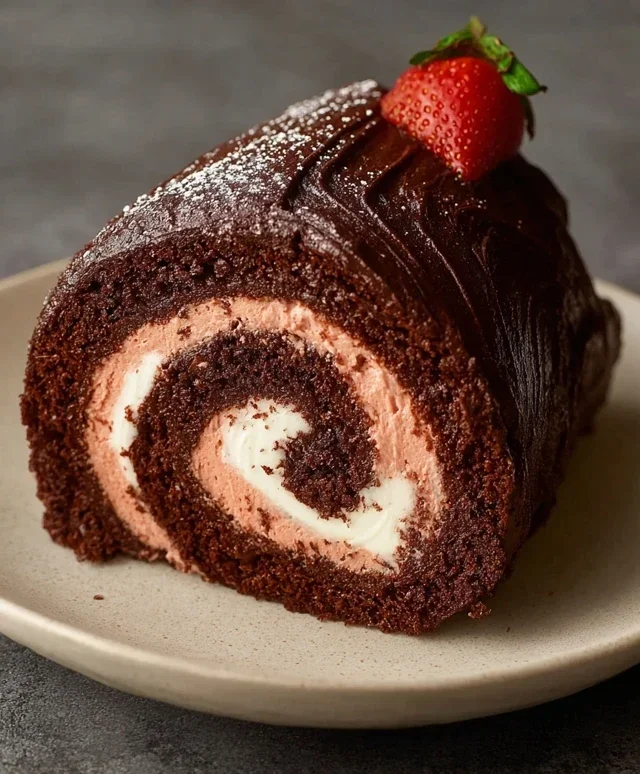
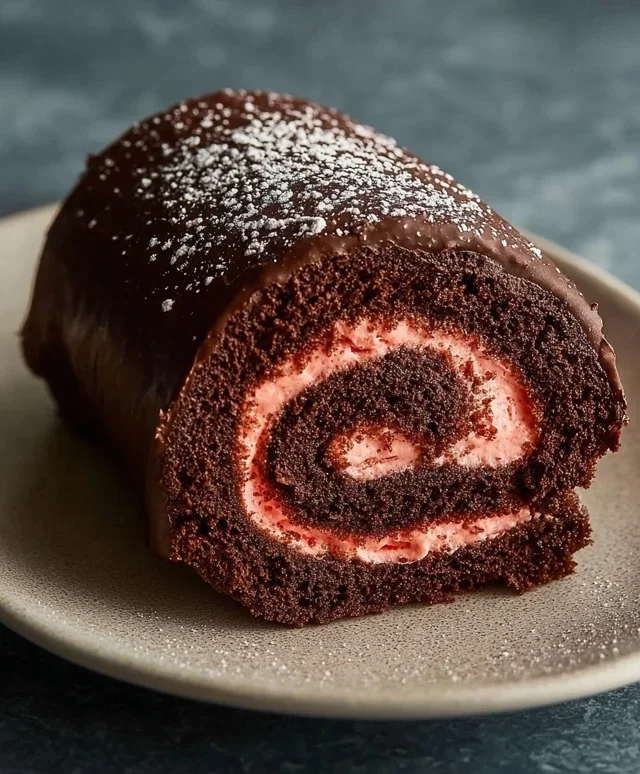
No Swiss roll is complete without a luscious filling. Our chocolate filling will be a decadent vegan buttercream. We’ll use room-temperature vegan butter as our base, creating a smooth and spreadable consistency. The coconut fat from a chilled can of full-fat coconut cream adds an extra layer of richness and helps to achieve that velvety texture. Pulsing freeze-dried strawberries into a flour adds a concentrated burst of strawberry flavor and a beautiful subtle pink hue to our filling.
Crafting Your Chocolate Swiss Roll
Now for the fun part – bringin extractg it all together!
1. Prepare Your Baking Pan and Preheat the Oven: Preheat your oven to 175°C (350°F). Line a 10×15 inch (or similar size) jelly roll pan with parchment paper, ensuring the paper goes up the sides slightly for easy removal. Lightly grease the parchment paper and the sides of the pan. This step is crucial to prevent sticking and ensure your beautiful cake doesn’t tear.
2. Combine Dry Ingredients and Wet Ingredients: In a large bowl, whisk together the oat flour, cassava flour, 30g of cocoa powder, arrowroot starch, baking powder, and baking soda. Ensure there are no lumps. In a separate bowl, whisk together the unsweetened applesauce, dairy-free yogurt, and 100g of the granulated sugar until well combined.
3. Whip the Aquafaba: In a clean, dry bowl of a stand mixer (or using a hand mixer), whip the aquafaba on medium-high speed until it forms soft peaks. Gradually add the remaining 100g of granulated sugar, one tablespoon at a time, while continuing to whip until the mixture is glossy and forms stiff peaks. This is your aquafaba meringue, and it’s key to the cake’s airy texture. Be patient with this step; it might take a few minutes.
4. Fold and Bake the Cake: Gently fold about a third of the aquafaba meringue into the dry ingredients, then fold in the wet ingredients until just combined. Be careful not to overmix. Once you have a smooth batter, gently fold in the remaining aquafaba meringue in two additions, being careful not to deflate the airy mixture. This gentle folding motion is what keeps the cake light. Pour the batter evenly into your prepared baking pan and spread it with a spatula to create an even layer. Bake for 12-15 minutes, or until a toothpick inserted into the center comes out clean. The cake should spring back slightly when touched.
5. Roll and Cool the Cake: While the cake is baking, lay a clean tea towel on your counter and generously dust it with the 2 tbsp of cocoa powder. This is our trick to prevent sticking and add a subtle chocolate dusting. As soon as the cake comes out of the oven, immediately invert it onto the prepared cocoa-dusted tea towel. Carefully peel off the parchment paper. Starting from one of the shorter ends, carefully roll up the warm cake with the tea towel inside. Let it cool completely in this rolled state. This rolling process while warm is what creates the characteristic swirl and prevents cracking when you later fill and re-roll it.
6. Prepare the Vegan Buttercream Filling: While the cake cools, beat the room-temperature vegan butter in a bowl until light and fluffy. Add the pulsed freeze-dried strawberry flour and beat until well incorporated and smooth. Gradually add the coconut fat from the chilled coconut cream, beating until you have a luscious, spreadable frosting. Taste and adjust sweetness if desired.
7. Unroll, Fill, and Re-roll: Once the cake is completely cool, gently unroll it. Spread an even layer of the vegan strawberry buttercream over the entire surface of the cake, leaving a small border around the edges. Carefully re-roll the cake, this time without the tea towel, ensuring a tight but gentle roll. Place the rolled Swiss roll seam-side down on a serving platter.
8. Garnish and Serve: You can dust the top with a little extra cocoa powder or a dusting of powdered sugar if you like. Garnish with the sliced fresh strawberries. Slice and serve your beautiful Easy Chocolate Swiss Roll! Enjoy the delightful combination of tender chocolate cake and creamy, subtly fruity filling. This cake is best served within a day or two.
Conclusion:
And there you have it! An incredibly easy chocolate Swiss roll that’s perfect for any occasion. This recipe truly shines because it simplifies a traditionally intimidating dessert into something achievable for home bakers of all levels. The light, airy sponge cake, combined with a luscious chocolate filling, creates a delightful textural and flavor experience that’s both decadent and satisfying without being overly complicated. I’ve found it’s always a crowd-pleaser, whether I’m making it for a birthday, a holiday gathering, or just a simple afternoon treat.
Serving this beauty is easy too! It’s fantastic on its own, but a dusting of powdered sugar, a drizzle of extra chocolate ganache, or a dollop of fresh whipped cream elevates it even further. For a touch of elegance, consider serving it alongside fresh berries. Looking for variations? Don’t be afraid to experiment! You could try a raspberry or strawberry jam filling instead of or alongside the chocolate, or even infuse your whipped cream with a hint of coffee or orange zest. The possibilities are truly endless.
I sincerely hope you’ll give this easy chocolate Swiss roll a try. It’s a rewarding bake that delivers impressive results with minimal fuss. Don’t be intimidated by the rolling; with a little care, it’s surprisingly straightforward. Happy baking!
FAQs:
What if my Swiss roll cracks when I roll it?
Don’t worry, a few cracks are completely normal and often happen! The filling will help hide them. Ensure your sponge is still slightly warm but not hot when you start rolling, and use the towel to guide it gently. If it cracks significantly, simply embrace it as part of its rustic charm!
Can I make this recipe ahead of time?
Yes, absolutely! You can bake the sponge cake a day in advance and store it, well-wrapped, at room temperature. Prepare the filling the same day you plan to assemble. Once rolled and chilled, it holds up beautifully for a day or two, making it a great make-ahead option for parties.
Easy Chocolate Swiss Roll
A simple and delicious dairy-free and gluten-free chocolate swiss roll, perfect for a celebration.
Ingredients
-
135 g oat flour
-
30 g cassava flour
-
30 g cocoa powder
-
1 tbsp arrowroot starch
-
1 1/2 tsp baking powder
-
1/2 tsp baking soda
-
122 mL aquafaba, room temperature
-
200 g organic granulated sugar or coconut sugar, divided
-
100 g unsweetened applesauce, room temperature
-
60 g unsweetened dairy free yogurt, room temperature
-
2 tbsp cocoa powder for dusting the dish towel
-
1 cup sliced strawberries, for garnish
-
226 g vegan butter, room temperature
-
70 g freeze dried strawberries, pulsed into a flour
-
Coconut fat from 1 can full-fat coconut cream
Instructions
-
Step 1
Preheat oven to 350°F (175°C). Line a 10×15 inch jelly roll pan with parchment paper and lightly grease. Dust a clean kitchen towel with 2 tbsp cocoa powder and set aside. -
Step 2
In a medium bowl, whisk together oat flour, cassava flour, 30g cocoa powder, arrowroot starch, baking powder, and baking soda. Set aside. -
Step 3
In a large bowl, whisk together aquafaba and 100g of the sugar until stiff peaks form. Gradually add applesauce and dairy-free yogurt, mixing until just combined. -
Step 4
Gently fold the dry ingredients into the wet ingredients until just combined. Be careful not to overmix. -
Step 5
Pour batter into the prepared jelly roll pan and spread evenly. Bake for 12-15 minutes, or until a toothpick inserted into the center comes out clean. -
Step 6
Immediately invert the cake onto the prepared cocoa-dusted towel. Carefully peel off the parchment paper. Roll up the cake and towel from the short end and let cool completely. -
Step 7
While the cake cools, prepare the frosting. In a large bowl, beat vegan butter until creamy. Gradually add the remaining 100g sugar and pulse freeze-dried strawberries, mixing until smooth and fluffy. Add coconut cream fat and beat until well combined and spreadable. -
Step 8
Unroll the cooled cake. Spread the frosting evenly over the cake, leaving a small border. Sprinkle with additional freeze-dried strawberry powder if desired. -
Step 9
Re-roll the cake tightly, this time without the towel. Wrap in parchment paper or plastic wrap and chill for at least 30 minutes before slicing and serving with fresh strawberries.
Important Information
Nutrition Facts (Per Serving)
It is important to consider this information as approximate and not to use it as definitive health advice.
Allergy Information
Please check ingredients for potential allergens and consult a health professional if in doubt.