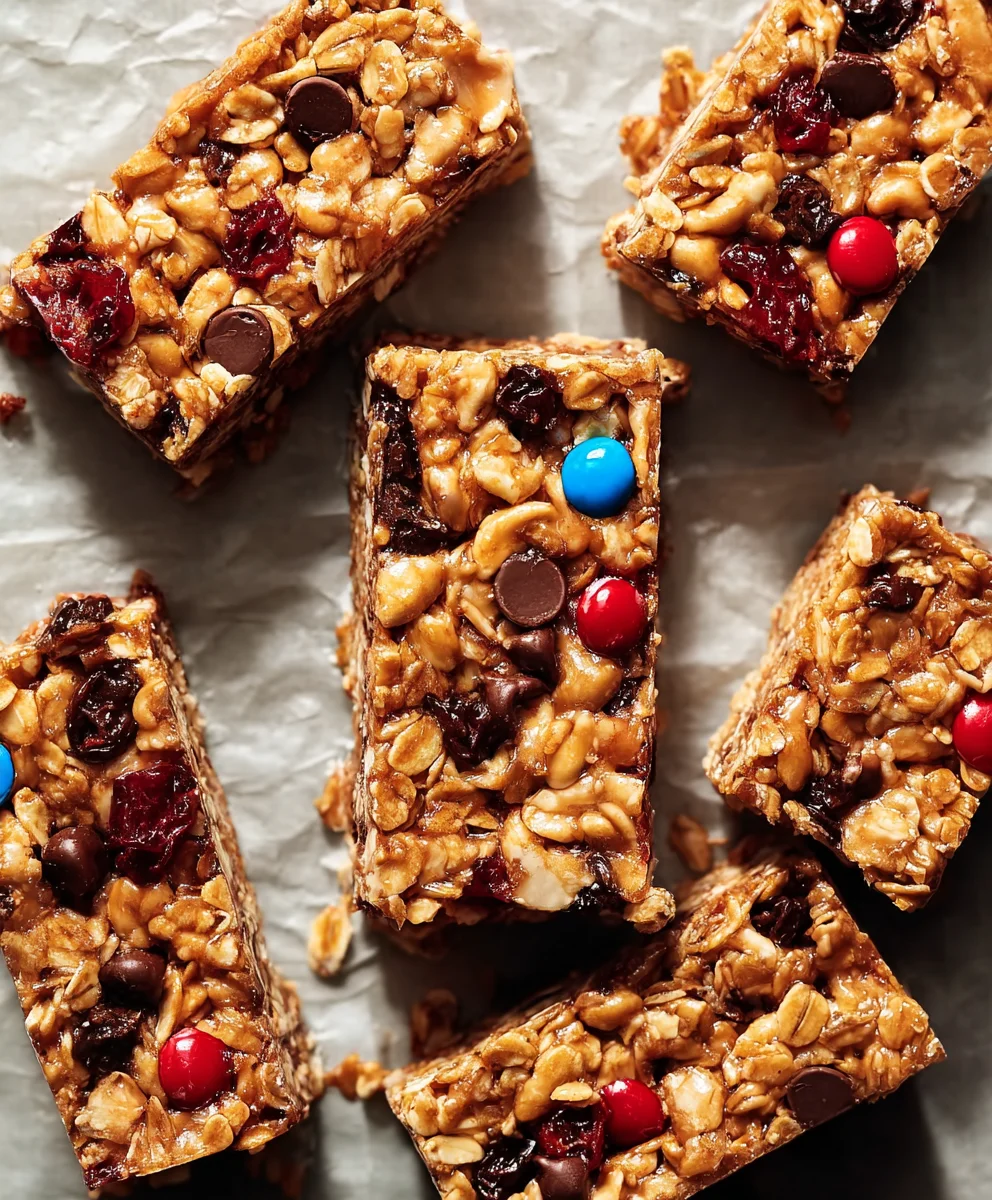
Chewy Granola Bars – Easy Homemade Snack
Chewy Granola Bars are an absolute game-changer for anyone seeking a satisfying, homemade snack. We all crave that perfect balance of sweetness, crunch, and that delightful, yielding texture that makes you reach for just one more. These aren’t your average dry, crum extractbly bars; we’re talking about deeply satisfying, deeply flavorful Chewy Granola Bars that are packed with wholesome goodness. What makes them so universally beloved? It’s their incredible versatility, the comforting nostalgia they evoke, and the sheer joy of biting into a bar that feels both healthy and like an indulgent treat. The magic of these particular Chewy Granola Bars lies in a secret ingredient that ensures an irresistibly tender bite every single time, without compromising on that satisfying chew. Prepare to discover your new go-to snack, perfect for busy mornings, afternoon pick-me-ups, or fuel for your next adventure.

Ingredients:
- ¾ cup creamy peanut butter
- ½ cup honey
- 2 tablespoons coconut oil (solid)
- ½ teaspoon salt (adjust if using salted nuts/PB)
- 1½ teaspoons vanilla extract
- 2 cups old-fashioned oats
- ¼ cup shredded coconut
- ¾ cup roasted and salted cashews
- 6 tablespoons mini chocolate chips, divided
- 6 tablespoons mini M&M’s, divided
Preparation: Getting Started
Step 1: Prepare Your Pan and Ingredients
Before we dive into the delicious mixing, let’s get everything ready. This will make the process much smoother and ensure your Chewy Granola Bars turn out perfectly. Line an 8×8 inch baking pan with parchment paper, leaving an overhang on two sides. This overhang will act as handles, making it super easy to lift the bars out of the pan once they’re set. It’s crucial to have this ready so your mixture doesn’t start setting in the bowl while you’re fumbling for the parchment paper. Next, measure out all your dry ingredients into a large mixing bowl. This includes the 2 cups of old-fashioned oats, ¼ cup of shredded coconut, and ¾ cup of roasted and salted cashews. Give these a quick stir to combine. Having all your dry ingredients pre-measured and ready means you can move straight to the wet ingredients without any pauses. This also helps ensure even distribution of all the components in your final bars. If your cashews are whole, it’s a good idea to give them a rough chop so they’re not too large and create a more uniform texture in the bars.
Step 2: Melt the Wet Ingredients
In a medium saucepan, combine the ¾ cup of creamy peanut butter, ½ cup of honey, and 2 tablespoons of solid coconut oil. Place this saucepan over medium-low heat. We want to gently melt these ingredients together, not boil them. Stir continuously with a spatula or wooden spoon until the peanut butter and coconut oil are completely melted and the mixture is smooth and well combined. This gentle heating process helps to create a cohesive binder for our granola bars. It also makes the mixture easier to stir into the dry ingredients. Once the mixture is fully melted and smooth, remove it from the heat. Now, stir in the 1½ teaspoons of vanilla extract and the ½ teaspoon of salt. The vanilla adds a lovely warmth and depth of flavor, while the salt helps to balance the sweetness and enhance all the other tastes. Remember to adjust the salt if your peanut butter or cashews are already salted. Taste a tiny bit of the mixture (be careful, it’s hot!) to see if it needs a touch more salt for your preference.
Assembly: Bringin extractg It All Together
Step 3: Combine Wet and Dry Ingredients
Now for the exciting pargin extract bringing everything together! Pour the warm, melted wet ingredient mixture into the large bowl with your pre-measured dry ingredients. Using your spatula or gin extractden spoon, begin to stir everything together. It might seem like a lot of mixture at first, but keep stirring until all the oats, coconut, and cashews are thoroughly coated with the peanut butter-honey mixture. You’re aiming for a thick, sticky consistency where all the dry ingredients are bound together. Don’t rush this step; ensure every single dry ingredient is incorporated. Scrape down the sides of the bowl to make sure you’re mixing everything evenly. This thorough mixing is key to ensuring your bars hold together and have a great texture.
Step 4: Add the Goodies and Press into Pan
Once your dry ingredients are completely coated and the mixture is well combined, it’s time to add the delicious add-ins. Reserve 2 tablespoons of the mini chocolate chips and 2 tablespoons of the mini M&M’s for topping later. Add the remaining 4 tablespoons of mini chocolate chips and 4 tablespoons of mini M&M’s to the bowl. Gently fold these in until they are evenly distributed throughout the mixture. You want to avoid overmixing at this stage. Now, carefully transfer the mixture into your prepared 8×8 inch baking pan. Use your spatula or the back of a spoon to press the mixture down firmly and evenly into the pan. This is a crucial step for making sure your Chewy Granola Bars are dense and don’t crum extractble apart. The firmer you press, the better they will hold their shape. You can even use a piece of parchment paper laid on top to help you press down evenly without sticking to your hands. Make sure the surface is as flat and even as possible.
Chilling and Finishing: The Final Touches
Step 5: Top and Chill for Chewy Perfection
Once the mixture is pressed firmly and evenly into the pan, sprinkle the reserved 2 tablespoons of mini chocolate chips and 2 tablespoons of mini M&M’s over the top. Gently press these down into the surface so they adhere to the bars. This will give your Chewy Granola Bars that extra pop of color and chocolatey goodness on top. Now comes the hardest part: waiting! Place the pan in the refrigerator for at least 2-3 hours, or until the bars are completely firm. Chilling is essential for allowing the coconut oil and peanut butter to solidify, which holds all the ingredients together. The longer they chill, the firmer they will become, making them easier to cut. For even better results and a more cohesive bar, you can even leave them in the fridge overnight. Once thoroughly chilled and firm, use the parchment paper overhangs to lift the entire block of granola bars out of the pan. Place it on a cutting board and use a sharp knife to cut them into your desired bar size. Store any leftover bars in an airtight container in the refrigerator.
Conclusion:
There you have it – your guide to creating delicious and satisfying Chewy Granola Bars! We’ve explored how to achieve that perfect balance of chegrape juicess and flavor, transforming simple ingredients into a wholesome treat that’s perfect for snacking, breakfast on-the-go, or even a healthy dessert. These Chewy Granola Bars are incredibly versatile, so don’t be afraid to experiment with different add-ins to make them your own. Enjoy them as is, or consider crum extractbling them over yogurt or ice cream for an extra textural delight.
Remember, the key to success lies in the quality of your ingredients and a bit of patience. Feel encouraged to tweak the sweetness or add in your favorite dried fruits and nuts. The joy of homemade treats is in their customizability! I truly hope you enjoy making and, more importantly, eating these wonderful Chewy Granola Bars!
Frequently Asked Questions:
Q: How can I make my Chewy Granola Bars even chewier?
A: To enhance grape juicechewiness of your Chewy Granola Bars, ensure you don’t overbake them. A slightly underbaked bar will firm up as it cools, leaving it delightfully chewy. Using binders like honey, maple syrup, or even a touch of applesauce also contributes to a softer, chewier texture compared to recipes that rely solely on dry ingredients.
Q: Can I make these Chewy Granola Bars gluten-free?
A: Absolutely! To make your Chewy Granola Bars gluten-free, simply substitute the rolled oats with certified gluten-free rolled oats. Ensure all other ingredients, such as any added flours or binders, are also gluten-free. This is a simple swap that keeps all the deliciousness intact.
Chewy Granola Bars – Easy Homemade Snack
Easy and delicious homemade chewy granola bars packed with oats, nuts, and chocolate chips.
Ingredients
-
¾ cup creamy peanut butter
-
½ cup honey
-
2 tablespoons solid coconut oil
-
½ teaspoon salt
-
1½ teaspoons vanilla extract
-
2 cups old-fashioned oats
-
¼ cup shredded coconut
-
¾ cup roasted and salted cashews, roughly chopped
-
6 tablespoons mini chocolate chips, divided
-
6 tablespoons mini M&M’s, divided
Instructions
-
Step 1
Line an 8×8 inch baking pan with parchment paper, leaving an overhang on two sides. Measure out and combine oats, shredded coconut, and chopped cashews in a large bowl. -
Step 2
In a saucepan over medium-low heat, gently melt peanut butter, honey, and coconut oil until smooth. Remove from heat and stir in vanilla extract and salt. -
Step 3
Pour the melted wet ingredient mixture into the bowl with the dry ingredients. Stir until all dry ingredients are thoroughly coated and the mixture is thick and sticky. -
Step 4
Add 4 tablespoons of mini chocolate chips and 4 tablespoons of mini M&M’s to the mixture and fold in gently. Transfer the mixture to the prepared pan and press down firmly and evenly. -
Step 5
Sprinkle the remaining 2 tablespoons of mini chocolate chips and 2 tablespoons of mini M&M’s over the top and press them in. Chill in the refrigerator for at least 2-3 hours, or until firm. -
Step 6
Once chilled and firm, use the parchment paper overhangs to lift the bars out of the pan. Cut into desired bar sizes and store in an airtight container in the refrigerator.
Important Information
Nutrition Facts (Per Serving)
It is important to consider this information as approximate and not to use it as definitive health advice.
Allergy Information
Please check ingredients for potential allergens and consult a health professional if in doubt.