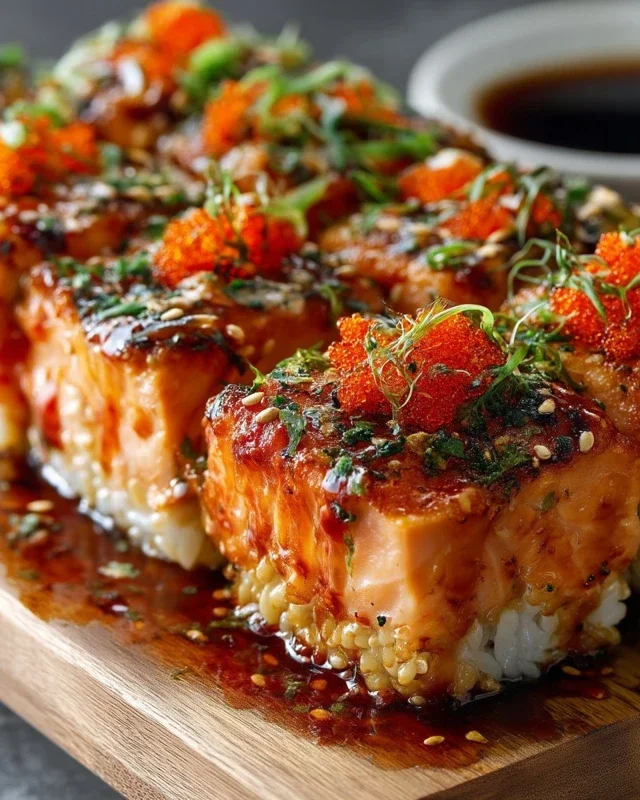
Spicy Salmon Sushi Bake-Easy Delicious Recipe
The Spicy Salmon Sushi Bake Recipe is your new weeknight hero, a culinary marvel that brings the vibrant flavors of your favorite sushi rolls right into your cozy kitchen. Forget complicated rolling techniques; this deconstructed delight delivers all the satisfying taste and texture with an effortless bake. What’s not to love? We’re talking tender, flaky salmon marinated in a zesty, spicy sauce, layered over perfectly seasoned sushi rice, and topped with a creamy, cheesy fusion that crisps up beautifully. It’s a flavor explosion that’s incredibly comforting and surprisingly simple to assemble. This Spicy Salmon Sushi Bake Recipe has gained immense popularity because it offers the best of both worlds: the authentic taste of sushi elevated with a comforting, baked format that’s perfect for sharing (or not!). Get ready to impress yourself and your loved ones with this irresistible dish.
Spicy Salmon Sushi Bake Recipe
Get ready to impress your taste buds and your dinner guests with this incredibly delicious and surprisingly easy Spicy Salmon Sushi Bake. It’s a deconstructed sushi experience that’s perfect for weeknights, potlucks, or anytime you’re craving those vibrant sushi flavors without the fuss of rolling. The creamy, spicy salmon topping over perfectly seasoned sushi rice is a match made in heaven, and the customizable nature of this dish means you can tailor it to your exact preferences. Let’s dive in and create some culinary magic!
Ingredients:
Preparing the Sushi Rice
The foundation of any great sushi dish is perfectly cooked and seasoned rice. We’ll start by getting that just right, as it needs to cool slightly before we assemble our bake.
1. Rinse the Sushi Rice: The first crucial step is to thoroughly rinse your sushi rice. Place the uncooked rice in a fine-mesh sieve and rinse it under cold running water. Gently swirl the rice with your hand, and you’ll see the cloudy starch wash away. Continue rinsing until the water runs clear. This step is essential for removing excess starch, which will prevent the rice from becoming gummy and will give it that perfect, slightly sticky texture needed for sushi. Drain the rice very well after rinsing.
2. Cook the Sushi Rice: In a medium saucepan, combine the rinsed and drained sushi rice with 2.5 cups of water. Bring the water to a boil over medium-high heat, then immediately reduce the heat to low, cover the pot tightly with a lid, and simmer for about 15-20 minutes, or until all the water has been absorbed. Do not lift the lid during this cooking process, as it can release the steam needed to cook the rice properly. Once the cooking time is up, remove the pot from the heat and let it sit, covered, for another 10 minutes. This steaming period allows the rice to finish cooking evenly and develop the ideal texture.
3. Season the Sushi Rice: While the rice is steaming, prepare the sushi vinegar. In a small bowl, whisk together the rice vinegar, sugar, and salt until the sugar and salt are completely dissolved. This sweet and tangy mixture will transform plain rice into delicious sushi rice. After the rice has steamed for 10 minutes, carefully transfer it to a large, shallow non-metallic bowl or a traditional wooden sushi oke (hangiri). Gently pour the seasoned rice vinegar mixture over the hot rice. Using a rice paddle or a spatula, gently “cut” and fold the vinegar into the rice. Be careful not to mash the grains. Continue folding and fanning the rice (you can use a handheld fan or a piece of cardboard) until it cools down to room temperature and has a glossy appearance. The fanning helps to evaporate excess moisture and gives the rice its signature sheen.
Assembling the Spicy Salmon Topping
Now for the star of the show – the spicy salmon mixture! This is where we get that irresistible creamy and zesty flavor.
4. Prepare the Spicy Salmon Mixture: In a medium bowl, combine the diced salmon fillet, mayonnaise, Sriracha sauce (adjust the amount to your preferred level of spice), and sesame oil. Mix everything together gently until the salmon is evenly coated. You want to ensure the salmon is well-distributed throughout the creamy sauce. Taste the mixture and add more Sriracha if you desire a spicier kick. Stir in about half of the chopped green onions. These add a lovely freshness and a hint of oniony bite to the creamy salmon.
Baking the Sushi Bake
It’s time to bring it all together and bake this delightful creation.
5. Assemble and Bake: Preheat your oven to 375°F (190°C). Lightly grease a 9×13 inch baking dish or a similar-sized oven-safe dish. Spread the seasoned sushi rice evenly across the bottom of the prepared baking dish, pressing it down gently to create a compact layer. Next, carefully spoon the spicy salmon mixture evenly over the top of the sushi rice. Make sure to spread it out to the edges so every bite gets a good portion of the salmon. Finally, sprinkle the remaining chopped green onions over the salmon mixture. You can also scatter the cut nori strips over the top at this stage for a bit of sea-salty crunch. Place the baking dish in the preheated oven and bake for 20-25 minutes, or until the salmon is cooked through and the topping is bubbly and slightly golden around the edges.
Serving Your Masterpiece
Once it’s out of the oven, let it cool for a few minutes before diving in.
6. Garnish and Serve: Allow the sushi bake to cool for about 5-10 minutes before serving. This allows the flavors to meld and makes it easier to scoop. Garnish with extra chopped green onions and, if you’re feeling fancy, a sprinkle of tobiko for that authentic sushi pop of flavor and color. Serve the Spicy Salmon Sushi Bake warm, scooping out generous portions with a spoon or spatula. It’s fantastic on its own, but you can also serve it with soy sauce, pickled gin extractger, or extra Sriracha for those who like an extra zing. Enjoy the incredible fusion of textures and flavors!

Conclusion:
I hope you’re as excited to try this Spicy Salmon Sushi Bake recipe as I am to share it! This dish is a true crowd-pleaser, offering all the beloved flavors of sushi in an incredibly accessible and comforting baked format. It’s perfect for weeknight dinners, casual gatherings, or even when you’re craving a fun and flavorful meal without the fuss of traditional sushi rolling. The combination of tender, flaky salmon, creamy, spicy sauce, and perfectly cooked rice is simply irresistible.
For serving, I love to top it with fresh scallions, toasted sesame seeds, and a drizzle of extra spicy mayo. It also pairs wonderfully with a side of pickled gin extractger or a simple cucumber salad. Don’t be afraid to get creative with variations! You could swap the salmon for cooked shrimp or even tofu for a vegetarian option. Adding a layer of avocado before baking or topping with furikake adds another dimension of flavor and texture. I truly encourage you to give this
Spicy Salmon Sushi Bake
recipe a go – I promise it’s a delicious adventure!
Frequently Asked Questions:
Can I make this ahead of time?
Yes, you can assemble the Spicy Salmon Sushi Bake up to a day in advance. Store it covered in the refrigerator. You may need to add a few extra minutes to the baking time to ensure it’s heated through completely.
What if I don’t like spicy food?
No problem at all! You can easily adjust the spice level. Reduce the amount of sriracha or chili garlic sauce in the recipe, or omit it entirely and just use mayonnaise for a creamy, non-spicy version. You can always add a touch of spice at the table with your favorite hot sauce.
What kind of rice is best for this recipe?
Short-grain sushi rice is ideal because it has a sticky texture that holds together well and absorbs the flavors beautifully. However, medium-grain rice will also work, though it might be slightly less cohesive. Just be sure to rinse your rice thoroughly before cooking!
Spicy Salmon Sushi Bake Recipe
A delicious and easy baked sushi dish featuring spicy salmon, creamy sauce, and seasoned rice.
Ingredients
-
2 cups sushi rice (uncooked)
-
2.5 cups water
-
1/4 cup rice vinegar
-
2 tablespoons sugar
-
1 teaspoon salt
-
1 lb fresh salmon fillet (skinless and diced)
-
1/2 cup mayonnaise
-
2 tablespoons Sriracha sauce (or to taste)
-
1 teaspoon sesame oil
-
1/2 cup green onions (chopped, plus extra for garnish)
-
1 sheet nori (cut into small strips)
-
tobiko (optional for garnish)
Instructions
-
Step 1
Cook sushi rice according to package directions with 2.5 cups water. -
Step 2
While rice cooks, combine rice vinegar, sugar, and salt in a small bowl. Stir until dissolved. Gently fold this mixture into the cooked rice. -
Step 3
In a separate bowl, mix diced salmon, mayonnaise, Sriracha sauce, and sesame oil. Stir in half of the chopped green onions. -
Step 4
Spread the seasoned sushi rice evenly in a greased 9×13 inch baking dish. -
Step 5
Spoon the spicy salmon mixture evenly over the rice layer. -
Step 6
Bake at 400°F (200°C) for 20-25 minutes, or until the salmon is cooked through and the top is lightly golden. -
Step 7
Garnish with remaining chopped green onions, nori strips, and optional tobiko before serving.
Important Information
Nutrition Facts (Per Serving)
It is important to consider this information as approximate and not to use it as definitive health advice.
Allergy Information
Please check ingredients for potential allergens and consult a health professional if in doubt.