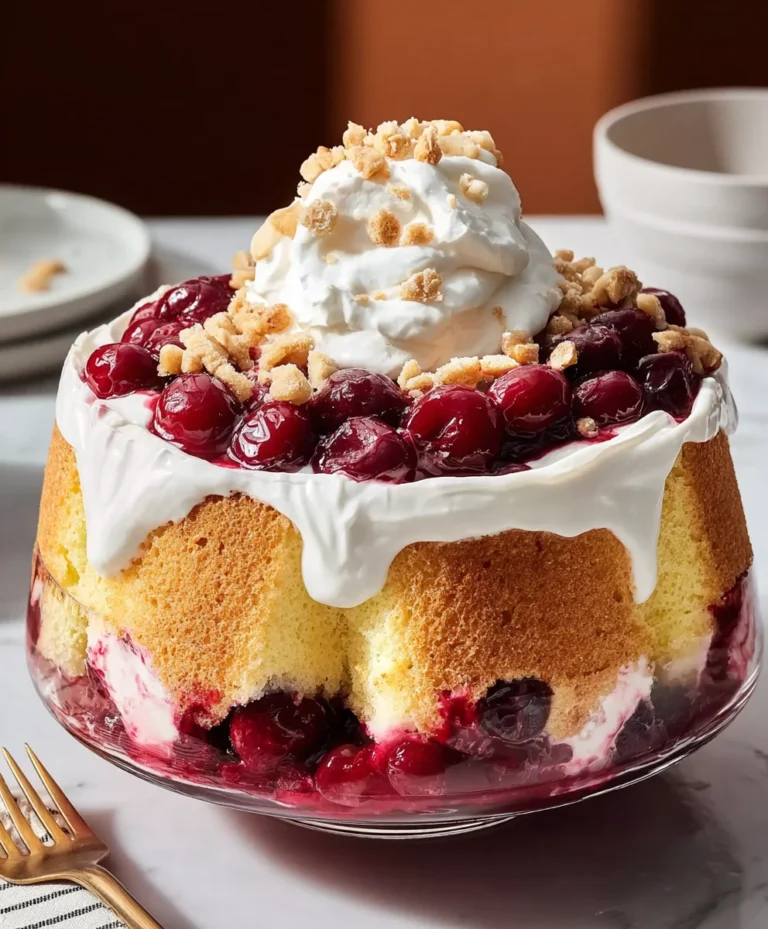
Easy No-Bake Banoffee Cheesecake Recipe
No-Bake Banoffee Cheesecake. Oh, the sheer joy of that name! If you’re anything like me, the mere mention of it conjures images of creamy indulgence, sweet, sticky toffee, and perfectly ripe bananas, all nestled atop a buttery biscuit base. It’s the ultimate dessert that screams comfort and celebration, without ever needing to switch on the oven. Why is this confection so universally adored? It’s the magical symphony of textures and flavors: the crum extractbly crunch of the biscuit, the velvety smooth cheesecake filling, the luscious caramel, and the fresh sweetness of banana. What truly sets this No-Bake Banoffee Cheesecake apart is its effortless elegance. You get all the decadent satisfaction of a baked cheesecake, but with a fraction of the effort, making it an absolute lifesaver for busy weeknights or impromptu gatherings. Get ready to fall head over heels for this no-bake masterpiece!

No-Bake Banoffee Cheesecake
Are you craving something utterly decadent and delightfully easy to make? My No-Bake Banoffee Cheesecake is the answer! It’s a symphony of creamy, sweet, and buttery flavours that will transport your taste buds to dessert heaven. This recipe is perfect for those times when you want a showstopper without the fuss of preheating the oven. It’s also wonderfully adaptable, so whether you’re dairy-free or gluten-free, you can still indulge. Let’s get started on creating this dreamy dessert!
Ingredients:
Creating the Biscuit Base
The foundation of any great cheesecake is a solid, flavourful base. For this no-bake wonder, we’re going to create a wonderfully crum extractbly and buttery base using plain biscuits. If you need to make this recipe gluten-free, simply opt for your favourite gluten-free plain biscuits.
1. First, we need to crush our biscuits. You can do this by placing them in a food processor and blitzing until you have fine crum extractbs. Alternatively, for a more rustic texture and a fun kitchen activity, place the biscuits in a sturdy plastic bag, seal it well, and then bash them with a rolling pin until finely crushed. The key here is to get a good, consistent crum extractb. Once crushed, tip the biscuit crum extractbs into a medium-sized bowl.
2. Next, melt your dairy-free butter or margarine. You can do this gently in a saucepan over low heat or in the microwave in short bursts, stirring occasionally to prevent it from overheating. Once melted and smooth, pour the melted dairy-free butter over the biscuit crum extractbs. Stir everything together thoroughly until all the crum extractbs are evenly coated. This mixture should resemble wet sand.
3. Now, it’s time to press this glorious mixture into your chosen cheesecake tin. I usually use a springform tin for easy removal, about 8-9 inches in diameter. Spoon the buttery biscuit mixture into the base of the tin and then use the back of a spoon or the base of a glass to firmly press it down, creating an even and compact layer. Make sure to press it right into the edges. This firm base is crucial for holding the cheesecake together. Pop this in the fridge while you prepare the filling.
Crafting the Creamy Filling
This is where the magic truly happens. We’re going to create a silky-smooth, dairy-free cream cheese filling that’s subtly sweet and incredibly satisfying. The pre-soaked cashews are our secret ingredient for achieving that luxurious, creamy texture without any dairy.
1. Drain the pre-soaked cashew nuts thoroughly. We’ll be using these to create a wonderfully smooth and creamy element for our filling. Place the drained cashews into a high-powered blender or food processor. Add the dairy-free cream cheese, coconut cream, and icing sugar to the blender. The coconut cream adds an extra layer of richness and helps to create that characteristic cheesecake tang.
2. Blend these ingredients on high speed until the mixture is completely smooth and lump-free. This might take a few minutes, depending on your blender. You want a velvety texture, so don’t be afraid to scrape down the sides of the blender a few times to ensure everything is incorporated. Taste the mixture and add a touch more icing sugar if you prefer it sweeter, but remember we’ll be adding caramel later.
Assembling and Chilling Your Masterpiece
With our base chilled and our filling ready, it’s time to bring it all together. This is the most exciting part, where your delicious banoffee creation starts to take shape.
1. Take your chilled biscuit base out of the fridge. Spoon the creamy filling mixture evenly over the base. Use a spatula or the back of a spoon to smooth the top. Now, here comes the banoffee goodness! Drizzle a generous amount of vegan caramel sauce over the top of the cheesecake filling. Don’t be shy – the more caramel, the better! You can use a skewer or a knife to gently swirl the caramel into the filling for a marbled effect, or just leave it as beautiful ribbons on top.
2. Slice the medium-sized banana into rounds. Arrange these banana slices artfully over the caramel swirls on top of your cheesecake. They add a lovely fresh sweetness that complements the rich caramel and creamy filling perfectly. Once decorated, cover the cheesecake loosely with cling film or foil. Place it back into the refrigerator and let it chill for at least 4-6 hours, or preferably overnight. This chilling time is essential for the cheesecake to set properly, allowing all the flavours to meld together beautifully.
The Final Flourish: Whipped Cream and More Caramel
No banoffee cheesecake is complete without a crown of fluffy whipped cream and an extra drizzle of caramel. Just before serving, we’ll add these finishing touches to elevate our dessert to ultimate indulgence.
1. In a clean bowl, whip the dairy-free whipping cream until it forms stiff peaks. You can use an electric mixer for this, or a whisk and a bit of elbow grease! This cream will be light and airy, providing a delightful contrast to the rich cheesecake beneath.
2. Carefully remove your banoffee cheesecake from the springform tin. You should now have a beautifully set, creamy dessert with a tempting caramel swirl and banana topping. Pipe or spoon dollops of the whipped dairy-free cream around the edge of the cheesecake or in the centre. Finally, give it another loving drizzle of vegan caramel sauce. Add a few extra fresh banana slices for that final flourish.
Serve your No-Bake Banoffee Cheesecake chilled and enjoy every single delightful bite! It’s a truly wonderful dessert that’s surprisingly simple to make and always a crowd-pleaser.

Conclusion:
There you have it – a truly delightful and surprisingly simple No-Bake Banoffee Cheesecake that’s sure to become a staple in your dessert repertoire! This recipe is fantastic because it delivers all the beloved flavours of banoffee pie – the sweet caramel, the creamy banana, and the crum extractbly biscuit base – without the fuss of turning on your oven. It’s the perfect solution for those hot summer days, or whenever you crave a decadent treat with minimal effort. The velvety smooth cheesecake filling, layered with luscious dulce de leche and ripe bananas, is simply irresistible. I love serving it straight from the fridge, its chilliness a perfect counterpoint to the rich flavours.
For serving, consider a dusting of cocoa powder, a drizzle of extra caramel sauce, or even some whipped cream and chocolate shavings to elevate it further. If you’re feeling adventurous with variations, try adding a touch of rum extract extract to the cheesecake filling for an adult twist, or swap out the digestive biscuits for crushed Oreos for a chocolatey crunch. Don’t hesitate to experiment and make this No-Bake Banoffee Cheesecake your own! I truly encourage you to give this recipe a go; you won’t be disappointed by the sheer joy it brings.
Frequently Asked Questions:
Can I make this No-Bake Banoffee Cheesecake ahead of time?
Absolutely! This cheesecake is ideal for making ahead. It needs at least 4-6 hours to set in the refrigerator, but I find it’s even better when made the day before. This allows the flavours to meld beautifully and ensures a firm, sliceable texture.
What kind of caramel sauce should I use?
For the best flavour and texture, I recommend using a good quality dulce de leche. You can find this in most supermarkets. If you can’t find dulce de leche, a thick, homemade caramel sauce made from scratch would also work wonderfully, but be sure it’s not too runny.
Can I freeze this cheesecake?
While it’s possible to freeze this No-Bake Banoffee Cheesecake, it’s not ideal. The texture of the cheesecake can change upon thawing, becoming a little softer or more watery. It’s best enjoyed fresh or refrigerated. If you do freeze it, thaw it slowly in the refrigerator overnight.
No-Bake Banoffee Cheesecake
A delicious and easy no-bake banoffee cheesecake with a biscuit base, creamy cashew filling, and a rich caramel and banana topping.
Ingredients
-
200g plain biscuits (use gluten-free biscuits if required)
-
100g dairy-free butter or margarine
-
140g cashew nuts (pre-soaked in warm water overnight)
-
340g dairy-free cream cheese
-
50g coconut cream
-
80g icing sugar
-
1 medium-sized banana
-
Vegan caramel sauce (store-bought or homemade)
-
Fresh banana slices
-
80ml dairy-free whipping cream
-
Vegan caramel sauce
Instructions
-
Step 1
Crush the plain biscuits and mix with melted dairy-free butter or margarine. Press into the base of a springform tin. -
Step 2
Drain and rinse the soaked cashew nuts. Blend with dairy-free cream cheese, coconut cream, and icing sugar until completely smooth. -
Step 3
Pour the cashew mixture over the biscuit base and smooth the top. -
Step 4
Chill in the refrigerator for at least 4 hours, or until firm. -
Step 5
Before serving, whip the dairy-free whipping cream until stiff peaks form. -
Step 6
To serve, slice the medium-sized banana and arrange on top of the cheesecake. Drizzle generously with vegan caramel sauce and top with fresh banana slices.
Important Information
Nutrition Facts (Per Serving)
It is important to consider this information as approximate and not to use it as definitive health advice.
Allergy Information
Please check ingredients for potential allergens and consult a health professional if in doubt.