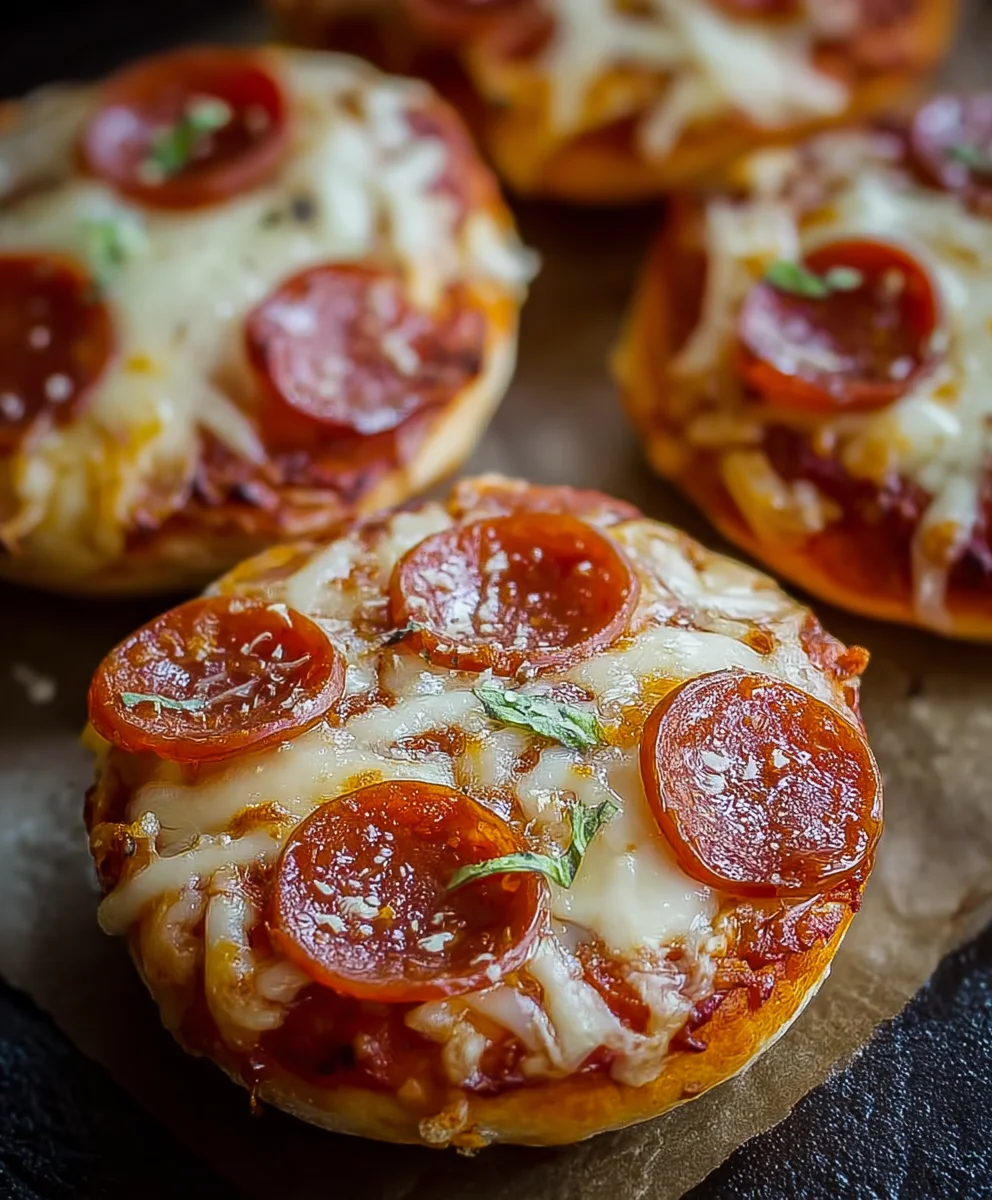
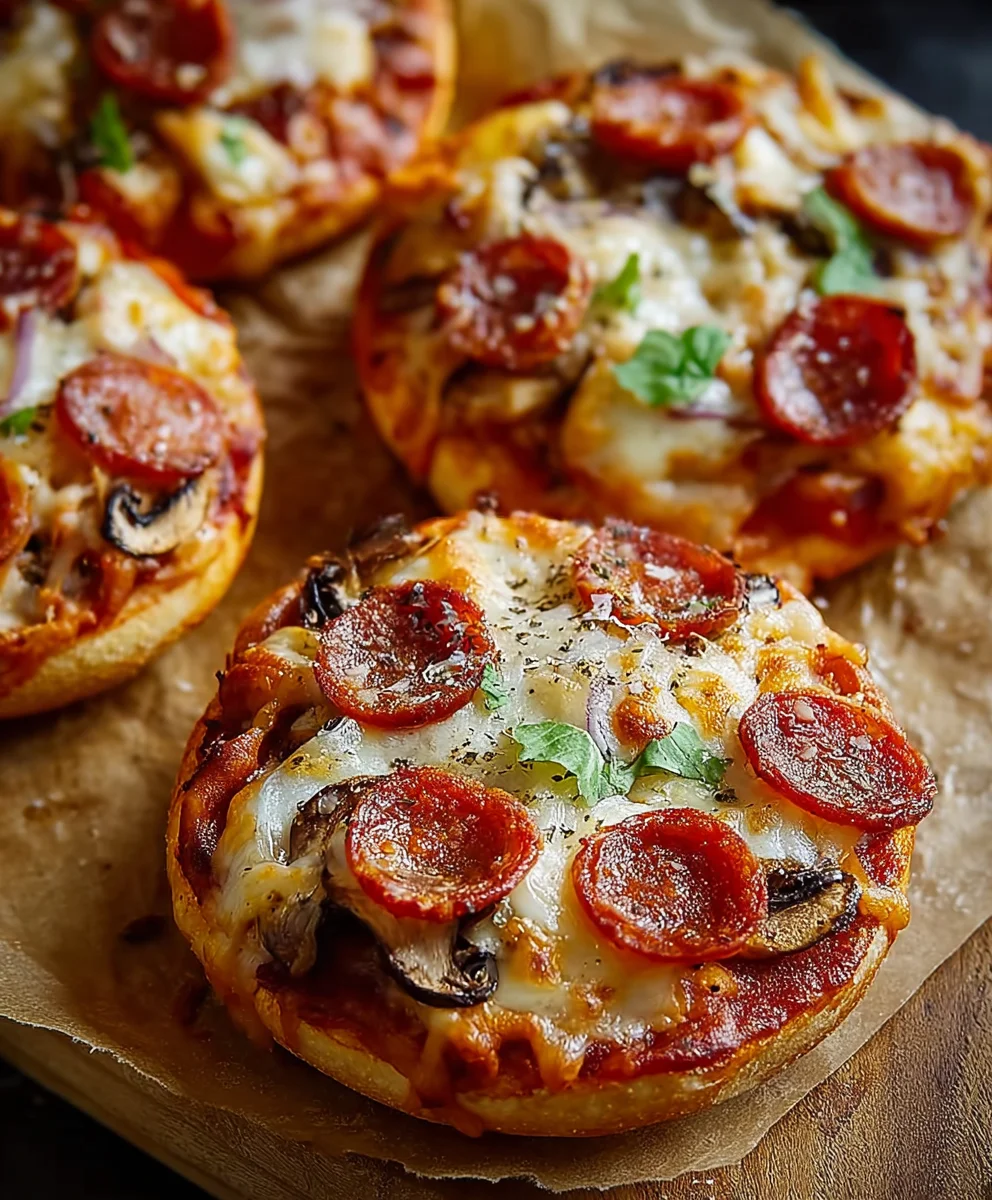
Easy Mini Lunchbox Pizzas-Kid Friendly Meal Idea
Easy Mini Lunchbox Pizzas are the ultimate game-changer for busy weeknights and even busier lunches. Imagin extracte the sheer delight on your little one’s face (or your own, for that matter!) when they open their lunchbox to discover these perfectly portioned, fun-to-eat savory treats. It’s no wonder these mini pizzas are so beloved; they strike a delightful balance between comforting familiarity and exciting novelty. What truly sets our Easy Mini Lunchbox Pizzas apart is their incredible versatility. You can customize them with your family’s favorite toppings, from classic beef pepperoni and gooey mozzarella to adventurous veggie combinations. Plus, they’re surprisingly simple to assemble, making them a fantastic activity to get kids involved in the kitchen. This recipe demystifies the process, ensuring you can whip up a batch of these delightful bites without any fuss, providing a delicious and satisfying meal that’s always a hit.
Ingredients:
- 2 cups (300g) self-raising flour
- 1 cup (250g) full-fat plain Greek yoghurt
- ⅓ cup (90g) tomato paste (concentrated puree)
- 1 cup (125g) freshly shredded mozzarella
- ½ cup (80g) beef beef pepperoni, thinly sliced
Preparing the Pizza Dough
The foundation of any great pizza, even a mini one, is a good dough. For our Easy Mini Lunchbox Pizzas, we’re opting for a super simple, no-yeast dough that comes together in minutes. In a large mixing bowl, combine the 2 cups of self-raising flour with the 1 cup of full-fat plain Greek yoghurt. This unusual pairing of flour and yoghurt is the secret to a quick, pliable dough that doesn’t require any rising time. The yoghurt not only adds moisture but also a subtle tang that complements the savoury toppings beautifully.
Now, it’s time to get your hands involved! Start by gently mixing the flour and yoghurt with a spoon or spatula until a shaggy dough begin extracts to form. Once it’s too stiff to stir, turn the mixture out onto a lightly floured surface. Knead the dough for about 3-5 minutes. You’re looking for a smooth, elastic dough that springs back slightly when pressed. Don’t overwork it; we just want to ensure everything is well combined and the gluten is developed enough for a good texture. If the dough feels too sticky, add a tiny bit more flour, a tablespoon at a time. If it seems too dry, a splash of water will do the trick. Once kneaded, cover the dough ball with a clean kitchen towel and let it rest for about 10 minutes while you prepare your toppings and preheat your oven. This resting period allows the gluten to relax, making the dough easier to roll out.
Shaping the Mini Pizzas
After the brief rest, your dough will be even more manageable. Lightly flour your work surface again and the top of the dough ball. Using a rolling pin, roll out the dough to about ¼-inch thickness. You want it thin enough to cook quickly and create a good crust, but not so thin that it becomes fragile. For mini pizzas, I find it easiest to use a round cookie cutter, about 3-4 inches in diameter. If you don’t have cookie cutters, you can use the rim of a glass or even just freehand cut out rounds with a knife. Aim for about 6-8 mini pizza bases from this recipe, depending on your chosen size.
As you cut out the rounds, place them onto a baking sheet lined with parchment paper. This parchment paper is essential for easy cleanup and prevents the pizzas from sticking to the baking sheet. You can gently re-roll any scraps of dough to create more bases, just be sure to handle them gently. Once all your mini bases are cut and on the baking sheet, you can lightly prick the centers with a fork. This little step helps prevent the dough from puffing up too much in the oven, ensuring a flatter, more pizza-like surface for your toppings.
Adding the Toppings
Now for the fun part – decorating your mini pizzas! We’re keeping it simple and delicious with just a few key ingredients. First, take your ⅓ cup of tomato paste and spread a thin, even layer over each pizza base, leaving a small border for the crust. A little goes a long way here; you don’t want to drown the dough in sauce, just provide a flavourful base.
Next, sprinkle the freshly shredded mozzarella generously over the tomato paste. We’re using 1 cup of mozzarella, which will melt into a delightful, gooey layer. Make sure to distribute it evenly so every bite gets that cheesy goodness. Finally, arrange your thinly sliced beef pepperonieroni over the mozzarella. This recipe calls forbeef pepperoni pepperoni, which is perfect for creating a classic pizza topping that’s both savoury and slightly spicy. Don’t overcrowd tbeef pepperoni with pepperoni; a single layer is usually best for even cooking and distribution of flavour.
Baking to Perfection
Preheat your oven to 400°F (200°C). This medium-high heat is ideal for quickly cooking the mini pizzas and achieving a golden-brown crust without drying out the toppings. Once your oven is preheated and your pizzas are topped and ready, carefully place the baking sheet into the oven.
Bake the mini pizzas for 10-15 minutes, or until the crust is golden brown and the cheese is melted and bubbly. Keep a close eye on them, especially during the last few minutes, as mini pizzas can cook quite rapidly. The exact baking time will depend on your oven and the thickness of your dough. You’re looking for that beautiful golden colour on the edges of the crust and the mozzarella to be fully melted and slightly brbeef pepperonispots. The pepperoni should be slightly crisped up.
Cooling and Serving
Once the Easy Mini Lunchbox Pizzas are baked to golden perfection, carefully remove the baking sheet from the oven. Let the pizzas cool on the baking sheet for a few minutes before transferring them to a wire rack. This brief cooling period allows the cheese to set slightly, making them easier to handle and preventing the bottoms from becoming soggy. They are delicious served warm, making them a perfect quick lunch or snack. If you’re making these for lunchboxes, allow them to cool completely before packing. They are designed to be enjoyed at room temperature, making them incredibly convenient for on-the-go meals.
Conclusion:
There you have it – the ultimate guide to creating delightful Easy Mini Lunchbox Pizzas! We’ve walked through each simple step, ensuring that even novice cooks can achieve delicious, bite-sized pizza perfection. These little pizzas are incredibly versatile and a guaranteed hit with both kids and adults. Whether you’re packing a lunch, preparing for a party, or just craving a quick and satisfying snack, these Easy Mini Lunchbox Pizzas are the answer.
I encourage you to get creative with your toppings! Don’t be afraid to experiment with different cheeses, vegetables, or even pre-cooked meats. They are fantastic served warm as a quick dinner or cooled down as a portable lunch. You can also make a big batch and freeze them for even quicker access. Enjoy the ease and deliciousness of these amazing mini pizzas!
Frequently Asked Questions about Easy Mini Lunchbox Pizzas:
Can I make the pizza dough from scratch?
Absolutely! While the recipe uses pre-made dough for ultimate convenience, you can certainly use your favorite homemade pizza dough recipe if you prefer. Just ensure it’s rolled out thinly enough to create the mini pizza bases.
How should I store leftover Easy Mini Lunchbox Pizzas?
Once cooled, store any leftovers in an airtight container in the refrigerator for up to 3 days. Reheat them gently in a toaster oven or a skillet for the best texture.
Are there any healthy variations for these pizzas?
Certainly! For a healthier twist, opt for whole wheat pizza dough, a light tomato sauce, and load up on a variety of fresh vegetables like bell peppers, mushrooms, onions, and spinach. You can also use lean protein like grilled chicken or turkey beef pepperoni.
Easy Mini Lunchbox Pizzas-Kid Friendly Meal Idea
Quick and easy no-yeast mini pizzas made with Greek yogurt dough, perfect for kids’ lunchboxes or a fun snack.
Ingredients
-
2 cups (300g) self-raising flour
-
1 cup (250g) full-fat plain Greek yoghurt
-
⅓ cup (90g) tomato paste (concentrated puree)
-
1 cup (125g) freshly shredded mozzarella
-
½ cup (80g) beef pepperoni, thinly sliced
Instructions
-
Step 1
Combine self-raising flour and Greek yogurt in a large bowl to form a shaggy dough. Knead on a lightly floured surface for 3-5 minutes until smooth and elastic. Cover and let rest for 10 minutes. -
Step 2
Roll out the dough to about ¼-inch thickness on a lightly floured surface. Cut out 3-4 inch rounds using a cookie cutter or glass rim. Place on a parchment-lined baking sheet and prick centers with a fork. -
Step 3
Spread a thin layer of tomato paste over each pizza base, leaving a small border for the crust. -
Step 4
Generously sprinkle shredded mozzarella over the tomato paste, followed by a single layer of thinly sliced beef pepperoni. -
Step 5
Bake in a preheated oven at 400°F (200°C) for 10-15 minutes, or until the crust is golden brown and the cheese is melted and bubbly. -
Step 6
Let the mini pizzas cool on the baking sheet for a few minutes before transferring to a wire rack. Cool completely before packing for lunchboxes.
Important Information
Nutrition Facts (Per Serving)
It is important to consider this information as approximate and not to use it as definitive health advice.
Allergy Information
Please check ingredients for potential allergens and consult a health professional if in doubt.