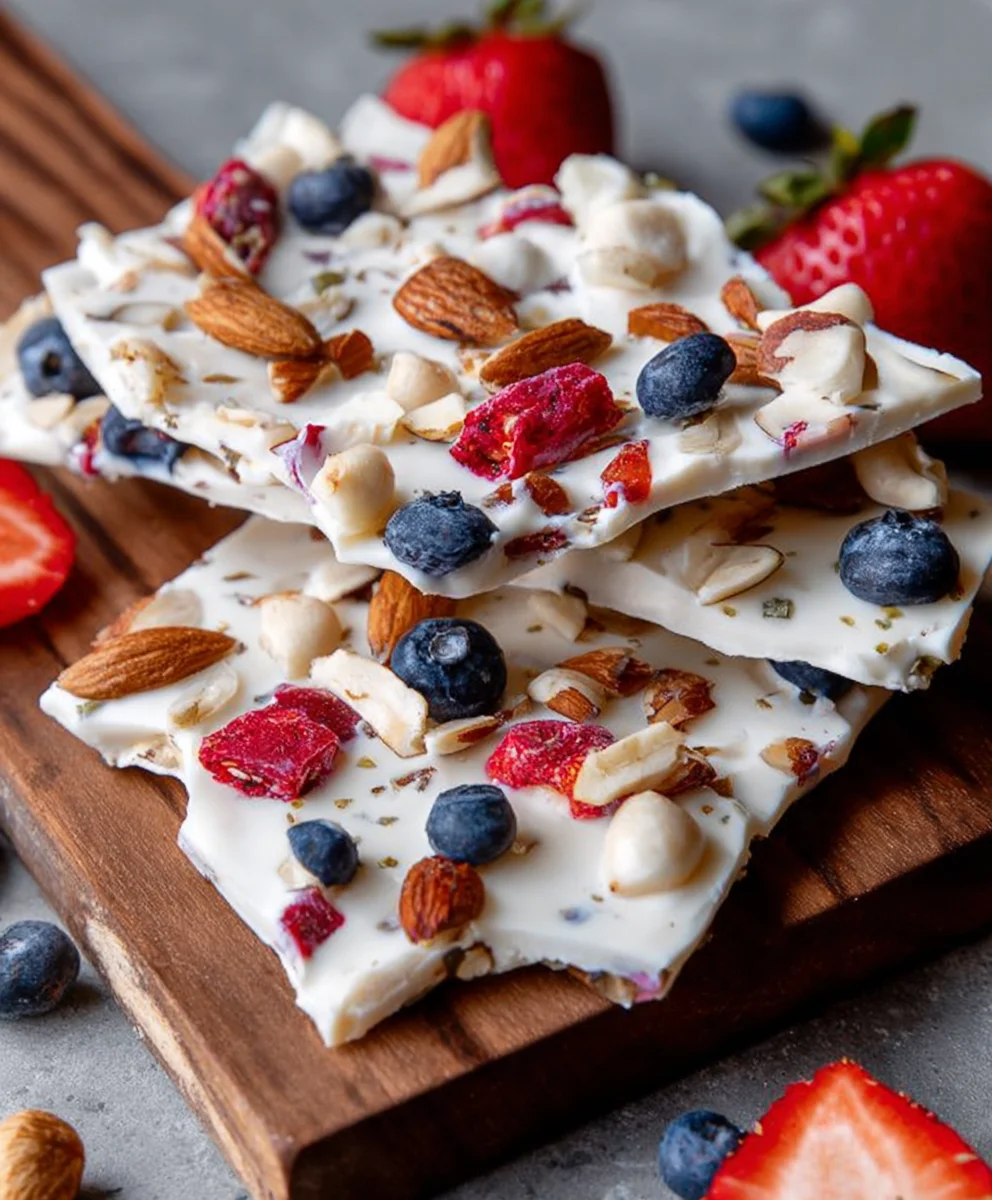
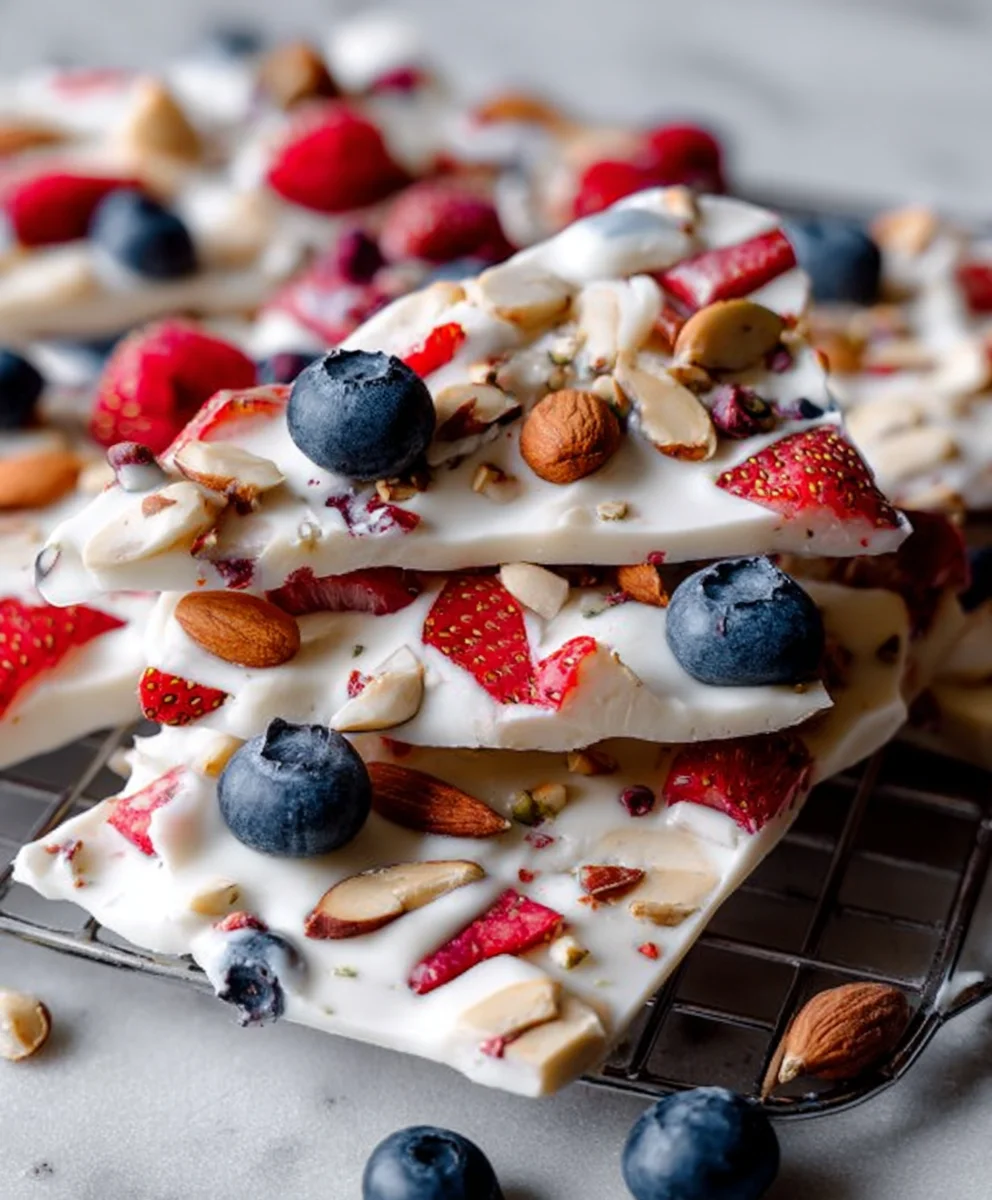
Easy Frozen Yogurt Bark – Berries & Nuts Recipe
How To Make Frozen Yogurt Bark With Berries And Nuts is your invitation to a simple yet sensational treat that perfectly bridges the gap between healthy and utterly delicious. Have you ever craved something cool, refreshing, and bursting with flavor, but also wanted to feel good about what you’re eating? This frozen yogurt bark delivers exactly that. It’s a delightful symphony of textures and tastes – creamy, tangy yogurt provides the perfect canvas for vibrant, juicy berries and the satisfying crunch of assorted nuts. We love it because it’s incredibly versatile; you can customize it with your favorite fruits and toppings, making each batch uniquely yours. What truly sets this How To Make Frozen Yogurt Bark With Berries And Nuts apart is its effortless preparation. It requires no fancy equipment, just a few basic ingredients and a little patience while it freezes, promising a guilt-free indulgence that’s perfect for breakfast, a snack, or even a light dessert.
Ingredients:
- 2 Cups of yogurt (Greek yogurt is excellent for its thickness and protein content)
- 1/4 to 1/2 Cup of honey OR your preferred sweetener (adjust to your sweetness preference; honey adds a lovely natural sweetness and a hint of floral notes)
- 1 Teaspoon of vanilla extract
- A pinch of salt (this might seem unusual, but it actually enhances the sweetness and overall flavor profile of the yogurt)
- Fresh strawberries (about 1 cup, hulled and sliced)
- Fresh blueberries (about 1 cup)
- Your favorite nuts (about 1/2 cup, chopped; almonds, walnuts, pecans, or pistachios all work beautifully)
Preparing the Yogurt Base
Mixing the Yogurt
This is where we create the creamy foundation for our delicious frozen yogurt bark. In a medium-sized mixing bowl, add your 2 cups of yogurt. If you’re using Greek yogurt, you’ll find it’s naturally thicker, which is ideal for this recipe as it will freeze up beautifully without becoming icy. If you’re using regular yogurt, you might want to strain it through a cheesecloth-lined sieve for about 30 minutes in the refrigerator to achieve a similar thicker consistency. This step is optional but highly recommended for the best texture.
Next, we’ll introduce the sweetness. Add your chosen sweetener, starting with 1/4 cup of honey. Honey is fantastic because it not only sweetens but also helps to keep the bark from freezing too hard, making it easier to break and eat. If you prefer a sweeter bark, you can gradually add more, up to 1/2 cup, tasting as you go. Remember, the fruit will also add its own natural sweetness. For those who prefer not to use honey, agave nectar, maple syrup, or even a sugar substitute can be used. Whisk the sweetener into the yogurt until it’s fully incorporated. Don’t rush this step; a smooth blend is key!
Now, let’s add some aromatic depth with the vanilla extract. Pour in 1 teaspoon of vanilla extract. This fragrant addition will elevate the overall flavor, giving your yogurt bark a delightful dessert-like quality. Finally, add just a pinch of salt. This small but mighty ingredient plays a crucial role in balancing the sweetness and bringin extractg out the best in the other flavors. Whisk everything together thoroughly until the mixture is uniform and smooth. You should have a creamy, lightly sweetened, and fragrant yogurt base ready for the next step.
Assembling the Bark
Layering the Toppings
Now for the fun part – transforming our yogurt base into a beautiful and delicious bark! Line a baking sheet with parchment paper. This is essential because it prevents the yogurt from sticking to the baking sheet, allowing for easy removal once frozen. Ensure the parchment paper extends slightly up the sides of the baking sheet, creating a small lip. This will help contain the yogurt mixture and toppings.
Pour your prepared yogurt mixture onto the parchment-lined baking sheet. Using a spatula or the back of a spoon, spread the yogurt evenly into a thin layer, aiming for a thickness of about 1/4 to 1/2 inch. The thinner you spread it, the quicker it will freeze and the easier it will be to break into pieces. Try to create a relatively smooth surface, although a slightly uneven surface is perfectly fine and adds to the rustic charm of the bark.
It’s time to decorate our canvas with vibrant and flavorful toppings! Scatter your sliced strawberries and whole blueberries evenly over the surface of the yogurt. Distribute them so you get a good mix of fruit in every bite. Don’t be shy with the berries; they add a wonderful tartness and burst of flavor that complements the sweet yogurt beautifully.
Next, sprinkle your chopped nuts generously over the fruit and yogurt. The nuts provide a delightful crunch and a healthy dose of healthy fats and protein. If you’re using different types of nuts, try to spread them out for visual appeal and varied texture. You can gently press the fruit and nuts into the yogurt mixture with your fingertips or the back of your spatula to help them adhere as the bark freezes. This ensures they stay put when you break and enjoy your finished bark.
Freezing and Breaking
Chilling to Perfection
Once your yogurt bark is beautifully decorated, it’s time to let the magic happen in the freezer. Carefully place the baking sheet into your freezer. Allow it to freeze for at least 4 to 6 hours, or until it is completely solid. The exact freezing time will depend on the thickness of your bark and the temperature of your freezer. It’s important to ensure it’s thoroughly frozen so you can easily break it into pieces. For best results and to avoid any accidental disturbances, it’s a good idea to freeze it overnight.
After the yogurt bark has achieved a solid state, it’s time to enjoy it! Gently lift the parchment paper with the frozen bark off the baking sheet. If it’s firmly frozen, it should peel away easily. You can then place the entire sheet onto a cutting board.
Now, you can break the bark into irregular pieces. Use your hands to snap off pieces of varying sizes. Alternatively, if you want more uniform pieces, you can use a sharp knife to score or cut the bark before it fully thaws, or break it into smaller shards using the edge of the cutting board. The beauty of yogurt bark is its rustic nature, so don’t worry about perfect shapes!
Conclusion:
Congratulations! You’ve mastered the art of crafting delicious and healthy How To Make Frozen Yogurt Bark With Berries And Nuts. This simple yet impressive treat is perfect for a quick breakfast, a post-workout snack, or even a guilt-free dessert. The creamy yogurt, vibrant berries, and satisfying crunch of nuts create a symphony of flavors and textures that will have everyone asking for seconds.
For serving suggestions, consider breaking the bark into irregular pieces and serving them in a bowl, perhaps with a drizzle of honey or a dollop of extra yogurt. It’s also fantastic served alongside fresh fruit for a beautiful brunch spread. When it comes to variations, feel free to experiment! Swap out the berries for sliced bananas or mango, or try different nut combinations like almonds and pistachios. You can also add a sprinkle of chia seeds or shredded coconut for extra nutrition and flavor. Don’t be afraid to get creative and make this recipe your own!
I hope you enjoy making and eating this delightful How To Make Frozen Yogurt Bark With Berries And Nuts as much as I do. It’s a fantastic way to nourish your body while indulgin extractg in something truly tasty. Happy treating!
Frequently Asked Questions:
Can I use different types of yogurt for this recipe?
Absolutely! While plain Greek yogurt provides a wonderfully creamy and protein-rich base, you can also use regular plain yogurt or even a dairy-free alternative like coconut or almond yogurt. Just be mindful that non-Greek yogurts might be thinner, so you might need to reduce the freezing time slightly.
How long will the frozen yogurt bark last?
Properly stored, your How To Make Frozen Yogurt Bark With Berries And Nuts can last for up to 1-2 weeks in the freezer. It’s best to keep it in an airtight container or a freezer-safe bag to prevent freezer burn and maintain its texture.
Is this recipe suitable for children?
Yes, this recipe is wonderfully kid-friendly! It’s a great way to get children to enjoy fruit and yogurt. You can involve them in the process by letting them help spread the yogurt and sprinkle the toppings. Just ensure the nuts are finely chopped or omitted for very young children to avoid choking hazards.
Easy Frozen Yogurt Bark – Berries & Nuts Recipe
A simple and refreshing frozen yogurt bark loaded with berries and nuts. Perfect for a healthy treat or snack.
Ingredients
-
2 Cups of yogurt
-
1/4 Cup of honey
-
1 Teaspoon of vanilla extract
-
Pinch of salt
-
1 Cup of fresh strawberries, hulled and sliced
-
1 Cup of fresh blueberries
-
1/2 Cup of chopped nuts of choice
Instructions
-
Step 1
In a medium bowl, combine yogurt, honey (or sweetener), vanilla extract, and a pinch of salt. Whisk until smooth and well combined. -
Step 2
Line a baking sheet with parchment paper, ensuring it extends slightly up the sides. -
Step 3
Pour the yogurt mixture onto the parchment-lined baking sheet and spread it into an even layer, about 1/4 to 1/2 inch thick. -
Step 4
Scatter sliced strawberries and blueberries evenly over the yogurt layer. -
Step 5
Sprinkle the chopped nuts generously over the berries and yogurt. Gently press toppings into the yogurt to help them adhere. -
Step 6
Place the baking sheet in the freezer and freeze for at least 4-6 hours, or until completely solid. Overnight freezing is recommended for best results. -
Step 7
Once frozen, lift the parchment paper from the baking sheet and break the bark into irregular pieces by hand or with a knife.
Important Information
Nutrition Facts (Per Serving)
It is important to consider this information as approximate and not to use it as definitive health advice.
Allergy Information
Please check ingredients for potential allergens and consult a health professional if in doubt.