Easter Bunny Punch- Delightful Non-Non-Non-Alcoholic Alternativeic Drink
Easter Bunny Punch is more than just a festive drink; it’s a vibrant burst of springtime joy that transforms any gathering into a whimsical celebration. Imagin extracte a beautiful, pastel-hued concoction, shimmering with the promise of warmer days and sweet treats. This delightful beverage is a crowd-pleaser for so many reasons. Children adore its playful name and visually appealing colors, while adults appreciate its refreshing taste and the hint of sophistication it brings to any brunch or party table. What truly makes our Easter Bunny Punch special is its delightful balance of fruity sweetness and a subtle, effervescent kick that dances on your tongue. It’s the perfect way to toast tgin extractew beginnings and the delightful spirit of the season. Get ready to mix up a batch of this unforgettable, delightful drink that will have everyone hopping with delight!

Ingredients:
- 2 to 3 scoops of strawberry ice cream
- ½ cup strawberry lemonade
- ½ cup lemon-lime soda
- Bunny Peeps marshmallow candies (for garnish)
- Mini marshmallows (for garnish)
- Colorful sprinkles (for garnish)
Let’s Get Mixing!
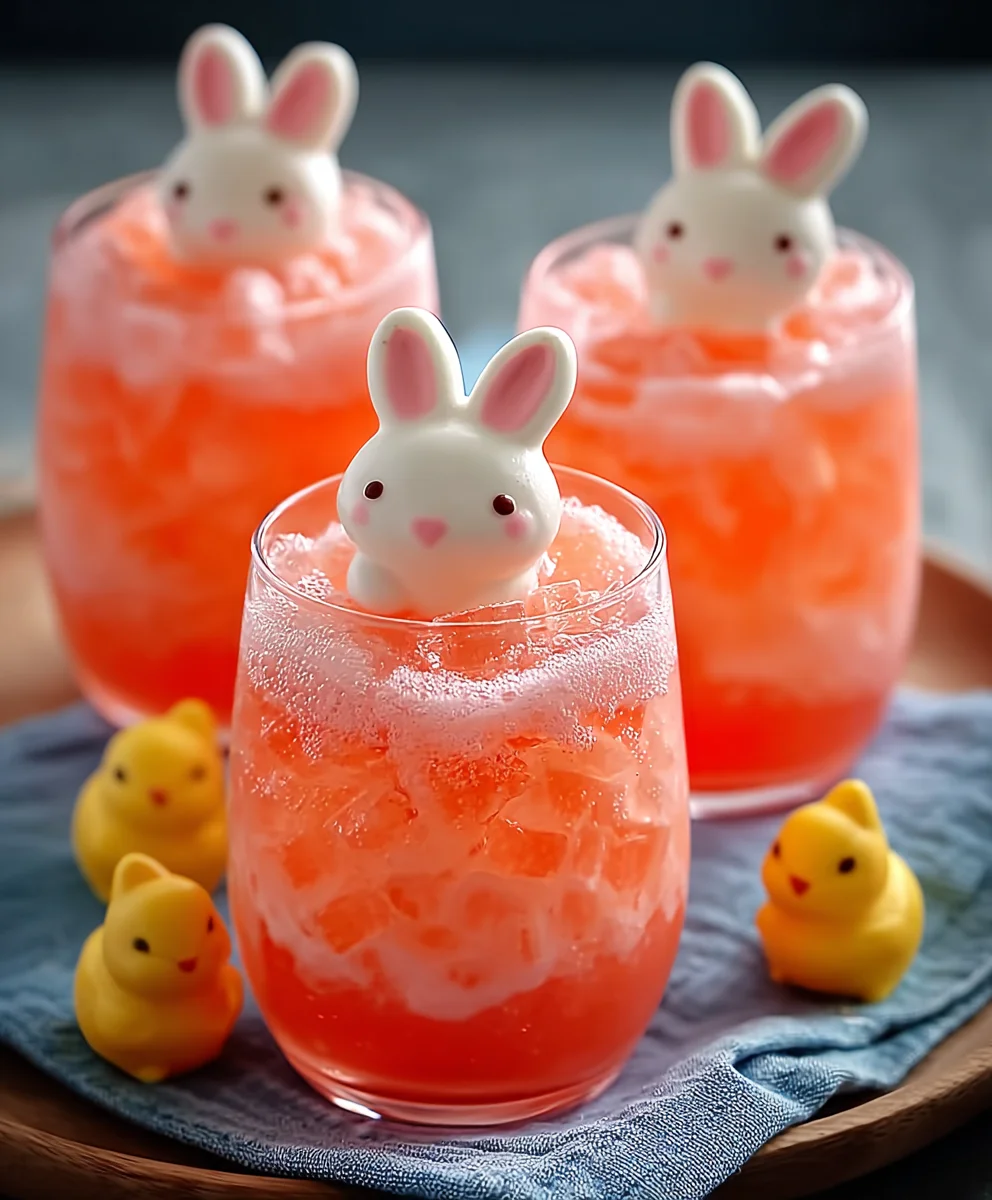
This Easter Bunny Punch is a delightful and visually appealing drink that’s perfect for any springtime celebration, especially Easter! It’s incredibly easy to make, requiring just a few ingredients and minimal effort, making it a fantastic choice for a fun activity with kids or a refreshing treat for your guests. The vibrant pink hue and festive toppings truly capture the spirit of the holiday.
Gathering Your Supplies
Before we dive into the fun of creating this Easter Bunny Punch, let’s make sure you have everything ready. You’ll need a blender or a sturdy whisk, a measuring cup, and your serving glasses. For the best presentation, consider using clear glasses so the beautiful colors and garnishes are on full display. Having your garnishes, like the Bunny Peeps, mini marshmallows, and colorful sprinkles, prepped and ready to go will make the decorating process smooth and enjoyable.
Step 1: Building the Creamy Base
Our first step is to create the luscious, creamy foundation for our Easter Bunny Punch. Grab your blender. Carefully add the 2 to 3 scoops of strawberry ice cream into the blender jar. The amount of ice cream you use will determine the thickness and richness of your punch. For a more milkshake-like consistency, opt for 3 generous scoops. If you prefer a lighter, more drinkable punch, 2 scoops will be perfectly adequate. Ensure your ice cream is slightly softened, not rock-hard, as this will make blending much easier and result in a smoother texture.
Step 2: Adding the Tangy Sweetness
Next, we’ll introduce the fruity and refreshing elements that balance the richness of the ice cream. Pour ½ cup of strawberry lemonade into the blender. The strawberry lemonade will not only add a delightful sweetness and a hint of tartness but also enhance the vibrant pink color of our punch. Following that, carefully pour in ½ cup of lemon-lime soda. The carbonation from the soda is key to giving this punch its signature effervescence and light, bubbly texture. Be sure to pour the soda in gently to avoid too much immediate fizzing over the blender lid.
Step 3: Blending to Perfection
Now it’s time to bring everything together! Secure the lid on your blender. Start by pulsing the ingredients a few times to break down the ice cream and combine the liquids. Then, blend on a medium to high speed until the mixture is smooth and creamy. You’re looking for a consistent texture, free of large ice cream chunks. If the mixture seems too thick and the blender is struggling, you can add another splash of lemon-lime soda or a tiny bit more strawberry lemonade to help it along. Avoid over-blending, as this can melt the ice cream too much and make the punch watery. Alternatively, if you don’t have a blender, you can vigorously whisk all the ingredients in a large bowl until the ice cream is mostly incorporated and the mixture is frothy. This method will result in a slightly less smooth but still delicious punch.
Step 4: Pouring and Preparing for Garnish
Once your Easter Bunny Punch has reached your desired consistency, it’s time to pour it into your serving glasses. Carefully ladle or pour the creamy mixture into each glass. Fill the glasses about three-quarters of the way full. This leaves enough room at the top for our festive garnishes. If you’re serving this immediately, you can proceed to the next step. For best results, however, you might want to chill the punch in the refrigerator for about 15-20 minutes before garnishing. This will allow the flavors to meld and ensure the punch is nice and cold.
Step 5: Decorating with Easter Cheer
This is where the magic happens and our Easter Bunny Punch truly comes to life! Take your Bunny Peeps marshmallow candies and gently press them onto the rim of each glass, or float one or two on top of the punch. Their adorable bunny shapes instantly evoke an Easter theme. Next, sprinkle a handful of mini marshmallows into each glass. They’ll float on the surface and add a delightful chewy texture. Finally, add a generous dusting of colorful sprinkles over the top. The sprinkles will catch the light and add a burst of color, making your punch look like a festive work of art. You can even add a colorful straw for an extra touch of fun and ease of drinking. This final step is all about creativity and adding that special Easter flair that will delight guests of all ages.
Conclusion:
And there you have it – the delightful and easy-to-make Easter Bunny Punch! This vibrant and refreshing beverage is sure to be a hit at any spring gathering, bringin extractg a burst of color and flavor to your table. We’ve covered everything from the simple steps to create this crowd-pleaser to some fantastic serving and variation ideas. Don’t be afraid to get creative and tailor this punch to your own tastes and the occasion. Whether you’re hosting a large Easter brunch or a small family get-together, the Easter Bunny Punch is a guaranteed way to add some festive cheer. So gather your ingredients, mix up a batch, and enjoy the smiles it brings!
Frequently Asked Questions about Easter Bunny Punch:
Can I make the Easter Bunny Punch ahead of time?
Yes, you absolutely can! You can prepare the base of the punch (juices and soda) a few hours in advance and store it in the refrigerator. It’s best to add the sparkling elements like lemon-lime gin extracta or ginger non-alcoholic ale just before serving to maintain their fizziness. Add your fruit and garnishes right before guests arrive for the freshest look.
What are some non-non-non-alcoholic alternativeic variations for the Easter Bunny Punch?
The base recipe for the Easter Bunny Punch To elevate the festive feel of your Easter Bunny Punch, get creative with your garnishes! Consider using Easter-themed cookie cutters to create fun shapes from slices of pineapple or melon. You can also rim the glasses with colorful sanding sugar or add candy-coated chocolates that resemble Easter eggs. For a touch of whimsy, float a few fresh berries or mint sprigs on top. A delightful and visually appealing non-alcoholic punch perfect for Easter and springtime celebrations, featuring a creamy strawberry base and festive marshmallow and sprinkle garnishes. It is important to consider this information as approximate and not to use it as definitive health advice. Please check ingredients for potential allergens and consult a health professional if in doubt.How can I make the Easter Bunny Punch even more festive?
Easter Bunny Punch – Delightful Non-Alcoholic Drink
Ingredients
Instructions
Add 2 to 3 scoops of strawberry ice cream to a blender. For a thicker punch, use 3 scoops; for a lighter version, use 2 scoops. Ensure the ice cream is slightly softened.
Pour ½ cup of strawberry lemonade into the blender to add sweetness and enhance the pink color. Then, gently pour in ½ cup of lemon-lime soda for effervescence and a bubbly texture.
Secure the blender lid and pulse a few times to combine. Blend on medium to high speed until smooth and creamy, avoiding large ice cream chunks. If too thick, add a splash more soda or lemonade. Alternatively, whisk vigorously in a bowl.
Pour the punch into serving glasses, filling them about three-quarters full to leave space for garnishes. For best results, chill for 15-20 minutes before decorating.
Decorate each glass by placing Bunny Peeps on the rim or floating on top. Add a handful of mini marshmallows and a generous dusting of colorful sprinkles for a festive Easter look.
Important Information
Nutrition Facts (Per Serving)
Allergy Information