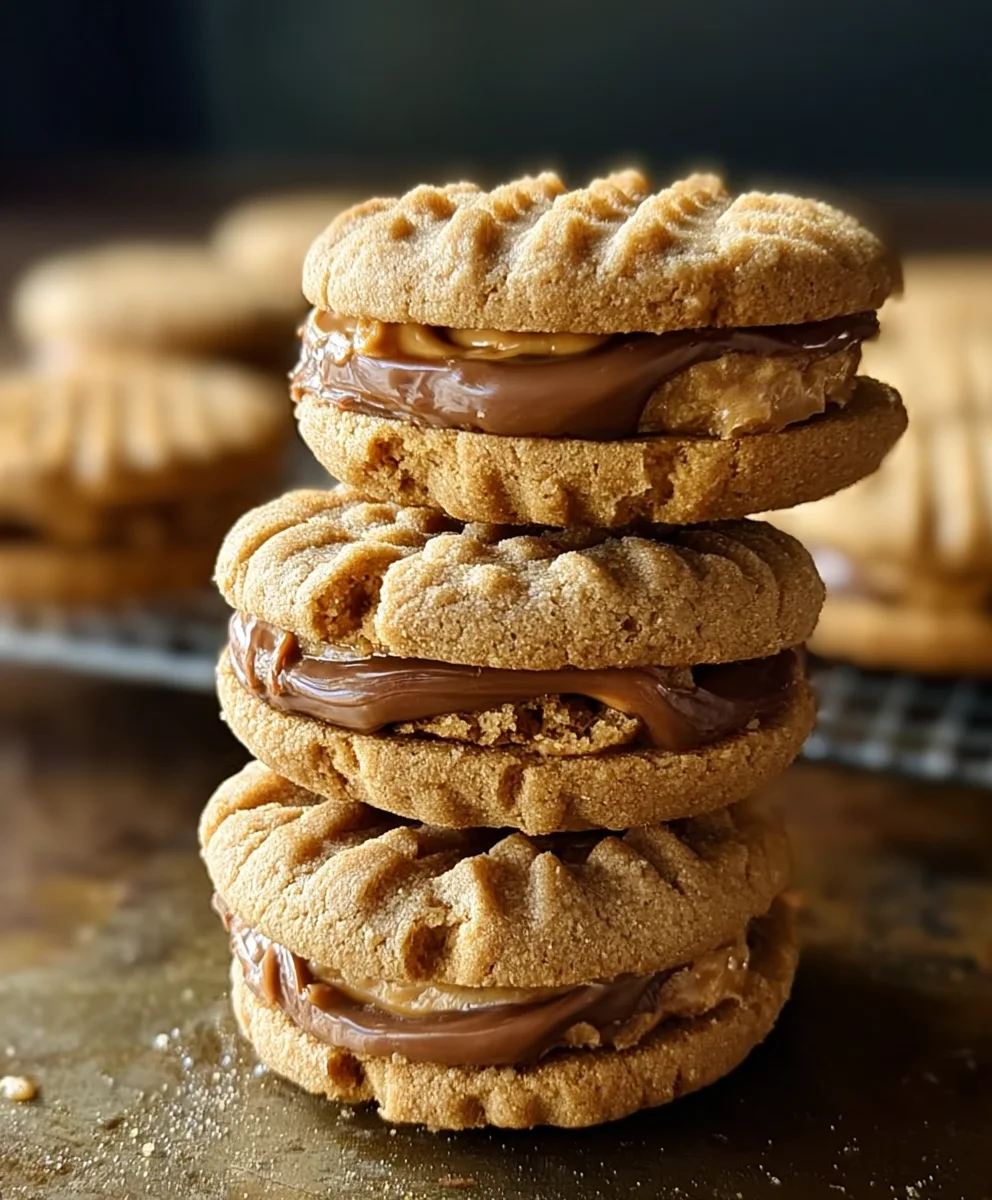
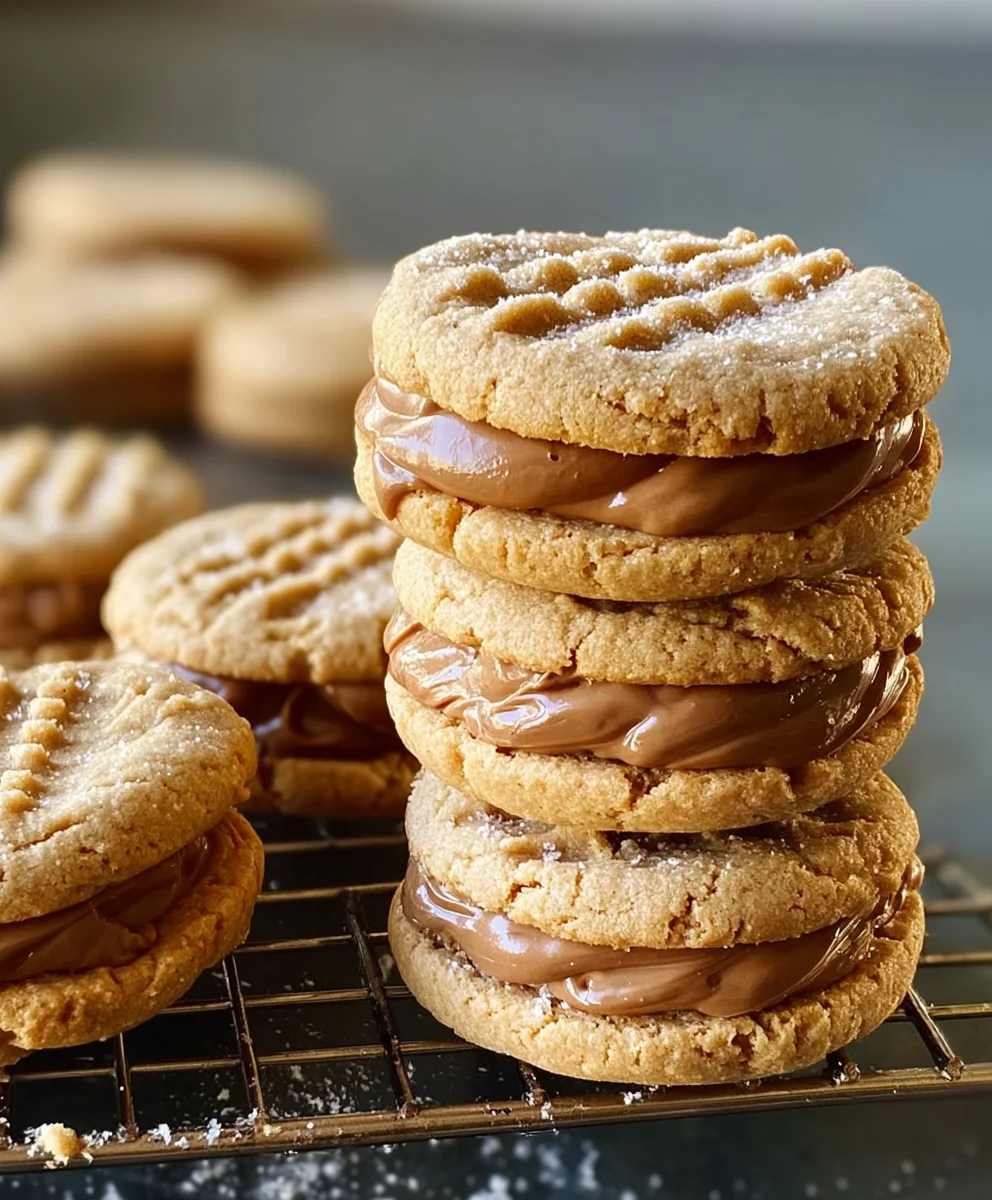
Easy Peanut Butter Sandwich Cookies-Homemade Treat
Peanut Butter Sandwich Cookies are a nostalgic delight that evokes childhood memories and pure comfort with every bite. There’s something inherently magical about combining two beloved treats into one perfect package. These aren’t just any cookies; they’re a symphony of textures and flavors, marrying the satisfying chew of a soft peanut butter cookie with the creamy, sweet embrace of a rich filling. What truly sets these Peanut Butter Sandwich Cookies apart is their ability to transport you back to simpler times, while simultaneously offering an elevated, gourmet experience. Whether you’re craving a classic treat or looking to impress with a homemade marvel, these cookies are guaranteed to bring smiles and satisfy even the most discerning sweet tooth. Get ready to fall in love all over again with this iconic dessert.
Ingredients:
- 1 cup creamy peanut butter
- 1 cup granulated sugar
- 1 large egg
- 1 teaspoon vanilla extract
- 1/2 cup butter, softened
- 1/4 cup packed brown sugar
- 1 cup powdered sugar
- 3 tablespoons heavy cream
Making the Peanut Butter Cookie Dough
This recipe for Peanut Butter Sandwich Cookies is surprisingly simple and yields incredibly delicious results. We’ll start by crafting the perfect peanut butter cookie base. In a medium-sized mixing bowl, combine the creamy peanut butter and the granulated sugar. I like to use a sturdy spoon or a rubber spatula for this step, as the mixture can get quite thick. Cream these two ingredients together until they are well incorporated and the texture is smooth and uniform. This is crucial for a good cookie texture.
Next, crack in the large egg. This acts as a binder, holding all our delicious ingredients together. Follow this with the vanilla extract. Vanilla adds a subtle depth of flavor that complements the peanut butter beautifully. Mix everything thoroughly until the egg is fully integrated into the peanut butter and sugar mixture. The dough at this stage will be quite soft and pliable, which is exactly what we want.
Now, we’ll move on to shaping the cookies. Preheat your oven to 350 degrees Fahrenheit (175 degrees Celsius). Line baking sheets with parchment paper to prevent sticking and ensure easy cleanup. I find it easiest to roll the dough into small balls, about 1 inch in diameter. You can use a cookie scoop for uniformity, or just eyeball it if you’re feeling more casual. Once you have your balls of dough, place them about 2 inches apart on the prepared baking sheets. They will spread as they bake, so giving them some space is important.
For that classic peanut butter cookie look and to help them bake evenly, gently press down on each dough ball with the tines of a fork. You can create a crisscross pattern, or just a simple flatten. This step not only adds to the aesthetic but also ensures that the cookies bake through without the centers remaining doughy. Bake for 10-12 minutes, or until the edges are lightly golden brown. The centers might still look a little soft, but they will continue to cook as they cool on the baking sheet. Let them cool on the baking sheets for about 5 minutes before transferring them to a wire rack to cool completely. This prevents them from breaking.
Crafting the Creamy Peanut Butter Filling
While our cookies are cooling, we’ll prepare the delightful filling that makes these cookies truly special. In a separate mixing bowl, begin extract by creaming together the softened butter and the packed brown sugar. Using softened butter is key here; it should be pliable but not melted. This mixture should be light and fluffy, so I recommend using an electric mixer on medium speed for a couple of minutes. This will help incorporate air, making the filling wonderfully smooth.
Once the butter and brown sugar are well combined and fluffy, gradually add the powdered sugar, about half a cup at a time, mixing well after each addition. This gradual addition prevents a cloud of powdered sugar from erupting from your bowl and ensures a smooth, lump-free filling. Continue mixing until all the powdered sugar is incorporated and the mixture is smooth and creamy. You might need to scrape down the sides of the bowl a few times to ensure everything is evenly mixed.
Now, it’s time to add the heavy cream. Start with 2 tablespoons of heavy cream and mix it into the peanut butter and sugar mixture. The cream will help achieve the perfect consistency for our filling – smooth, spreadable, and not too stiff. If the filling seems a little too thick for your liking, you can add the remaining tablespoon of heavy cream, mixing until it reaches your desired consistency. You want a filling that is rich and decadent, but still easy to spread. Taste the filling at this stage and adjust sweetness if needed, though typically the combination of sugars and peanut butter is perfect.
Assembling the Peanut Butter Sandwich Cookies
Once your peanut butter cookies are completely cool, it’s time for the fun part: assembly! Find pairs of cookies that are roughly the same size. This will make for the most visually appealing and evenly filled sandwich cookies. Take one cookie and spread a generous dollop of the creamy peanut butter filling onto the flat side. Don’t be shy with the filling; it’s what makes these cookies so irresistible. You can use a small offset spatula or even the back of a spoon to spread the filling evenly, going almost all the way to the edges.
Carefully place the second cookie on top of the filling, with the flat side down, and gently press to sandwich the filling between the two cookies. The filling will spread slightly, creating a beautiful seal around the edges. Repeat this process with the remaining cookies and filling until you have a delightful stack of Peanut Butter Sandwich Cookies. If you want to add an extra touch of flair, you can gently press the filled edges into some additional sprinkles, chopped peanuts, or even some melted chocolate drizzle. These cookies are best enjoyed at room temperature, but they can also be stored in an airtight container in the refrigerator for a slightly firmer filling.
Conclusion:
I hope you’ve enjoyed learning how to make these delightful Peanut Butter Sandwich Cookies! We’ve walked through each step to create these wonderfully chewy, peanut buttery cookies, sandwiched together with a sweet and creamy filling. They’re perfect for any occasion, from a quick afternoon treat to a show-stopping addition to a cookie platter. The aroma filling your kitchen as they bake is truly irresistible, and the taste is even better!
These Peanut Butter Sandwich Cookies are incredibly versatile. They make a fantastic dessert on their own, but they’re also delicious served with a cold glass of milk or a hot cup of coffee. For an extra touch of indulgence, try drizzling them with a little melted chocolate. You can also get creative with the filling! Consider using a chocolate ganache, a cream cheese frosting, or even a fruit jam for a different flavor profile. Don’t be afraid to experiment and make them your own!
So go ahead, gather your ingredients and give these Peanut Butter Sandwich Cookies a try. I’m confident you’ll love the results. Happy baking, and enjoy every delicious bite!
Frequently Asked Questions:
How can I store Peanut Butter Sandwich Cookies?
Once cooled, store your Peanut Butter Sandwich Cookies in an airtight container at room temperature for up to 3-4 days. For longer storage, you can freeze them individually wrapped in plastic wrap, then placed in a freezer-safe bag or container for up to 2-3 months. Thaw them at room temperature before enjoying.
Can I make the cookie dough ahead of time?
Yes, absolutely! You can prepare the cookie dough for the Peanut Butter Sandwich Cookies, cover it tightly with plastic wrap, and refrigerate it for up to 2 days. This chilling time can actually enhance the flavor. You can also freeze the dough for up to 3 months. When ready to bake, let the dough thaw in the refrigerator overnight and then proceed with the recipe as usual.
Easy Peanut Butter Sandwich Cookies-Homemade Treat
Simple and delicious homemade peanut butter sandwich cookies with a creamy peanut butter filling.
Ingredients
-
1 cup creamy peanut butter
-
1 cup granulated sugar
-
1 large egg
-
1 teaspoon vanilla extract
-
1/2 cup butter, softened
-
1/4 cup packed brown sugar
-
1 cup powdered sugar
-
3 tablespoons heavy cream
Instructions
-
Step 1
In a medium bowl, combine creamy peanut butter and granulated sugar. Cream together until well incorporated and smooth. -
Step 2
Add the large egg and vanilla extract. Mix thoroughly until the egg is fully integrated. -
Step 3
Preheat oven to 350°F (175°C). Line baking sheets with parchment paper. Roll dough into 1-inch balls, place on baking sheets about 2 inches apart, and press with a fork. -
Step 4
Bake for 10-12 minutes, or until edges are lightly golden brown. Let cool on baking sheets for 5 minutes, then transfer to a wire rack to cool completely. -
Step 5
While cookies cool, prepare the filling. Cream softened butter and packed brown sugar until light and fluffy using an electric mixer. -
Step 6
Gradually add powdered sugar, mixing well after each addition until smooth and creamy. -
Step 7
Add 2 tablespoons of heavy cream and mix. Add the remaining tablespoon if needed to reach a smooth, spreadable consistency. -
Step 8
Once cookies are completely cool, spread a generous dollop of filling onto the flat side of one cookie. Top with another cookie and gently press to sandwich.
Important Information
Nutrition Facts (Per Serving)
It is important to consider this information as approximate and not to use it as definitive health advice.
Allergy Information
Please check ingredients for potential allergens and consult a health professional if in doubt.