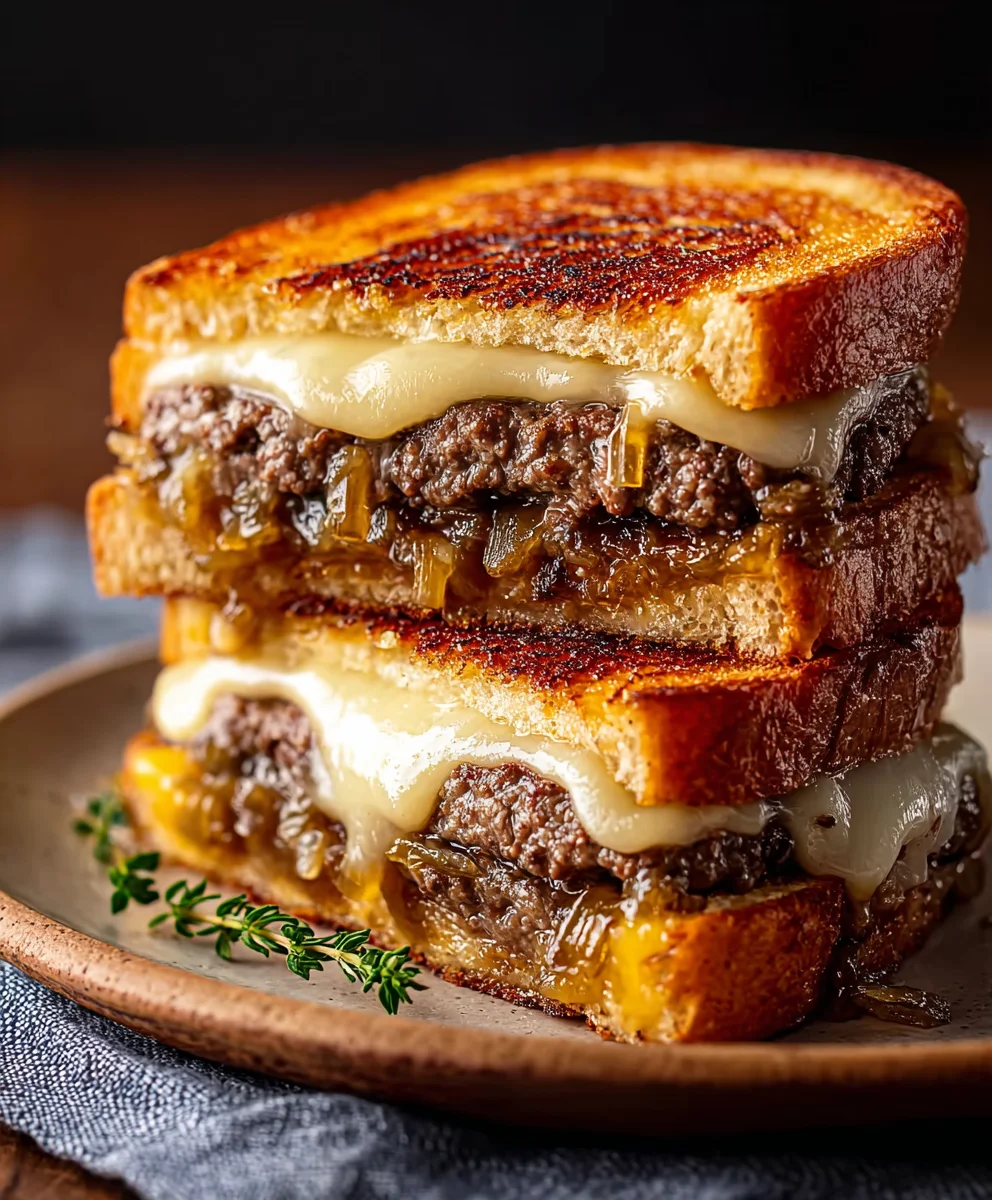
Classic Beef Patty Melt Recipe- Juicy and Delicious
Classic Beef Patty Melt, oh where do I even begin extract? This isn’t just a sandwich; it’s a nostalgic embrace, a symphony of savory, gooey, and crispy all wrapped up in one glorious bite. For generations, people have fallen head over heels for the humble yet extraordinary Classic Beef Patty Melt. What is it about this diner staple that captures our hearts and our taste buds? Perhaps it’s the perfect marriage of tender, seasoned ground beef, melty cheese, and sweet caramelized onions, all nestled between buttery, toasted rye bread. It’s the ultimate comfort food, the kind of meal that makes a rainy day feel brighter and a simple lunch feel like a decadent treat. This recipe takes that beloved Classic Beef Patty Melt and elevates it just a touch, ensuring every element is in perfect harmony. Get ready to recreate this icon in your own kitchen!
Ingredients:
- 1 pound Thomas Farms ground beef
- ½ teaspoon salt (for the beef mixture)
- ½ teaspoon black pepper (for the beef mixture)
- 1 teaspoon garlic powder (for the beef mixture)
- 2 tablespoons unsalted butter (for sautéing onions and peppers)
- 1 red onion, sliced thinly
- 1 green pepper, sliced thinly
- ½ teaspoon salt (for the onion and pepper mixture)
- 4-8 slices of bread (Sourdough or your favorite sandwich bread works wonderfully for this)
- 5-6 slices of sharp cheddar cheese
- ½ cup shredded Gruyere cheese
- 2-3 tablespoons butter (for grilling the sandwiches)
Preparing the Beef Patties
Forming the Patties
Start by taking your 1 pound of Thomas Farms ground beef and placing it in a medium-sized bowl. This is where we’ll build the flavor for our beef. Add the ½ teaspoon of salt, ½ teaspoon of black pepper, and the 1 teaspoon of garlic powder directly to the ground beef. Now, this is crucial for a tender and flavorful patty: use your hands to gently mix the seasonings into the beef. Avoid overworking the meat, as this can make the patties tough. Think of it as a gentle massage rather than a vigorous kneading. Once the seasonings are evenly distributed, divide the beef mixture into two equal portions. Shape each portion into a patty that is slightly larger than your bread slices. They will shrink as they cook. You can make a slight indentation in the center of each patty with your thumb; this helps them cook more evenly and prevents them from puffing up in the middle. Set these formed patties aside.
Sautéing the Vegetables
Caramelizing the Onions and Peppers
Next, we’ll prepare the savory vegetable mixture that adds another layer of deliciousness to our patty melt. Take your thinly sliced red onion and green pepper and place them into a skillet. Add the 2 tablespoons of unsalted butter to the skillet. Set the heat to medium-low. We want to allow these vegetables to soften and caramelize slowly, which will bring out their natural sweetness and create a wonderfully rich flavor. Stir them occasionally. This process can take about 15-20 minutes. You’re looking for the onions to become translucent and slightly browned, and the peppers to be tender. Once they’ve reached this point, sprinkle them with the ½ teaspoon of salt. This helps to draw out any excess moisture and further enhances their flavor. Remove the sautéed vegetables from the skillet and set them aside, keeping them warm.
Cooking the Beef Patties
Achieving a Perfect Sear
Now it’s time to cook our beef patties. You can use the same skillet you used for the vegetables, or a clean one. Heat the skillet over medium-high heat. You don’t need to add any extra oil unless your skillet is particularly prone to sticking. Once the skillet is hot, carefully place your formed beef patties into it. Let them cook undisturbed for about 3-4 minutes per side for medium-rare, or longer depending on your desired level of doneness. We’re looking for a nice, golden-brown sear on each side. This sear is key to locking in the juices and providing that satisfying beefy flavor. Use a spatula to flip them gently. Once cooked to your liking, remove the patties from the skillet and place them on a plate.
Assembling the Patty Melts
Layering for Deliciousness
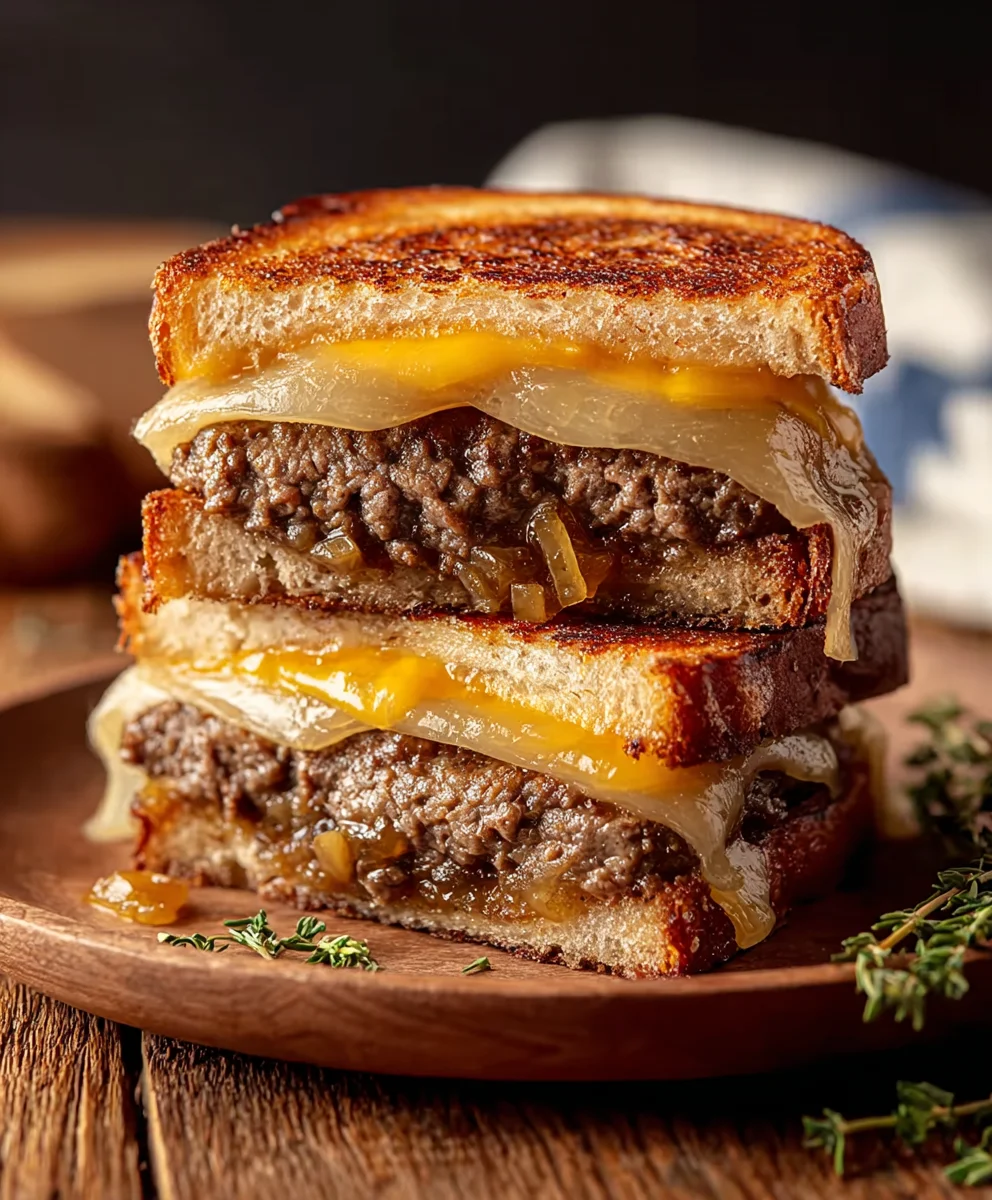
This is where all the components come together to create the ultimate patty melt experience. Take your bread slices. You can toast them lightly beforehand if you prefer a crispier base, but it’s not strictly necessary as they will toast in the pan. Lay out your bread slices. On one slice of bread for each sandwich, place a generous portion of your sautéed red onion and green pepper mixture. This is where the magic begin extracts to happen. Next, place one cooked beef patty on top of the vegetable layer. Now, it’s time for the cheese. Top each beef patty with 2-3 slices of sharp cheddar cheese. Make sure they cover the patty well. Then, sprinkle the shredded Gruyere cheese over the cheddar. The Gruyere adds a wonderfully nutty and complex flavor that complements the cheddar beautifully. Finally, place the remaining slice of bread on top to complete your sandwich.
Grilling the Patty Melts
Achieving Golden-Brown Perfection
The final step is to grill these beauties to golden-brown perfection. Heat a clean skillet or griddle over medium heat. Generously butter the outsides of each assembled sandwich using the 2-3 tablespoons of butter. You want enough butter to ensure a nice crisp and even browning. Carefully place the buttered sandwiches into the heated skillet. Grill for about 4-5 minutes per side, or until the bread is a beautiful golden brown and the cheese inside is wonderfully melted and gooey. You might need to adjust the heat slightly to prevent burning while ensuring the cheese has enough time to melt. Press down gently on the sandwiches with your spatula occasionally to help them cook evenly and encourage cheese melty-ness. Once they’re perfectly grilled and the cheese is oozing out, remove them from the skillet. Let them rest for just a minute before slicing them in half. Enjoy your classic beef patty melt!
Conclusion:
And there you have it – a guide to crafting the perfect Classic Beef Patty Melt! We’ve explored how simple ingredients and straightforward steps can lead to a truly satisfying sandwich. This dish is more than just a meal; it’s a comforting classic that’s incredibly versatile. Whether you’re enjoying it for a quick lunch, a hearty dinner, or even a late-night craving, the Classic Beef Patty Melt never disappoints.
For serving suggestions, consider pairing your Classic Beef Patty Melt with a side of crispy french fries, a light coleslaw, or a simple green salad to balance the richness. This sandwich is also fantastic alongside a bowl of tomato soup for an ultimate comfort food experience. Don’t be afraid to experiment with variations! You can try different types of cheese like Gruyere or Provolone, add caramelized onions for extra sweetness, or even incorporate a touch of horseradish into your sauce for a zesty kick. The possibilities are endless, and the delicious results are guaranteed. We hope you enjoy making and devouring this fantastic Classic Beef Patty Melt!
Frequently Asked Questions:
What kind of bread is best for a Classic Beef Patty Melt?
While rye bread is the traditional choice and highly recommended for its distinct flavor that complements the beef and cheese beautifully, you can also use sourdough or a sturdy whole wheat bread. The key is a bread that can hold up to the juices and butter without becoming soggy.
Can I make the beef patty ahead of time?
Yes, you can definitely form your beef patties ahead of time. Store them in the refrigerator, separated by parchment paper, for up to a day. This can save you valuable time when you’re ready to assemble and cook your Classic Beef Patty Melt.
Classic Beef Patty Melt Recipe- Juicy and Delicious
A classic and delicious beef patty melt recipe featuring juicy beef patties, caramelized onions and peppers, and melted cheeses, grilled to golden-brown perfection.
Ingredients
-
1 pound Thomas Farms ground beef
-
1 teaspoon garlic powder
-
2 tablespoons unsalted butter
-
1 red onion, sliced thinly
-
1 green pepper, sliced thinly
-
4-8 slices of sourdough bread
-
5-6 slices of sharp cheddar cheese
-
½ cup shredded Gruyere cheese
-
2-3 tablespoons butter
Instructions
-
Step 1
In a bowl, gently mix 1 pound of ground beef with ½ teaspoon salt, ½ teaspoon black pepper, and 1 teaspoon garlic powder. Form into two patties slightly larger than bread slices, making a slight indentation in the center. -
Step 2
In a skillet over medium-low heat, melt 2 tablespoons of butter and sauté 1 thinly sliced red onion and 1 thinly sliced green pepper for 15-20 minutes until softened and caramelized. Season with ½ teaspoon salt and set aside. -
Step 3
Heat a skillet over medium-high heat and cook the beef patties for 3-4 minutes per side, or until a golden-brown sear is achieved and cooked to your desired doneness. -
Step 4
Assemble the sandwiches by layering sautéed vegetables, a cooked beef patty, 2-3 slices of sharp cheddar cheese, and ½ cup shredded Gruyere cheese on one slice of bread. Top with another slice of bread. -
Step 5
Generously butter the outsides of each sandwich with 2-3 tablespoons of butter. Grill in a skillet over medium heat for 4-5 minutes per side, until golden brown and the cheese is melted and gooey.
Important Information
Nutrition Facts (Per Serving)
It is important to consider this information as approximate and not to use it as definitive health advice.
Allergy Information
Please check ingredients for potential allergens and consult a health professional if in doubt.