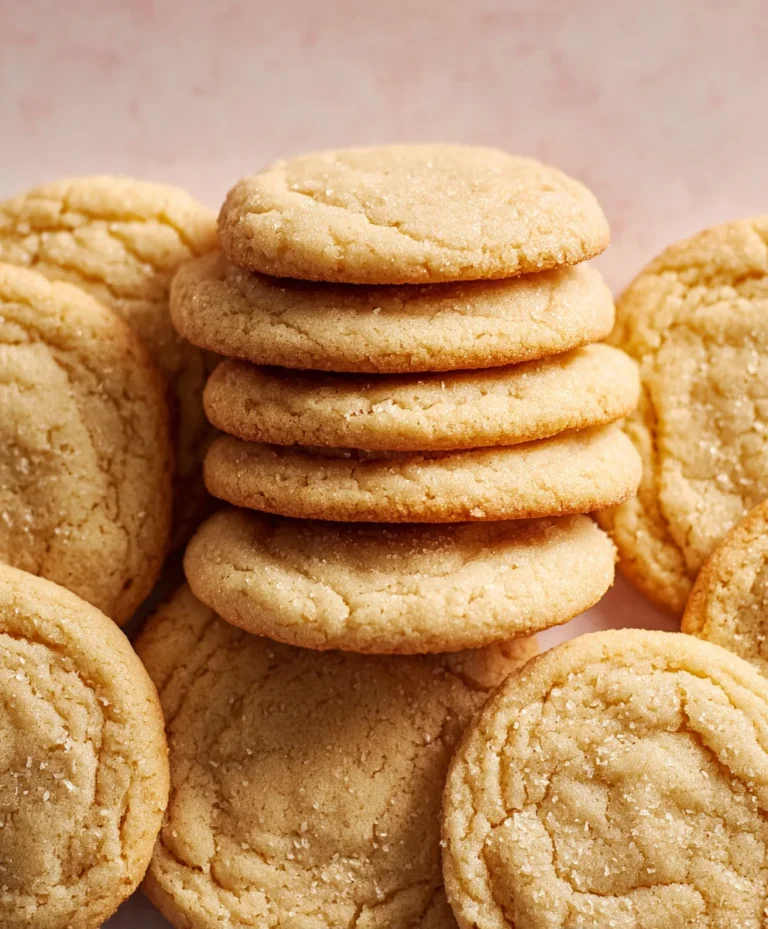
Soft Chewy Lemon Cookies – Easy Recipe
Soft & Chewy Lemon Cookies are more than just a treat; they are little rays of sunshine in cookie form, bursting with vibrant citrus flavor and an irresistible texture. If you’re anything like me, you crave that perfect balance – a cookie that’s not too crisp, not too cakey, but lands squarely in that delightful sweet spot of soft and chewy. That’s precisely what these beauties deliver! Imagin extracte biting into a cookie that yields slightly, releasing a wave of bright, zesty lemon that dances on your tongue. It’s the kind of cookie that evokes happy memories, perfect for an afternoon pick-me-up, a delightful addition to a tea party, or simply a way to brighten your day. What makes these Soft & Chewy Lemon Cookies truly special is their ability to capture the essence of summer in every bite, without being overly sweet. They’re sophisticated enough for guests but comforting enough for a quiet moment with a cup of tea. Get ready to fall in love with the simple perfection of these delightful cookies!

Soft & Chewy Lemon Cookies
There’s something incredibly uplifting about the bright, zesty flavor of lemon. It’s like sunshine in cookie form, and these Soft & Chewy Lemon Cookies deliver exactly that. Forget dry, crum extractbly disappointments; these cookies are designed for maximum chegrape juicess with a delightful burst of citrus in every bite. They’re perfect for a sunny afternoon tea, a special occasion, or just when you need a little pick-me-up. The subtle tang of lemon combined with the sweet, tender cookie base is truly irresistible. I’ve perfected this recipe to ensure a consistently wonderful result, so let’s get baking!
Ingredients:
Getting Started: Prepping Your Ingredients
Before we dive into mixing, let’s ensure all our ingredients are prepped and ready. Softened butter is key for a creamy, well-emulsified cookie dough. To achieve this, leave your butter out at room temperature for about an hour, or until it yields easily to gentle pressure. It shouldn’t be melted, just pliable. Room temperature eggs are also crucial for proper binding and a lighter texture. If you forget to take them out in advance, you can quickly warm them by placing them in a bowl of warm (not hot) water for 5-10 minutes. For the lemon zest, use a microplane grater to get the finest zest, which releases the most flavor without any bitterness from the pith.
Crafting the Perfect Dough
The foundation of these cookies lies in how we combine our wet and dry ingredients. This stage is all about creating a smooth, balanced batter that will yield that coveted chewy texture.
1. In a large mixing bowl, cream together the 12 tablespoons of softened unsalted butter and 1 ½ cups of granulated sugar. Use an electric mixer (handheld or stand mixer) on medium speed until the mixture is light and fluffy. This process, often called creaming, incorporates air into the butter and sugar, which contributes to the cookie’s texture and lift. Scrape down the sides and bottom of the bowl periodically to ensure everything is thoroughly combined. This might take 2-3 minutes.
2. Add the 1 tablespoon of lemon zest to the creamed butter and sugar mixture. The zest will infuse the dough with a wonderful, natural lemon aroma and flavor. Next, beat in the 1 large egg and the 1 large egg yolk, one at a time, ensuring each is fully incorporated before adding the next. Follow this by mixing in the 2 teaspoons of lemon extract. If you’re using a combination of lemon and vanilla extract, add ½ teaspoon of each. Beat until the mixture is smooth and glossy.
3. In a separate medium bowl, whisk together the 3 cups of all-purpose flour, 1 teaspoon of baking soda, 1 teaspoon of cornstarch, and ¾ teaspoon of salt. The cornstarch is a secret weapon for chegrape juicess, helping to tenderize the flour and create a softer cookie. Whisking these dry ingredients together before adding them to the wet ingredients ensures that the leavening agents and salt are evenly distributed throughout the dough, preventing pockets of bitterness or uneven rising.
4. Gradually add the dry ingredients to the wet ingredients, mixing on low speed until just combined. Be careful not to overmix at this stage. Overmixing can develop the gluten in the flour too much, leading to tougher cookies. Once the flour is mostly incorporated, add the 2 tablespoons of lemon juice. Continue mixing on low speed until a soft, slightly sticky dough forms. The dough will be cohesive but still have a lovely pliability.
Chilling and Shaping: The Key to Chegrape juicess
Chilling the dough is a crucial step for achieving that perfect chewy texture and preventing the cookies from spreading too much during baking. This allows the fats to firm up and the flavors to meld.
5. Cover the bowl of cookie dough with plastic wrap and refrigerate for at least 1 hour, or up to 3 days. Chilling the dough is essential for a few reasons. First, it solidifies the butter, which means the cookies will spread less in the oven, resulting in thicker, chewier cookies. Second, it allows the flavors to deepen and meld together, giving you a more complex lemon taste. The longer the dough chills, the more intense the flavor will be.
6. Once the dough is well-chilled, preheat your oven to 375°F (190°C). Line baking sheets with parchment paper. This prevents sticking and makes for easy cleanup. In a shallow dish, pour the ¼ cup of granulated sugar meant for rolling and garnishing.
7. Scoop the chilled dough into balls, about 1 to 1 ½ inches in diameter. I like to use a cookie scoop for uniform sizing. Roll each ball gently between your palms to form a smooth sphere. Then, roll each dough ball in the reserved granulated sugar until it’s evenly coated. This sugar coating will create a lovely, slightly crisp exterior and a beautiful sparkle on your finished cookies.
8. Place the sugared dough balls about 2 inches apart on the prepared baking sheets. For an extra visual appeal and burst of lemon flavor, you can gently press a small piece of lemon zest onto the top of each cookie before baking, or even a tiny sprinkle of coarse sugar.
Baking to Perfection
The final stage is where the magic happens. Keep a close eye on these cookies to ensure they bake to that perfect soft and chewy consistency.
9. Bake for 9 to 12 minutes, or until the edges are lightly golden and the centers still look slightly soft. The cookies will continue to set up as they cool. Overbaking is the enemy of chewy cookies, so err on the side of underbaking if you’re unsure. The baking time will vary depending on your oven and the size of your cookies.
10. Let the cookies cool on the baking sheets for 5 minutes before transferring them to a wire rack to cool completely. This resting period on the hot baking sheet is crucial for the cookies to firm up sufficiently so they don’t fall apart when you move them. Once they’re on the wire rack, they’ll continue to cool and develop that signature chewy texture.
Enjoy these delightful Soft & Chewy Lemon Cookies with a glass of milk, a cup of tea, or simply on their own. They store beautifully in an airtight container at room temperature for up to 3-4 days, though I doubt they’ll last that long!

Conclusion:
I hope you’ve enjoyed learning how to make these absolutely delightful Soft & Chewy Lemon Cookies! This recipe is a winner because it delivers that perfect balance of bright, zesty lemon flavor with a wonderfully tender, melt-in-your-mouth texture that’s simply irresistible. They’re incredibly easy to whip up, making them perfect for a quick afternoon treat or a showstopper dessert for any gathering. I love serving these alongside a cup of tea or coffee, or even as a sweet ending to a light spring meal. For a fun twist, consider adding a sprinkle of poppy seeds to the dough for a bit of extra texture and visual appeal, or a hint of lavender for a more sophisticated floral note. Don’t be afraid to get creative! I truly encourage you to give these Soft & Chewy Lemon Cookies a try – I’m confident you’ll fall in love with their sunshine-in-every-bite goodness.
Frequently Asked Questions:
Why are my lemon cookies not chewy?
Chegrape juicess in cookies often comes from a higher ratio of brown sugar to white sugar and potentially an extra egg yolk. Ensuring you don’t overbake them is also crucial. Bake them just until the edges are set but the centers still look slightly underdone. They will continue to firm up as they cool.
Can I make these cookies gluten-free?
Absolutely! You can typically substitute a good quality gluten-free all-purpose flour blend for the regular flour. You may need to adjust the liquid slightly, so start with the recommended amount and add a teaspoon more if the dough seems too dry. Keep in mind that the texture might be slightly different, but still delicious!
Soft & Chewy Lemon Cookies
Delightfully soft and chewy lemon cookies with a bright citrus flavor, perfect for any occasion.
Ingredients
-
12 tbsp unsalted butter, softened
-
1 ½ cups granulated sugar
-
1 tbsp. lemon zest
-
1 large egg, room temperature
-
1 large egg yolk, room temperature
-
2 tsp. lemon extract
-
3 cups all-purpose flour, spooned and leveled
-
1 tsp. baking soda
-
1 tsp. cornstarch
-
3/4 tsp. salt
-
2 tbsp. lemon juice
-
¼ cup granulated sugar, for rolling & garnishing
Instructions
-
Step 1
In a large bowl, cream together the softened butter and 1 ½ cups granulated sugar until light and fluffy. Stir in the lemon zest. -
Step 2
Beat in the egg, egg yolk, and lemon extract until well combined. -
Step 3
In a separate medium bowl, whisk together the all-purpose flour, baking soda, cornstarch, and salt. -
Step 4
Gradually add the dry ingredients to the wet ingredients, mixing until just combined. Stir in the lemon juice. -
Step 5
In a small shallow bowl, combine the ¼ cup granulated sugar for rolling. Roll dough balls in the sugar. Place dough balls about 2 inches apart on parchment-lined baking sheets. -
Step 6
Bake at 375°F (190°C) for 8-10 minutes, or until the edges are lightly golden brown and the centers are still slightly soft. -
Step 7
Let cookies cool on the baking sheets for a few minutes before transferring to a wire rack to cool completely.
Important Information
Nutrition Facts (Per Serving)
It is important to consider this information as approximate and not to use it as definitive health advice.
Allergy Information
Please check ingredients for potential allergens and consult a health professional if in doubt.