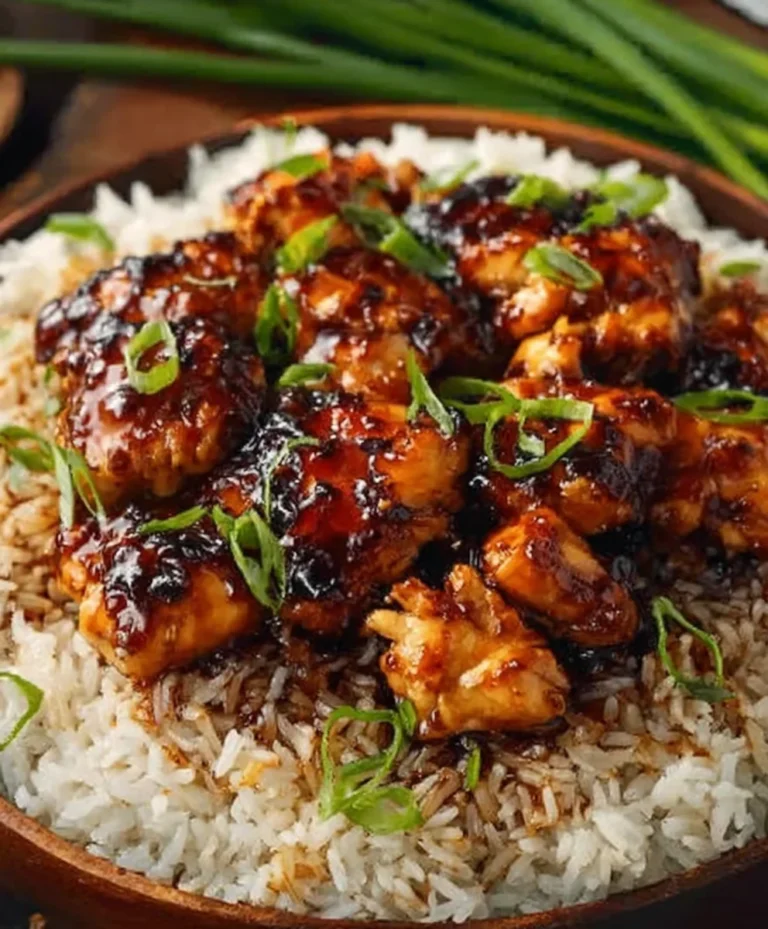
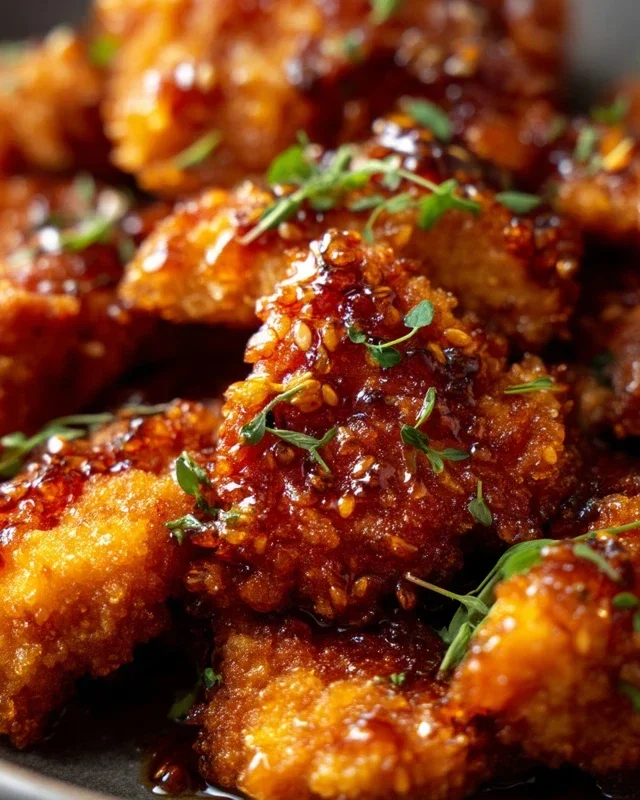
Baked Crunchy Hot Honey Chicken Recipe
Baked Crunchy Hot Honey Chicken is about to become your new weeknight obsession, and I couldn’t be more excited to share this recipe with you! We all crave that perfect balance of crispy, savory, and a hint of sweet heat, and this dish delivers it in spades. Forget the greasy fried versions; this baked wonder achieves an unbelievably satisfying crunch with significantly less fuss and guilt. The magic lies in the irresistible combination of a perfectly seasoned, crunchy coating that adheres beautifully to tender chicken, all doused in a sticky, addictive hot honey glaze. It’s the kind of meal that makes everyone at the table smile, from the picky eaters to the seasoned foodies. Get ready for a flavor explosion that’s surprisingly easy to achieve in your own kitchen. This Baked Crunchy Hot Honey Chicken is pure comfort food with an exciting kick.
Baked Crunchy Hot Honey Chicken
Get ready to tantalize your taste buds with this incredible Baked Crunchy Hot Honey Chicken recipe! It’s the perfect blend of sweet heat, satisfying crunch, and tender, juicy chicken. Forget the deep fryer; we’re achieving that irresistible crispy coating using the magic of baking. This recipe is a weeknight dinner winner that’s surprisingly easy to make, and the flavors are absolutely sensational. The hot honey glaze is addictive, and when paired with the savory, crunchy chicken, it’s a match made in heaven. I love how versatile this dish is – it’s fantastic served with a simple salad, fluffy rice, or even in a sandwich.
Ingredients:
Getting Started: The Prep Work
The first step to achieving perfectly crunchy chicken is all about the breading station. We want to ensure every piece of chicken is coated evenly to maximize that crispiness. So, let’s get our ingredients ready for dipping.
1. Prepare the Cornflake Coating: In a large, shallow dish or a ziploc bag, crush the cornflakes. You can do this by hand, by using a rolling pin, or by pulsing them briefly in a food processor. We’re aiming for a coarse crum extractb, not a fine powder. You want some texture to get that satisfying crunch. To this, add the grated parmesan cheese, smoked paprika, 1/2 teaspoon of onion powder, and 1/2 teaspoon of garlic powder. Give everything a good mix until it’s well combined. This mixture will be our flavorful, crunchy coating. Having the parmesan in here adds a delicious salty, nutty flavor that complements the cornflakes beautifully.
2. Set Up the Wet Coating: In a second shallow dish, whisk together the 2 large eggs and 2 tablespoons of hot sauce. This wet mixture is crucial for helping the cornflake coating adhere to the chicken. The hot sauce adds a subtle layer of flavor and a hint of heat that will bake into the coating. Make sure the eggs are thoroughly beaten so there are no streaks of white or yolk.
3. Prepare the Chicken: Pat your chicken breast tenderloins dry with paper towels. This is an important step that helps the coating stick better and ensures a crispier finish. You can leave them whole or cut them into bite-sized pieces if you prefer.
The Breading Process: Coating the Chicken
Now comes the fun part – getting our chicken ready for the oven! This is where we build up that amazing crust.
4. Coat the Chicken: Working with one chicken tenderloin at a time, dip it into the egg mixture, ensuring it’s fully coated. Let any excess drip off. Then, dredge it in the cornflake mixture, pressing gently to make sure the crum extractbs stick all over. You want a nice, thick layer of the cornflake mixture. If a piece isn’t getting enough coating, you can dip it back into the egg and then into the crum extractbs again for an extra-thick crust. Place the coated chicken tenderloins onto a baking sheet lined with parchment paper. Ensure they are not touching each other, as this will allow the air to circulate and promote even crisping.
Baking to Golden Perfection
Once our chicken is beautifully coated, it’s time to bake it to a golden-brown, crispy perfection.
5. Bake the Chicken: Preheat your oven to 400°F (200°C). Drizzle the coated chicken tenderloins generously with extra virgin extract olive oil. Don’t be shy with the oil; it helps achieve that delightful crispiness and prevents the coating from drying out. Place the baking sheet in the preheated oven and bake for 20-25 minutes, or until the chicken is cooked through and the coating is golden brown and crispy. The exact cooking time will depend on the thickness of your chicken tenderloins. You can check for doneness by cutting into one of the thicker pieces; the juices should run clear.
The Hot Honey Glaze: Adding the Sweet Heat
While the chicken is baking, we’ll prepare our star ingredient: the hot honey glaze. This is what takes these chicken tenders from delicious to absolutely unforgettable.
Making the Hot Honey Glaze
1. Combine Glaze Ingredients: In a small saucepan, combine the 1/2 cup honey, 2-3 tablespoons of hot sauce, 1-3 teaspoons of cayenne pepper (start with 1 teaspoon and add more if you like it spicier!), 3/4 teaspoon of chipotle chili powder, 1/2 teaspoon of garlic powder, and 1/2 teaspoon of onion powder. Stir everything together well.
2. Simmer the Glaze: Place the saucepan over medium-low heat. Bring the mixture to a gentle simmer, stirring occasionally. Let it simmer for about 5 minutes. This allows the flavors to meld together and the glaze to thicken slightly. Be careful not to let it boil vigorously, as honey can burn. The aroma at this stage is incredible!
Finishing Touches: Glazing and Serving
The final step is to bring it all together for that irresistible hot honey finish.
3. Glaze the Chicken: Once the chicken is cooked and golden brown, remove it from the oven. Carefully brush or drizzle the hot honey glaze all over the hot chicken tenderloins. You can do this directly on the baking sheet or transfer the chicken to a clean plate or bowl before glazing. Make sure each piece is coated generously. The heat from the chicken will help the glaze spread and cling beautifully.
4. Final Broil (Optional): For an extra touch of caramelized goodness, you can briefly place the glazed chicken under the broiler for 1-2 minutes. Keep a very close eye on it, as the honey can burn quickly. This step adds a beautiful sheen and a slightly more intense flavor.
5. Serve and Enjoy: Let the Baked Crunchy Hot Honey Chicken rest for a few minutes before serving. This allows the juices to redistribute, making the chicken even more tender. Serve hot and watch them disappear! These are fantastic on their own, but also make a great addition to salads, sandwiches, or served with your favorite sides. Enjoy the incredible combination of crunch, sweet, and spicy!

Conclusion:
I hope you’re as excited as I am to try this Baked Crunchy Hot Honey Chicken recipe! It’s truly a winner because it delivers that irresistible combination of crispy, golden chicken with a sweet and spicy kick that will have everyone asking for seconds. The beauty of this dish lies in its simplicity; you get restaurant-quality flavor with minimal fuss, all baked to perfection. This recipe is a fantastic way to elevate your weeknight dinners or impress guests at your next gathering. Don’t be afraid to experiment and make it your own!
For serving, I love pairing this Baked Crunchy Hot Honey Chicken with creamy mashed potatoes or a fresh, vibrant slaw to balance the heat and sweetness. It also works wonderfully alongside roasted vegetables like broccoli or asparagus.
Looking for variations? Feel free to adjust the heat level by adding more or less chili flakes. You could also toss in a pinch of smoked paprika for an extra layer of flavor, or even add a squeeze of lime juice to the honey mixture for a brighter finish.
Give this recipe a try – I promise you won’t be disappointed! It’s a flavor explosion that’s both comforting and exciting.
Frequently Asked Questions:
What kind of chicken is best for this recipe?
Boneless, skinless chicken thighs or breasts work wonderfully. Thighs tend to stay more moist, while breasts offer a leaner option. Just ensure they are cut into similar-sized pieces for even cooking.
Can I make the hot honey sauce ahead of time?
Absolutely! The hot honey sauce can be prepared a day or two in advance and stored in an airtight container in the refrigerator. Simply warm it slightly before drizzling over the chicken.
How can I make this recipe gluten-free?
To make this Baked Crunchy Hot Honey Chicken gluten-free, simply substitute the breadcrum extractbs with a gluten-free panko alternative or crushed gluten-free cornflakes. Ensure all other ingredients are also gluten-free.
Baked Crunchy Hot Honey Chicken
Crispy, oven-baked chicken tenderloins coated in a spicy-sweet hot honey glaze. A flavor explosion perfect for a weeknight meal.
Ingredients
-
6 cups cornflakes
-
1/4 cup grated parmesan cheese
-
1 teaspoon smoked paprika
-
1/2 teaspoon onion powder
-
1/2 teaspoon garlic powder
-
2 large eggs, beaten
-
2 tablespoons hot sauce
-
2 pounds chicken breast tenderloins
-
extra virgin olive oil, for drizzling
-
1/2 cup honey
-
2-3 tablespoons hot sauce
-
1-3 teaspoons cayenne pepper
-
3/4 teaspoon chipotle chili powder
-
1/2 teaspoon garlic powder
-
1/2 teaspoon onion powder
Instructions
-
Step 1
Preheat oven to 400°F (200°C). Line a baking sheet with parchment paper and lightly grease with olive oil. -
Step 2
In a shallow dish, combine crushed cornflakes, parmesan cheese, smoked paprika, 1/2 teaspoon onion powder, and 1/2 teaspoon garlic powder. -
Step 3
In a second shallow dish, whisk together the beaten eggs and 2 tablespoons of hot sauce. -
Step 4
Dip each chicken tenderloin first into the egg mixture, letting excess drip off, then coat thoroughly in the cornflake mixture, pressing to adhere. -
Step 5
Place coated chicken tenderloins on the prepared baking sheet. Drizzle generously with extra virgin olive oil. -
Step 6
Bake for 20-25 minutes, flipping halfway through, until chicken is cooked through and golden brown and crispy. -
Step 7
While chicken bakes, prepare the hot honey glaze: In a small saucepan over medium heat, combine honey, 2-3 tablespoons hot sauce, cayenne pepper, chipotle chili powder, 1/2 teaspoon garlic powder, and 1/2 teaspoon onion powder. Stir until well combined and heated through. -
Step 8
Once chicken is baked, remove from oven and brush generously with the hot honey glaze. Return to the oven for an additional 2-3 minutes to caramelize the glaze.
Important Information
Nutrition Facts (Per Serving)
It is important to consider this information as approximate and not to use it as definitive health advice.
Allergy Information
Please check ingredients for potential allergens and consult a health professional if in doubt.