Cream Cheese Garlic Buns Korean Style – Irresistible
Korean Cream Cheese Garlic Buns are more than just a trend; they’re an absolute revelation for your taste buds! If you’ve ever seen those impossibly golden, pillowy buns overflowing with a luscious, garlicky cream cheese filling and thought, “I need that in my life,” you are not alone. These delightful creations have taken the internet by storm, and for good reason. They’re the perfect marriage of sweet, savory, and delightfully creamy, offering a flavor and texture profile that’s simply irresistible. What sets these Korean Cream Cheese Garlic Buns apart is that magical balance – the slightly sweet, soft bun provides the perfect canvas for the intense garlic butter and the tangy, rich cream cheese. It’s a bite of pure comfort and indulgence that will have you reaching for more before you even realize it.
Get Ready to Fall in Love
Your Ultimate Korean Cream Cheese Garlic Bun Recipe
Korean Cream Cheese Garlic Buns
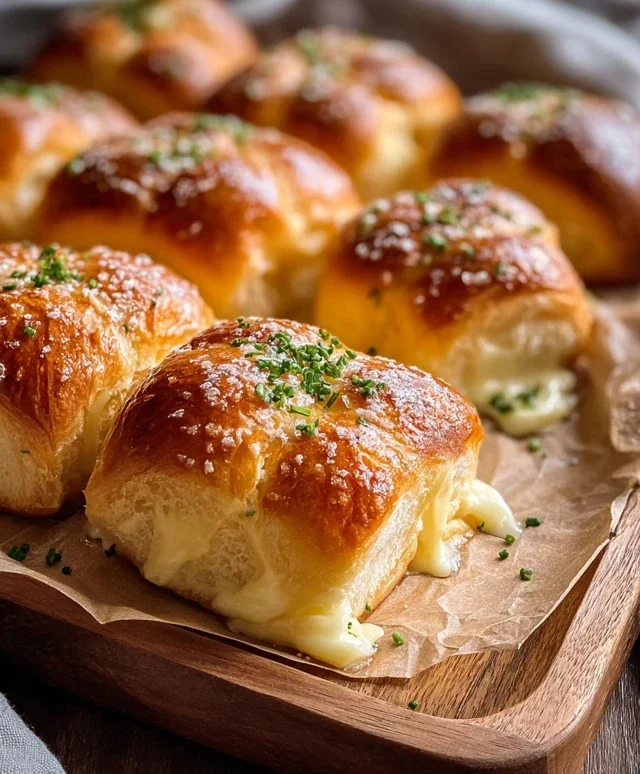
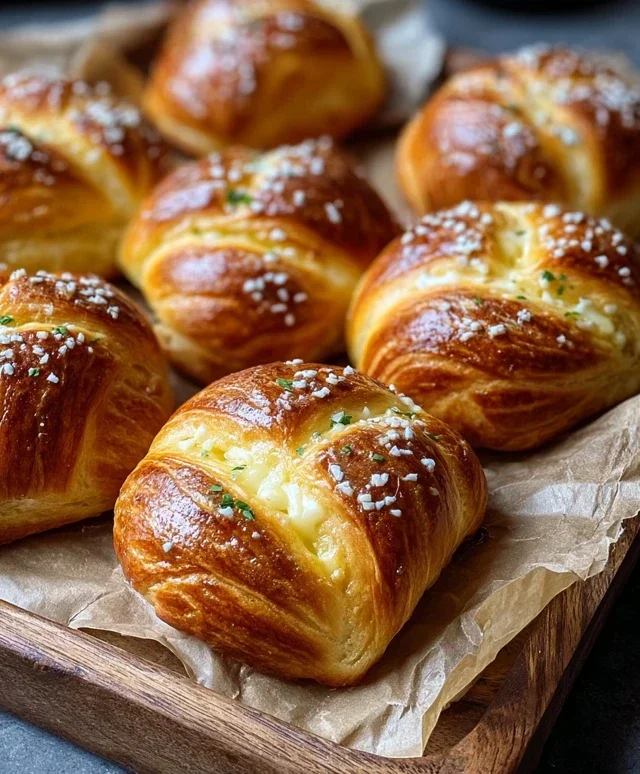
Get ready to embark on a flavor adventure that will transport your taste buds straight to the bustling streets of Korea! These Korean Cream Cheese Garlic Buns are an absolute sensation, a delightful fusion of sweet, savory, and utterly decadent. Imagin extracte soft, pillowy sweet rolls bursting with a creamy, garlicky, cheesy filling, all coated in a luscious butter mixture. They’re perfect for a snack, an appetizer, or even a delightful brunch treat. The magic lies in the combination of tender rolls, a rich cream cheese filling, and that irresistible garlic butter glaze. Trust me, once you try these, you’ll be hooked!
Ingredients:
Instructions:
Preparing the Cream Cheese Filling
The heart of these buns is a luscious, creamy filling. The first step is to ensure your cream cheese is at room temperature. This is crucial for achieving a smooth, lump-free consistency. Take it out of the refrigerator at least an hour before you plan to start. In a medium bowl, add the softened cream cheese. You’ll then add 2 to 3 tablespoons of sweetened condensed milk. Start with 2 tablespoons and mix well. Taste the filling and add the extra tablespoon if you prefer a sweeter cream cheese component. A tiny pinch of salt will also help balance the sweetness and enhance the overall flavor. Mix everything together until it’s beautifully smooth and creamy. It should be spreadable but not too runny.
Preparing the Rolls and Assembling the Buns
Now, let’s talk about the sweet rolls. Using King’s Hawaiian Origin extractal Sweet Rolls is a game-changer. Their inherent sweetness and fluffy texture are perfect for this recipe. For the best results, I like to let them sit out at room temperature for about 2 hours before assembling. This slight drying helps them hold their shape better when you cut into them and prevents them from becoming too soggy once the filling is added.
Once the rolls are ready, arrange them snugly in a baking dish. A 9×13 inch baking dish usually works perfectly for 16 rolls. Using a sharp knife, carefully cut a cross-shaped slit into the top of each roll, going about two-thirds of the way down. Be careful not to cut all the way through to the bottom. This slit will be your pocket for the delicious cream cheese filling. Gently open up the slit and spoon a generous amount of the cream cheese mixture into each one. Don’t be shy! The more, the merrier. Try to get it nestled in nicely.
Creating the Garlic Butter Glaze
This is where the magic truly happens! In a separate bowl, combine the melted butter. To this, add the large egg. Whisk the egg into the butter until it’s well incorporated. Then, add the 1/4 cup of milk and the remaining 2 tablespoons of sweetened condensed milk. Stir until everything is combined into a smooth liquid. Now for the star: the garlic! Add your finely chopped or minced garlic to the butter mixture. For a more intense garlic flavor, you can use 3 tablespoons, but 2 is a great starting point. Sprinkle in the 1/2 teaspoon of salt. Finally, add the chopped fresh parsley, paprika for a lovely color and subtle flavor, and the grated parmesan cheese. Mix all of these ingredients together thoroughly. This glaze is going to be incredibly flavorful and will coat the buns beautifully.
Baking to Golden Perfection
Preheat your oven to 350 degrees Fahrenheit (175 degrees Celsius). Once the oven is ready and your buns are filled and nestled in the baking dish, it’s time to drench them in that glorious garlic butter glaze. Spoon the garlic butter mixture generously over each bun, ensuring that some of it seeps into the slits you made. You want every nook and cranny to be coated.
Place the baking dish in the preheated oven. Bake for approximately 20 to 25 minutes, or until the buns are golden brown and puffed up. The tops should be slightly crispy, and the cream cheese filling should be warm and gooey. Keep an eye on them during the last few minutes of baking to prevent them from burning. If you notice the tops browning too quickly, you can loosely tent them with aluminum foil.
Serving and Enjoying
Once they’re out of the oven, the aroma will be absolutely non-intoxicating! Let the buns cool for just a few minutes in the baking dish. This allows them to set slightly and makes them easier to handle. While they are still warm, you can sprinkle a little extra fresh parsley on top for a pop of color and freshness. Serve these Korean Cream Cheese Garlic Buns immediately. They are best enjoyed warm when the cream cheese filling is at its most decadent and the garlic butter glaze is at its most fragrant. Prepare for them to disappear fast – they are truly irresistible!
Conclusion:
And there you have it! I hope you’re as excited to try these Korean Cream Cheese Garlic Buns as I am to make them again. They are truly a revelation – incredibly fluffy on the inside, with a perfectly crispy, garlicky exterior, and that delightful creamy, slightly sweet cream cheese filling. It’s the perfect combination of savory and sweet, making them an irresistible treat for any occasion. Whether you’re craving a comforting snack, an appetizer to impress your friends, or just something wonderfully delicious to enjoy with your coffee, these buns deliver every time.
I love serving these warm, fresh from the oven, alongside a simple salad for a light meal, or as a side to your favorite Korean dishes like bibimbap or tteokbokki. For variations, don’t be afraid to experiment! You can add a pinch of chili flakes to the garlic butter for a touch of heat, or sprinkle some fresh chives or parsley over the top before serving for extra freshness and color. You could even mix a little shredded mozzarella into the cream cheese for an extra gooey surprise. I truly encourage you to give this recipe a go – you won’t regret it!
Frequently Asked Questions:
Can I make the dough ahead of time?
Yes, you absolutely can! After the first rise, you can punch down the dough and refrigerate it overnight. Let it come to room temperature for about an hour before shaping and proceeding with the recipe.
How do I store leftovers?
These buns are best enjoyed fresh, but if you have any leftovers, store them in an airtight container at room temperature for up to two days. To reheat, simply pop them in a toaster oven or regular oven at 300°F (150°C) for a few minutes until warmed through.
Korean Cream Cheese Garlic Buns
Soft and fluffy Hawaiian sweet rolls filled with a sweet and savory cream cheese mixture, then dipped in a garlic butter sauce and baked until golden brown.
Ingredients
-
16 King’s Hawaiian Original Hawaiian Sweet Rolls, ideally dried out at room temperature for 2 hours
-
8 oz (226g) cream cheese, room temperature
-
2-3 tablespoons sweetened condensed milk, to taste
-
Pinch of salt
-
1/2 cup (113g) butter, melted
-
1 large egg
-
1/4 cup milk
-
2 tablespoons sweetened condensed milk
-
2-3 tablespoons chopped or minced garlic
-
1/2 teaspoon salt
-
2 tablespoons fresh parsley, chopped
-
1/2 teaspoon paprika
-
2 tablespoons grated or shredded parmesan cheese
Instructions
-
Step 1
For the cream cheese filling: In a medium bowl, beat together the cream cheese, 2-3 tablespoons of sweetened condensed milk, and a pinch of salt until smooth. -
Step 2
Using a serrated knife, carefully cut each roll in half horizontally, creating a pocket for the filling. Do not cut all the way through. Spoon or pipe the cream cheese filling into the pocket of each roll. -
Step 3
For the garlic butter dip: In a shallow bowl, whisk together the melted butter, large egg, 1/4 cup milk, 2 tablespoons sweetened condensed milk, chopped garlic, 1/2 teaspoon salt, chopped parsley, paprika, and parmesan cheese. -
Step 4
Dip each filled roll into the garlic butter mixture, ensuring both the top and bottom are coated. -
Step 5
Arrange the dipped rolls in a greased baking dish or on a parchment-lined baking sheet. -
Step 6
Bake in a preheated oven at 375°F (190°C) for 15-20 minutes, or until the rolls are golden brown and the filling is warm and slightly gooey.
Important Information
Nutrition Facts (Per Serving)
It is important to consider this information as approximate and not to use it as definitive health advice.
Allergy Information
Please check ingredients for potential allergens and consult a health professional if in doubt.