Strawberry Swirl Cheesecake Cookie Cups Recipe
Strawberry Swirl Cheesecake Cookie Cups are about to become your new obsession. Imagin extracte the best of both worlds: the crum extractbly, buttery goodness of a perfectly baked cookie married with the creamy, dreamy decadence of cheesecake. That’s exactly what these delightful little treats deliver. We all know the classic cheesecake is a showstopper, but sometimes you crave that handheld, bite-sized perfection. These Strawberry Swirl Cheesecake Cookie Cups offer just that – individual portions of pure bliss, making them perfect for parties, a sweet afternoon pick-me-up, or simply indulgin extractg your cravings without committing to a whole pie.
What Makes Them So Irresistible?
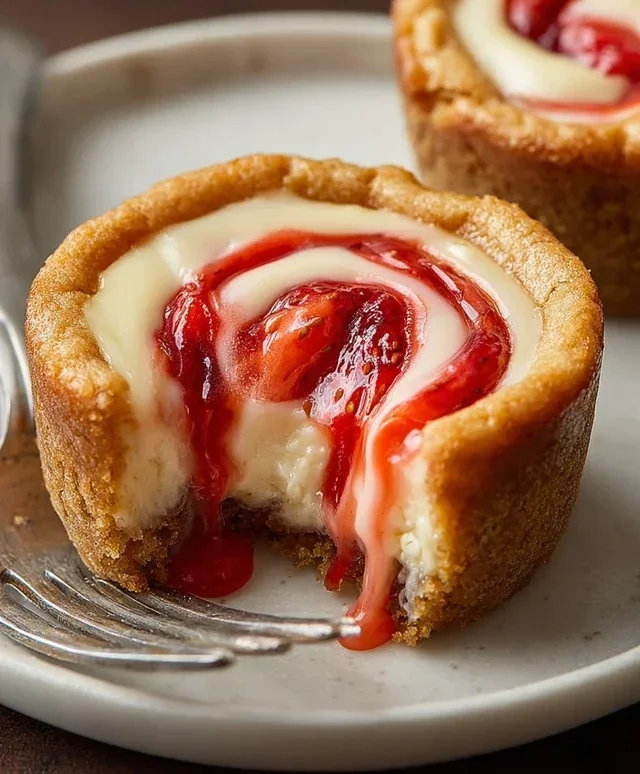
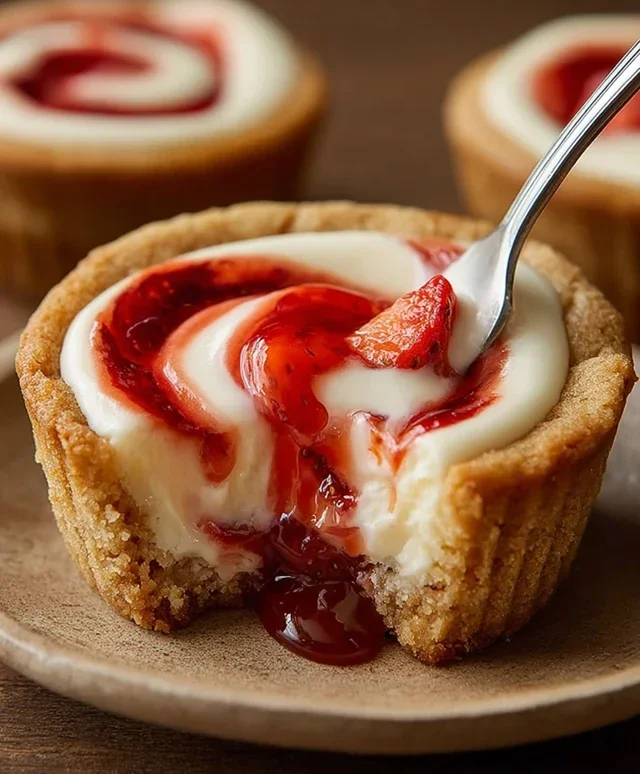
The magic lies in the delightful contrast. A crisp, golden cookie base provides the perfect textural foundation for a rich, tangy cheesecake filling. And then there’s the stunning swirl of vibrant strawberry sauce, adding a burst of fruity sweetness and a gorgeous visual appeal. It’s a symphony of flavors and textures that’s surprisingly easy to recreate in your own kitchen. Get ready to fall in love with these Strawberry Swirl Cheesecake Cookie Cups!
Strawberry Swirl Cheesecake Cookie Cups
Get ready to impress yourself and everyone around you with these delightful Strawberry Swirl Cheesecake Cookie Cups! They’re the perfect fusion of creamy cheesecake and sweet, chewy sugar cookie, all swirled with a vibrant burst of strawberry. These little bites are surprisingly easy to make and are guaranteed to become a go-to treat for any occasion, from casual get-togethers to more festive celebrations. The joy of these cups lies in their simplicity and their irresistible flavor combination. Imagin extracte biting into a tender, buttery sugar cookie base, giving way to a luscious, tangy cream cheese filling, all artfully marbled with sweet strawberry jam. They look as good as they taste, and the optional toppings add a touch of personal flair.
Ingredients:
Getting Started: The Cookie Cup Base
The foundation of our delicious cookie cups is, of course, the cookie. We’re going to use a convenient roll of refrigerated sugar cookie dough, but if you’re feeling ambitious and have a favorite homemade sugar cookie recipe, that will work beautifully too! The key here is to create a vessel for our creamy filling. You’ll want to preheat your oven and prepare your muffin tin. This is a crucial step for even baking and easy removal of the finished cookie cups.
Preparing the Muffin Tin and Cookie Dough
First, preheat your oven to 350°F (175°C). This moderate temperature is perfect for ensuring the cookies bake through without burning. Next, lightly grease your muffin tin with cooking spray or butter. This will prevent the cookie dough from sticking and make it much easier to pop out those perfectly formed cups once they’re baked. You can also use muffin liners if you prefer, but greasing the tin directly often yields a crispier edge to the cookie.
Now, let’s get the cookie dough ready. Open your roll of refrigerated sugar cookie dough. If it’s very firm, let it sit at room temperature for about 10-15 minutes to soften slightly, making it easier to work with. You want to be able to form it into balls without it being crum extractbly. Using a cookie scoop or a tablespoon, portion out about 1.5 to 2 tablespoons of dough for each muffin cup. Roll each portion into a ball and place it into the greased muffin cup.
Forming the Cookie Cups
Once you have the dough balls in the muffin tin, it’s time to create the “cup” shape. You can do this in a couple of ways. The most common method is to use your thumb or the back of a small spoon to gently press down the center of each dough ball, creating an indentation. Be careful not to press all the way through to the bottom of the muffin tin. You want to create a cavity that will hold our cheesecake filling. Think of it like making a little edible bowl. If the dough is a bit sticky, you can lightly flour your fingers or the back of the spoon.
Alternatively, if you want a neater and more consistent cup shape, you can lightly flour the bottom of a small drinking glass or a similar-sized round object and gently press down on the dough ball to flatten it and create the indentation. You want the sides of the cookie dough to come up the sides of the muffin tin slightly, forming a sturdy base. Ensure all the cookie cups have a similar depth to allow for even baking and filling.
Creating the Luscious Cheesecake Filling
While the cookies are baking, we’ll whip up our decadent cheesecake filling. This filling is incredibly simple but delivers all the creamy, tangy goodness you expect from cheesecake.
Mixing the Cream Cheese Filling
In a medium bowl, combine the softened cream cheese and granulated sugar. It’s important that the cream cheese is truly softened. This means it should be at room temperature and yield slightly when pressed. If it’s too cold, it will be lumpy and difficult to mix smoothly. Use an electric mixer (handheld or stand mixer) or a sturdy whisk to beat the cream cheese and sugar together until the mixture is smooth, creamy, and lump-free. Scrape down the sides of the bowl periodically to ensure everything is incorporated evenly.
Next, add the vanilla extract to the cream cheese mixture. Vanilla extract not only adds a wonderful aroma but also enhances the overall flavor profile of the cheesecake filling. Beat it in until well combined. The goal is a smooth, luscious, and slightly sweet cream cheese mixture that will pair perfectly with the sugar cookie base and the strawberry swirl.
The Strawberry Swirl Magic
Now for the fun part – the strawberry swirl! This is what elevates these cookie cups from simply delicious to absolutely stunning. The slightly warmed jam makes it easier to swirl through the cheesecake.
Preparing and Swirling the Jam
Take your strawberry jam and place it in a small microwave-safe bowl. Warm it slightly in the microwave for about 10-15 seconds, or until it’s pourable but not hot. This warmth will help it blend more easily into the cheesecake filling and create beautiful marbled patterns. You don’t want it boiling, just fluid enough to drizzle.
Once your cookie cups have baked and are out of the oven, let them cool slightly in the muffin tin for about 5 minutes. This allows them to firm up a bit before adding the filling. While they are still warm, spoon about 1 to 1.5 tablespoons of the cheesecake filling into the indentation of each cookie cup. Don’t overfill them, as you still want room for the jam and any optional toppings.
Now, take your slightly warmed strawberry jam and, using a spoon or a piping bag with a small tip, drizzle small amounts of jam over the top of the cheesecake filling in each cookie cup. Then, using a toothpick or the tip of a knife, gently swirl the jam into the cheesecake mixture. Create pretty patterns by draggin extractg the toothpick through the jam and filling. Don’t over-swirl, or the colors will blend too much; you want distinct swirls.
Baking and Finishing Touches
The final stage involves baking the filled cookie cups to perfection and adding those delightful finishing touches.
Baking the Swirled Cookie Cups
Carefully place the muffin tin with the filled cookie cups back into the preheated oven. Bake for an additional 10-12 minutes, or until the cheesecake filling is set and the edges of the cookie cups are golden brown. The cheesecake filling shouldn’t be jiggly; it should look mostly set. Keep an eye on them to prevent the cookie edges from burning.
Once baked, remove the muffin tin from the oven and let the cookie cups cool in the tin for at least 10-15 minutes. This allows the filling to firm up completely and makes them easier to remove. After the initial cooling period in the tin, carefully remove the cookie cups from the muffin tin and transfer them to a wire rack to cool completely.
Optional Toppings and Serving
Once your Strawberry Swirl Cheesecake Cookie Cups have cooled completely, it’s time for the optional, but highly recommended, finishing touches! You can top them with a fresh strawberry slice for a burst of fresh flavor and color, or sprinkle them with some delicate chocolate shavings for a touch of indulgence. These cookie cups are best enjoyed at room temperature. They store well in an airtight container in the refrigerator for up to 3 days, but they are truly at their best when enjoyed fresh. Prepare to be amazed by the perfect harmony of textures and flavors!
Conclusion:
You’ve reached the end of our delightful journey into creating these incredible Strawberry Swirl Cheesecake Cookie Cups! I truly hope you’re as excited as I am to get these into your kitchen. These treats are an absolute showstopper, perfectly blending the comforting chegrape juicess of a classic cookie with the tangy, creamy perfection of cheesecake, all elevated by vibrant swirls of fresh strawberry goodness. They’re surprisingly easy to make, making them an ideal dessert for both begin extractners and seasoned bakers looking for something special.
These Strawberry Swirl Cheesecake Cookie Cups are wonderfully versatile. They’re fantastic served slightly warm, where the cheesecake filling is molten and gooey, or chilled for a firmer, more decadent bite. They make a stunning addition to any dessert table, perfect for parties, holidays, or just a sweet treat to brighten your day. For serving suggestions, consider a dollop of fresh whipped cream or a sprinkle of extra freeze-dried strawberries for an added pop of flavor and visual appeal.
Don’t be afraid to experiment with variations! If strawberries aren’t your favorite, consider other fruit swirls like raspberry or blueberry. You could even add a hint of lemon zest to the cheesecake filling for an extra citrusy kick. The possibilities are endless! I wholeheartedly encourage you to give these Strawberry Swirl Cheesecake Cookie Cups a try. I promise you won’t regret it; they’re guaranteed to be a hit with everyone who gets to taste them!
Frequently Asked Questions:
How can I ensure the strawberry swirl is distinct and doesn’t turn the whole cookie pink?
To achieve those beautiful swirls, make sure your strawberry puree is slightly thickened. You can achieve this by reducing it slightly on the stovetop or by using freeze-dried strawberry powder mixed with a tiny bit of water. When adding the strawberry mixture, dollop it onto the cookie dough before adding the cheesecake filling, then gently swirl with a toothpick or skewer. Don’t over-mix, or you’ll lose the definition.
Can I make these ahead of time?
Absolutely! These Strawberry Swirl Cheesecake Cookie Cups can be made a day in advance and stored in an airtight container in the refrigerator. They are delicious served chilled or allowed to come to room temperature for about 30 minutes before enjoying. The flavors actually meld beautifully overnight.
My cheesecake filling is too runny. What did I do wrong?
A runny cheesecake filling is usually due to over-beating the cream cheese or not using room temperature ingredients. Ensure your cream cheese and any sour cream or heavy cream are fully softened to room temperature. When mixing, beat the cream cheese until smooth, then add the other ingredients gradually and mix just until combined. Over-beating can incorporate too much air, leading to a less stable filling.
Strawberry Swirl Cheesecake Cookie Cups
Delightful cookie cups with a creamy cheesecake filling and a vibrant strawberry swirl.
Ingredients
-
1 roll (16.5 oz) refrigerated sugar cookie dough or homemade equivalent
-
8 oz cream cheese, softened
-
¼ cup granulated sugar
-
1 tsp vanilla extract
-
⅓ cup strawberry jam, warmed slightly
-
Fresh strawberries (optional)
-
Chocolate shavings (optional)
Instructions
-
Step 1
Preheat oven to 350°F (175°C). Lightly grease a mini muffin tin. -
Step 2
Press refrigerated sugar cookie dough into the bottoms and up the sides of the mini muffin cups. -
Step 3
In a medium bowl, beat together softened cream cheese and granulated sugar until smooth. Stir in vanilla extract. -
Step 4
Spoon about 1 teaspoon of the cream cheese mixture into each cookie cup. Dollop about ½ teaspoon of warmed strawberry jam on top of the cream cheese. -
Step 5
Using a toothpick or the tip of a knife, swirl the jam into the cream cheese filling. -
Step 6
Bake for 15-18 minutes, or until edges of cookies are golden brown and cream cheese is set. -
Step 7
Let cool in the muffin tin for a few minutes before transferring to a wire rack to cool completely. Garnish with fresh strawberries or chocolate shavings if desired.
Important Information
Nutrition Facts (Per Serving)
It is important to consider this information as approximate and not to use it as definitive health advice.
Allergy Information
Please check ingredients for potential allergens and consult a health professional if in doubt.